Week 4: Welcome to the Strugglebus

This week was a little more tough than I had really expected. Going into this past week, we had been making such good progress so far and it felt like we were making huge strides every day. I really felt like we were going to be almost done with the project by the end of the week, but of course that’s where the struggles set in. To begin with, I spent basically all day on Monday and most of Tuesday working on a modified CAD file for the labia mold we were using. Our client had said in our last meeting that it would be better to have more surface area on our labia and to essentially turn the labia into more of an oval shape by expanding the sides. However, the challenge was just exactly how to do that. I worked with one of the TAs, Magdah, on Fusion 360 to try and edit the file to keep the main labia shape intact while expanding the sides. This gave us a lot of trouble, because the file we were working with was made by the LUCIA team, and we didn’t really know how they made it. Not getting too into the technical details of it, it basically took us a long time to even expand the edges of the mold at all, let alone try to shape the new edges of the mold. 


Unfortunately, when we met with our client again we discovered that all of the work on the CAD file was for naught as she didn’t think we needed the oval shape anymore. I guess there had been a miscommunication about what our model looked like (Possibly because our model that we showed the previous week was clear and she couldn’t see it well on the camera). We basically had to reset after that since the rest of the team had been working on attachment mechanisms for oval labias to the base and those were all scrapped as well. It was honestly very upsetting to hear that your work from the past two days is now useless and not needed. Also, we were corrected on dimensions in that meeting so we had to change the dimensions of everything we had been working on too. For the first time in the project, it felt like we were at a standstill.


Luckily, after that meeting we talked with Grant, a design specialist from Rice360 and he put us in a good direction. I’m going to talk about all of those updates next week however, so be sure to check out my blog then!

Week 4: New Directions

This week, our team finalized the general design and structure of our device! It’s a relief to have a set plan we are moving with in the future. As I mentioned in my last post, based on expert feedback, we decided to focus on making the base of our mask-disinfecting unit out of a 55 gallon oil drum due to the drum’s high accessibility in Malawi and Tanzania. After we’d decided upon the enclosure for our device, the major decision we had to make was regarding the structure of our frame. We had two main ideas, so to help evaluate our options we created low fidelity prototypes and performed exposure calculations for both.  

Idea A: Triangular-prism frame

  • Masks suspended on each long face of a triangular-prism frame
  • Two stacked lights attached to the inside of the oil drum in front of each triangular face (leading to 6 bulbs total being attached to the inside wall of the drum), and two lights stacked in the middle of the drum in order to expose the insides of the masks 
  • Frame able to be removed, while lights stay in place

Triangular Frame Pros Triangular Frame Cons
  1. Able to fit a very high number of masks (9 on each face = 27 overall)
    1. Higher masks per unit time rate
  2. Maximizes space
  1. Stacking bulbs in center may be unstable
  2. Large frame harder to remove with one person (bulky and heavy)
    1. May not be able to lift frame entirely out with one person
  3. Less uniform exposure across all locations of mask frame (based on calculations)
  4. Generally more complex to design, build, and operate
  5. More bulbs = higher cost


Idea B: Single Mask Frame

  • Single large mask-hanging frame slides into center of oil drum
  • 3 bulbs attached to each side of drum in triangular formation (6 bulbs total) 
  • Frame can be removed, bulbs stay in place

Single Frame Pros Single Frame Cons
  1. High usability – very easy to remove frame (much lighter)
  2. Bulbs all stable
  3. Very simple
  4. Fewer bulbs = lower cost
  5. More uniform exposure across all locations on frame
  1. Can fit fewer masks (15) than the triangular prism 
    1. BUT still higher masks per unit time than previous prototype
  2. More open space (space not maximized)

In the end, after weighing the pros and cons of each idea, we decided to move forward with the single-frame idea! We made this decision because, although the triangular prism could fit more masks, we didn’t think it was worth sacrificing the uniform exposure, ease of use, and simplicity of the single-frame design. 

After we made this decision, we began to finalize our list of materials and place orders for the things we would need to build our final prototype. A major decision was regarding the material to use in the mask frame. Initially, we had been planning to use bamboo, but a conversation with our international clients suggested that bamboo may not be as readily available as we had originally thought. In addition, bamboo often isn’t as uniform as other building materials, which could create issues in standardizing our design. In the end, we decided to use square wooden dowels in order to construct the frame, which we will coat with either chrome paint or carbon black paint to prevent warping from the UV light. After making this decision, we built a higher-fidelity frame with our new wooden dowels and screws (this process involved splitting A LOT of wood in the search for the correct dowel and screw sizes). 

In the next week, our team is going to be busy creating our final device. We have met with two electrical specialists to begin to discuss how we will power our device, and we plan to begin building our circuit. In addition, once our oil drum arrives, we can incorporate our frame and begin doing exposure testing using a UV meter. By the end of the week, we are hoping that our prototype will be nearly functional.

On a different note, because our TAs are often surprising us, we decided it would be fun to surprise them by all wearing red on the same day. We were super excited that everyone pulled through, and the TAs were definitely caught off guard!

Week 4: Iterate, Modify, Repeat

*Content warning: My project deals with pediatric sexual abuse. Please exercise self-care while reading.

For Team PIPER, this past week was a total immersion into iterative design – filled with tweaks and modifications to different components of our model, over and over again. It’s really interesting to me that even when part of a design feels perfect in your head, or even works as an individual component, it may not necessarily work the best with the whole design or work at all in real life.

Bayonet mount attachment: not secure & not usable/intuitive

We began the week really ambitiously, with a detailed plan for what we wanted to accomplish and the hope of getting some inspiration for ways we could attach our labia and hymen to the model base by browsing Lowe’s. Long story short, our trip to Lowe’s was quite unsuccessful and we realized we would need to reconsider our entire set of ideas for attachment mechanisms.

After a conversation with Grant Belton, Chief Designer at Rice 360⁰, and a trip to the Rice 360⁰ office at Bioscience Research Collaborative to see a diabetic foot ulcer model, we developed a totally new design for what would go on our rod in the swiveling model. The basic concept? A mason jar! With this design, we’d be able to just set any given labia/hymen into a cylinder that’s permanently attached to the rod, and then screw on a separate cap to secure it in place.

After several iterations in CAD and a couple of 3D-prints that introduced some more room for improvement, we produced a functioning component!

The components of our new attachment idea!
The labia & hymen (attached to the orange piece) can be set into the cylinder.
A threaded ring screws on to secure everything in place.


As for our progress on the actual labia and hymen itself, after a client meeting we decided to pivot away from increasing the surface area on the sides of the labia and stay with our initial circular design. We got some more confirmation of this move, and a confirmation that Ecoflex 30 is the most realistic material for the labia and hymen, from Dr. Kathleen Schmeler, a gynecologist at MD Anderson who so generously met with us and gave us some excellent feedback on our materials.

Dr. Schmeler also brought up an incredibly important point – all of the labia we showed her were pigmented a light skin tone, since that was the silicone pigment most readily available to us. But where was the representation of a variety of skin tones? She emphasized the importance of including darker pigmentation in our design, and we immediately heeded her advice and ordered some darker pigmentation. We’re now hoping to produce three labia/hymen sets, each with a different skin color. It’s incredibly important, especially in training resources, to include visuals of a diversity of skin tones to provide clinical providers with a realistic representation of the populations they will be working with.

This past week, despite being only three days long (we had two days off for the 4th of July!), was filled with design modifications, pivots, and iterations. In the coming week, Team PIPER will be doing more of exactly that – iterating on our rotation system, our attachment mechanism, and combining that with some benchtop testing to see if we can reach some of our design objectives. We will also be working more heavily with prototyping different hymen variations, which will require making separate molds and curing silicone samples. Hopefully, this week we will finally put together a higher-fidelity, integrated model that works, and do some preparation for our final showcase and presentation next week!

-Shivani

Preview: crescentic hymen mold!
Preview: higher-fidelity, laser-cut acrylic base!


Week 4 Reflections

This past week, my team experienced a lot of stalls and struggles in our project’s progress, yet despite these frustrations and challenges, the week was brightened by significant support from others in the internship. A lot of the week involved waiting for materials to arrive and trying to figure out which materials to order. We were still trying to find ways to attach interchangeable labia/hymen sets to the cylinder on the base for rotation, and found little luck at Lowe’s or with our bayonet mounts we were attempting to create. Later in the week, with the help of Grant, we decided on a mason jar-esqe design with the labia and hymen attached to a flat cap with a rim that screws on to attach them to the cylinder. One team member also spent a significant amount of time expanding the labia mold CAD file into an oval shape to have more skin on the sides only to be told by the client that the circle mold was preferable. On the materials side, we began experimenting with thin silicone rubber molds in order to make the hymen look realistic and hopefully be able to move and fall when stretched and when put in supine versus prone positions. This task proved very difficult and after gaining a thorough understanding of the true complexity of this movement and creating it with lifelike materials, my team has decided that it is very possible this is outside the scope of our summer internship. We received support from our TAs and Grant upon drawing this conclusion, and while we hope to experiment with modeling hymens if we have time later in the internship, we want to prioritize the base, rotation, attachment mechanisms, and labia since we have a strong foundation and direction for those components. I began attempting to create a Adobe Illustrator file for our base, and while two members of another team very kindly helped my find a template online, I still need to work on editing that to fit our base’s unique purposes and design. It has been difficult trying to figure this out, but hopefully coming in next week with a fresh pair of eyes will help. Despite the challenges of this past week, our team remains hopeful for what we can accomplish over these next few weeks.

On a fun note, this week all the interns coordinated to wear red on Tuesday and we got some really cute pictures out of it! Also, we met with a gynecologist from the Texas Medical Center to help us decide on materials and assess our model, and she said the labia looked really realistic and the Ecoflex 30 (the silicone rubber we had been leaning towards) definitely seemed like the best material from the silicone sample set we had, so that was encouraging! My team and I are looking forward to pushing forward to a more finalized prototype and getting to share all our work in the coming weeks!

Week 3 Reflections

During week 3, we made a lot of progress in our prototyping, and it was really exciting getting to be very hands-on in bringing our project to life! We started off the week by creating our top 3 solutions (narrowed down from top 5 after more team discussion) as low fidelity prototypes, as pictured. These solutions were made quickly, to demonstrate the concept with cheap and widely available materials such as popsicle sticks and cardboard. After meeting with our client, we chose a top idea to turn into a medium fidelity prototype, made out of more precise and higher quality materials. We used several different types of silicone rubbers to mold labias using a 50% scaled down version of the LUCIA labia. Grant helped us choose which silicone rubbers to buy and helped us find some in the OEDK. We used Ecoflex 10 and 30 and Dragonskin 10 to test at first, and have Dragonskin FX Pro ordered. These are all different types of silicone rubbers with varying textures and levels of elasticity. Currently, of the three we have tested, the Ecoflex 30 seems best for modeling the labia skin and tissue. We are still trying to determine best materials for the hymen.

On Thursday, Dr. Wettergreen came for a prototype evaluation and gave us advice on our model and specifically the base and attachment mechanisms we can use. On Friday, we had our midsummer presentation to present our cumulative work to peers in the internship and members of the Rice 360 internal team. This was a really great chance for our team to look back at our work so far this summer and see how far we’ve come. I was very proud looking at the medium fidelity prototype and seeing the first physical model we’ve made. Our goal is to increase that to be as high fidelity as possible by the end of the internship, but having that medium fidelity prototype on hand made me feel like we had a really strong start towards our goals. It was especially exciting seeing that first physical prototype since there’s no existing solutions similar to this out there so it felt like a really major step bringing this idea into physical existence. We also got to take cute team photos after the presentation!

Medium Fidelity Prototype

For bonding this week, the TA’s hosted a catered Torchy’s dinner followed by a fun team scavenger hunt! This was a really fun event and a great way to connect with others in the internship outside my design team, since our scavenger hunt teams were randomized. Overall, this was a really great week. My team worked really hard on Friday to plan out important tasks and goals for the remainder of the internship, so I have a optimistic outlook on the rest of the internship even though we will have a lot of problems and tasks to tackle in the next few weeks.

Scavenger Hunt Fun!


Week 2 Reflections

Moving forward with this project has been both exciting and intimidating. This past week we have worked on creating design criteria, breaking the project down into components, and thoroughly brainstorming solutions for each component: the labia, hymen, attachment, base, and rotation. We created a colorful whiteboard full of brainstormed ideas with each teammate contributing ideas in a different color (I used bright green !). When we read through all the ideas after a certain amount of time of brainstorming, it was really interesting hearing everyone else’s ideas I hadn’t thought of as well as where we had similar ideas. Reading through our preliminary individual brainstorming ideas lead to a lively team discussion and generation of more ideas and initial full solution ideas to consider. As we go through the design process, we will continue considering different ideas and alternatives to our chosen design components, but this was a really effective first brainstorming round. To help guide us in this brainstorming and idea generation phase, we also talked to Grant, the resident materials expert at the internship, about potential materials to mimic the texture and feel of skin and tissue, as well as Yajur Maker, a graduate student at Rice 360 who is currently working on the LUCIA model. The LUCIA is a cervical cancer model which models an adult labia, vaginal canal, and cervix, and can be seen as a similar solution to our PIPER model since it models similar anatomy and has interchangeable cervixes. We are looking to use a scaled down version of the labia mold from this for our PIPER model.

After narrowing down from the 74 different brainstormed ideas into top ideas per component, we used a chart to combine our top component ideas into a set of full solutions. Then, we used Pugh screening and scoring to narrow down our full solution ideas into a top five solutions to move to low fidelity prototyping next week. It was a really long process trying to decide which solutions would be better or worse for each criteria than our standard set up, and our whole team was very exhausted after discussing this for hours, but it was a very important step to understanding which solutions were best to move forward with. Part of what made this process so difficult was that we all had slightly different solutions pictured in our minds based on our verbal descriptions of the solutions we’d formed from components. It was difficult trying to communicate exactly what each of us was picturing, which is why I’m excited to move into low fidelity prototyping. Low fidelity prototyping will allow us to build our imagined solutions using the most basic materials and therefore be able to communicate our design ideas visually, which I feel will be really effective to clarifying our different perceptions of the five proposed solutions we’re moving forward with.

A really nice break from this intense discussion of narrowing down brainstormed ideas was a one-on-one meeting with one of the internship supervisors, Dr. Taylor. She made it an option for any interns who wanted to schedule 20 minute meetings with her to discuss hopes for the internship and future plans. It was amazing getting to talk to her and having her encourage all of my social justice and policy ambitions and global health interests. She’s very genuinely kind and encouraging and I know that I and all of my teammates were very much grateful for these one-on-one opportunities and all the efforts she makes to build relationships. Another shoutout for the week goes to Emily Mitaro, who met with our team to establish weekly check-ins as we tackle a project related to such a heavy and potentially traumatic topic. We talked about meeting weekly as a team to discuss any issues which might arise, accountability for taking breaks more, and making sure there’s a safe space for all team members. This made me feel really cared for at the internship and had a really positive impact on my mental health. Despite some struggles this week in communicating and narrowing down project ideas, overall it has been a really positive experience at the internship and with my whole team so far.

Week 4: Decisions, Decisions…

If you’ve ever been around me when I play music in the OEDK, you’ll know that the very first question I always ask is “What should I play?” I’ve always struggled with making everyday decisions–what snack to eat (something healthy? crunchy? or just…chocolate?), what clothes to wear (sometimes I’ll go through 4 outfits each morning), or even something as simple as what music to play (being the OEDK Basement DJ is stressful!).

This indecisiveness came into play this past week as we were finalizing our project design. As mentioned in the previous blog post, we have been back and forth between two design geometries: a cylinder shape (Carl) and rectangular shape (Geraldine/Gertrude). However, after weighing the pros and cons of the two designs, we found ourselves stuck in the decision of which one to pick.

On one hand, the cylindrical shape would be made from a 55-gallon oil drum, which is both a standard shape and size and is very common in our African partners’ countries. It would not require any manufacturing or coating processes to make the actual enclosure, being made from a UVC-resistant metal. However, the design process would prove complicated: limited space for the bulbs/masks, and limited space through which to remove the frame.

On the other hand, a rectangular shape would need to be manufactured from sheet metal or UV-protectant-treated wood, both of which require decent time and effort to manufacture. However, the scaleability of the design and ability to open the side of the box and simply remove the mask trays would mean greater usability and ease of design. 

So now you can see our dilemma! We were set up to make a choice between Carl’s accessibility and ease of manufacturing versus Geraldine/Gertrude’s ease of use and design. Luckily for my indecisive self, Dr. Matthew Wettergreen visited to discuss our prototypes. When we showed him our lo-fi prototypes, it took him all of 5 seconds to matter-of-factly state, “Forget the box ideas–let’s focus on the barrel.” 

Well…that was easy. If that’s how normal people make decisions, I could definitely use some of that surety. 

 After discussing the advantages of this choice as a team and with Dr. Andi Gobin (one of our clients), it was decided: we were moving forward with the oil drum design. 

If only we could have stopped the tough decisions there! When designing the frame, we had to choose between a triangular prism shape which used 8 bulbs but disinfected 27 masks per cycle, and a single rectangular mask frame which used 6 bulbs but disinfected 15 masks per cycle. Abby and I made countless UV exposure estimations, spending hours calculating the UV flux at different points of the frame. I’ll include a screenshot of our calculations below: green indicates ideal exposure levels, while yellow/orange are too high and blue is too low. Our goal was to minimize the disparity between the highest and lowest points of exposure on the frame.

Above: Exposure calculations for the 8-bulb triangular prism orientation in the oil drum (dosage disparity: 0.73). Below: Exposure calculations for the 6-bulb single tray orientation in the oil drum (dosage disparity: 0.47) . Measurements are in J/cm^2.

Unfortunately, all of this work only proved that the two frame ideas provided awfully similar exposure results. Stumped, we then estimated how many masks would fit in each design. Although the triangle could fit more masks per unit time, the three of us decided that ease of use trumped the slight increase in efficiency and were able to make a big design decision on our own!

Long story short, I am learning the value of balancing the need for data-based decisions with the practicality of gut instinct in order to effectively make decisions. Let’s see if tomorrow, I can take less than 15 minutes to decide what I’m going to wear!

Week 4: Make a U-Turn!

Content warning: My project deals with pediatric sexual abuse. Please take care of yourself and feel free to forgo reading any parts of this blog. 


The name of the game this week was divide and conquer. At the end of last week, team PIPER spent time prioritizing and delegating tasks to ensure we would finish our project on time. As a result, we dove into this week focused on accomplishing our individual goals related to the project. For me, this meant figuring out the attachment mechanism for attaching the labia and hymen to the base. Dr. Wettergreen had suggested looking into a bayonet mount, so I created a bayonet mount on Fusion 360 and 3D printed it. However, due to the oval geometry of the anatomy and the need for the model to rotate, the bayonet mount proved to be ineffective in correctly locking the labia and hymen to the base.

This is the bayonet mount that failed to attach the labia and hymen to the base.

While I was trying to create the bayonet mount, my teammates were hard at work on other aspects of our pediatric pelvic model. Alex focused on extending the labia and hymen mold, as our client had requested we make the anatomy an oval shape, as opposed to the current circle shape. This would give nurses more skin with which to practice performing labial traction. Elise and Shivani focused on further materials testing. After receiving a shipment of Soma Foama, they tested this material to see if it could be used in creating the estrogenized hymen. However, this material was very fragile and ripped after slightly pulling the material apart, causing us to remove it from further materials consideration. Elise and Shivani also created separate hymen molds to create hymens that could then be attached to the labia. 

At this point in the week, I was feeling frustrated with how things were going, as we seemed to be struggling with every aspect of the project we were working on. The bayonet mount failed, Alex was struggling to edit the current labia mold, and our Soma Foama ripped when molded. Then, we had our client meeting, which caused a pivot in our plans. Ms. Harris decided that she did like the circular shape for the labia and hymen instead of the oval shape, making our lives easier by allowing us to use the circular LUCIA labia mold instead of trying to edit it into an oval. Additionally, we met with Grant, the chief designer for Rice 360, after the meeting, and he gave us a promising idea for the attachment mechanism. While it was tough to pivot and scrap our work for the week up until this point, we knew that this was the way to move forward in order to complete the pediatric pelvic model. 

After these meetings, Shivani and I got to work on creating the new attachment mechanism. The mechanism consists of three pieces- a cylinder with a rectangular hole in it that is permanently attached to the base of the model, a table with the labia and hymen and a rectangular protrusion that fits into the hole in the cylinder, and a ring that screws on to secure the two together. The attachment mechanism functions most similarly to a Mason jar- one places the labia and hymen into the cylinder, and then screws on the cap to secure the anatomy in place. Shivani and I were able to quickly create this mechanism on Fusion 360 and get it printed. The mechanism was successful, minus a few small changes that we will make next week.

This is the new attachment mechanism. The labia and hymen are on a table with a rectangular protrusion that allows it to fit into the cylinder. The circular ring screws on to hold the anatomy in place.

While we worked on this, Alex and Elise tackled other aspects of the project. Alex focused on finalizing the labia and hymen mold according to our client’s new wishes of a circular shape. We are still experimenting with different sizes of the mold, as we are aiming for a size that is both big enough to manipulate but also accurate to the anatomy of a young female. Elise worked on the base of our model. We are going to create an acrylic base that is easily sanitizable. Additionally, Elise is working on finalizing a notching system that will allow the model to lock in different positions. Both the base and notching system will be laser cut, so she is working in Adobe Illustrator to prepare the files with the base and notching system. 

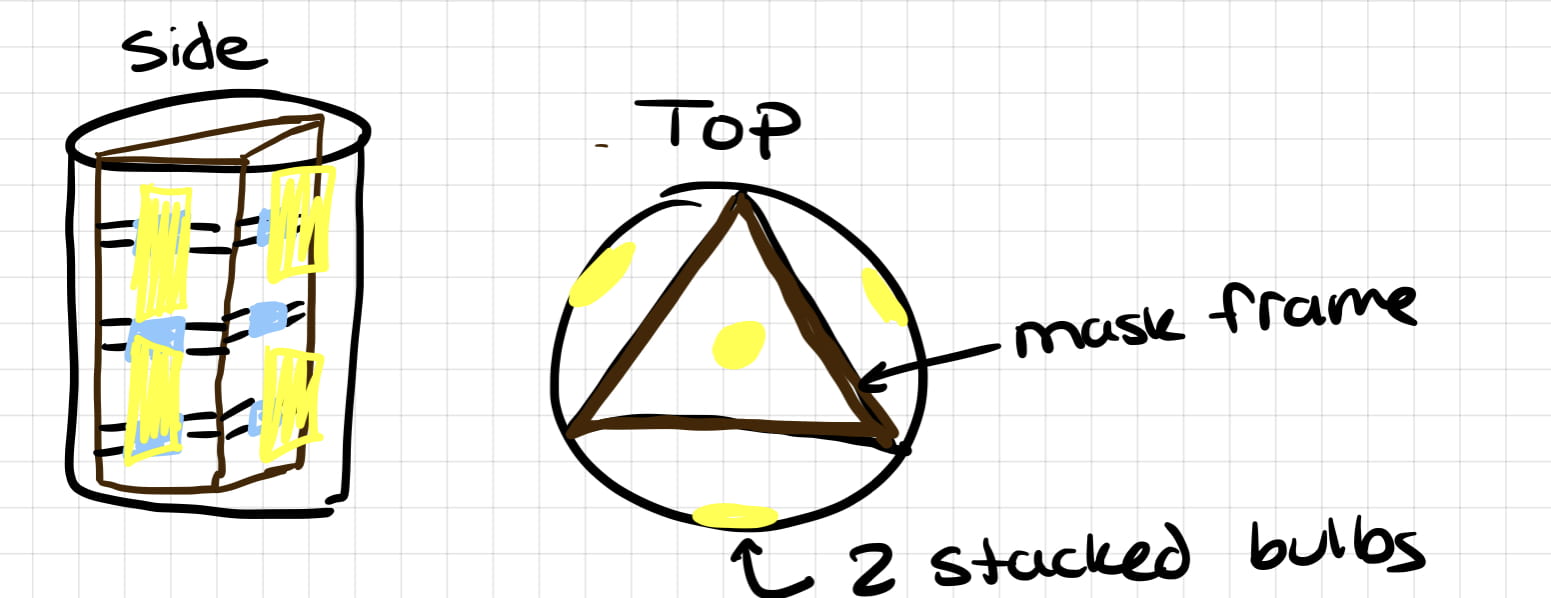
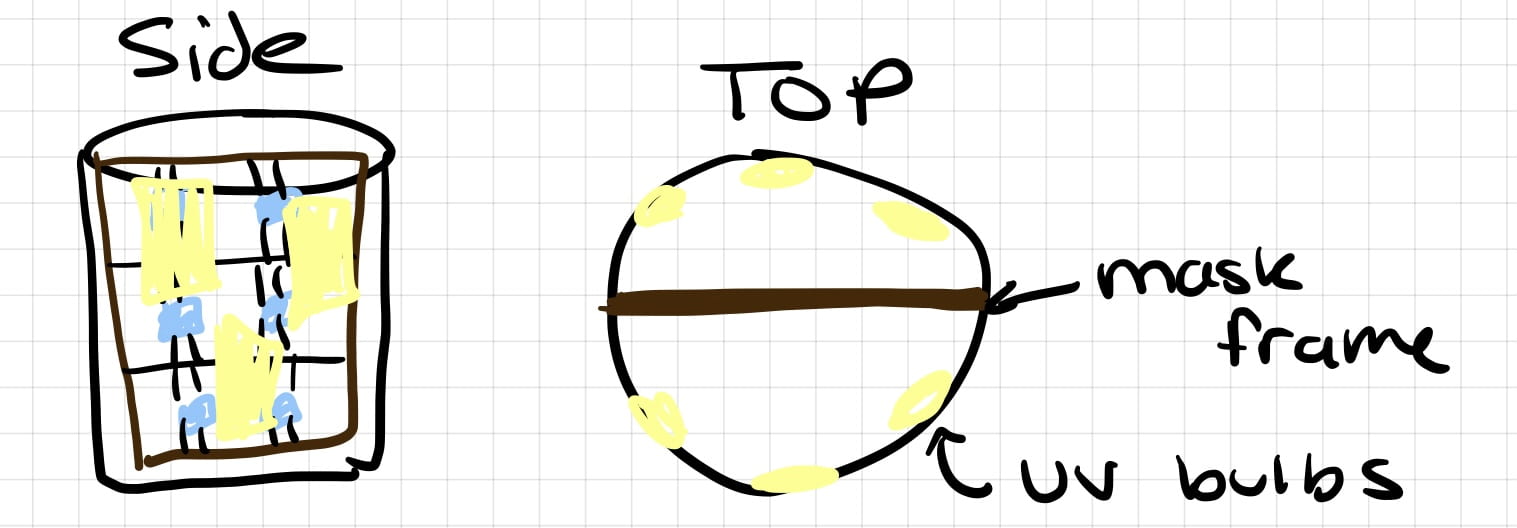
On Thursday, we met with Dr. Schmeler, a gynecologist at MD Anderson Cancer Center, to get feedback on our various synthetic skin samples. After talking with her, she indicated that Ecoflex 30 would provide the best tactile experience of the anatomy. She was very pleased with the visual appearance of the anatomy as well. Now that we have finalized our material, we can put materials testing aside and focus on accurately modeling the movement of the hymen and labia.

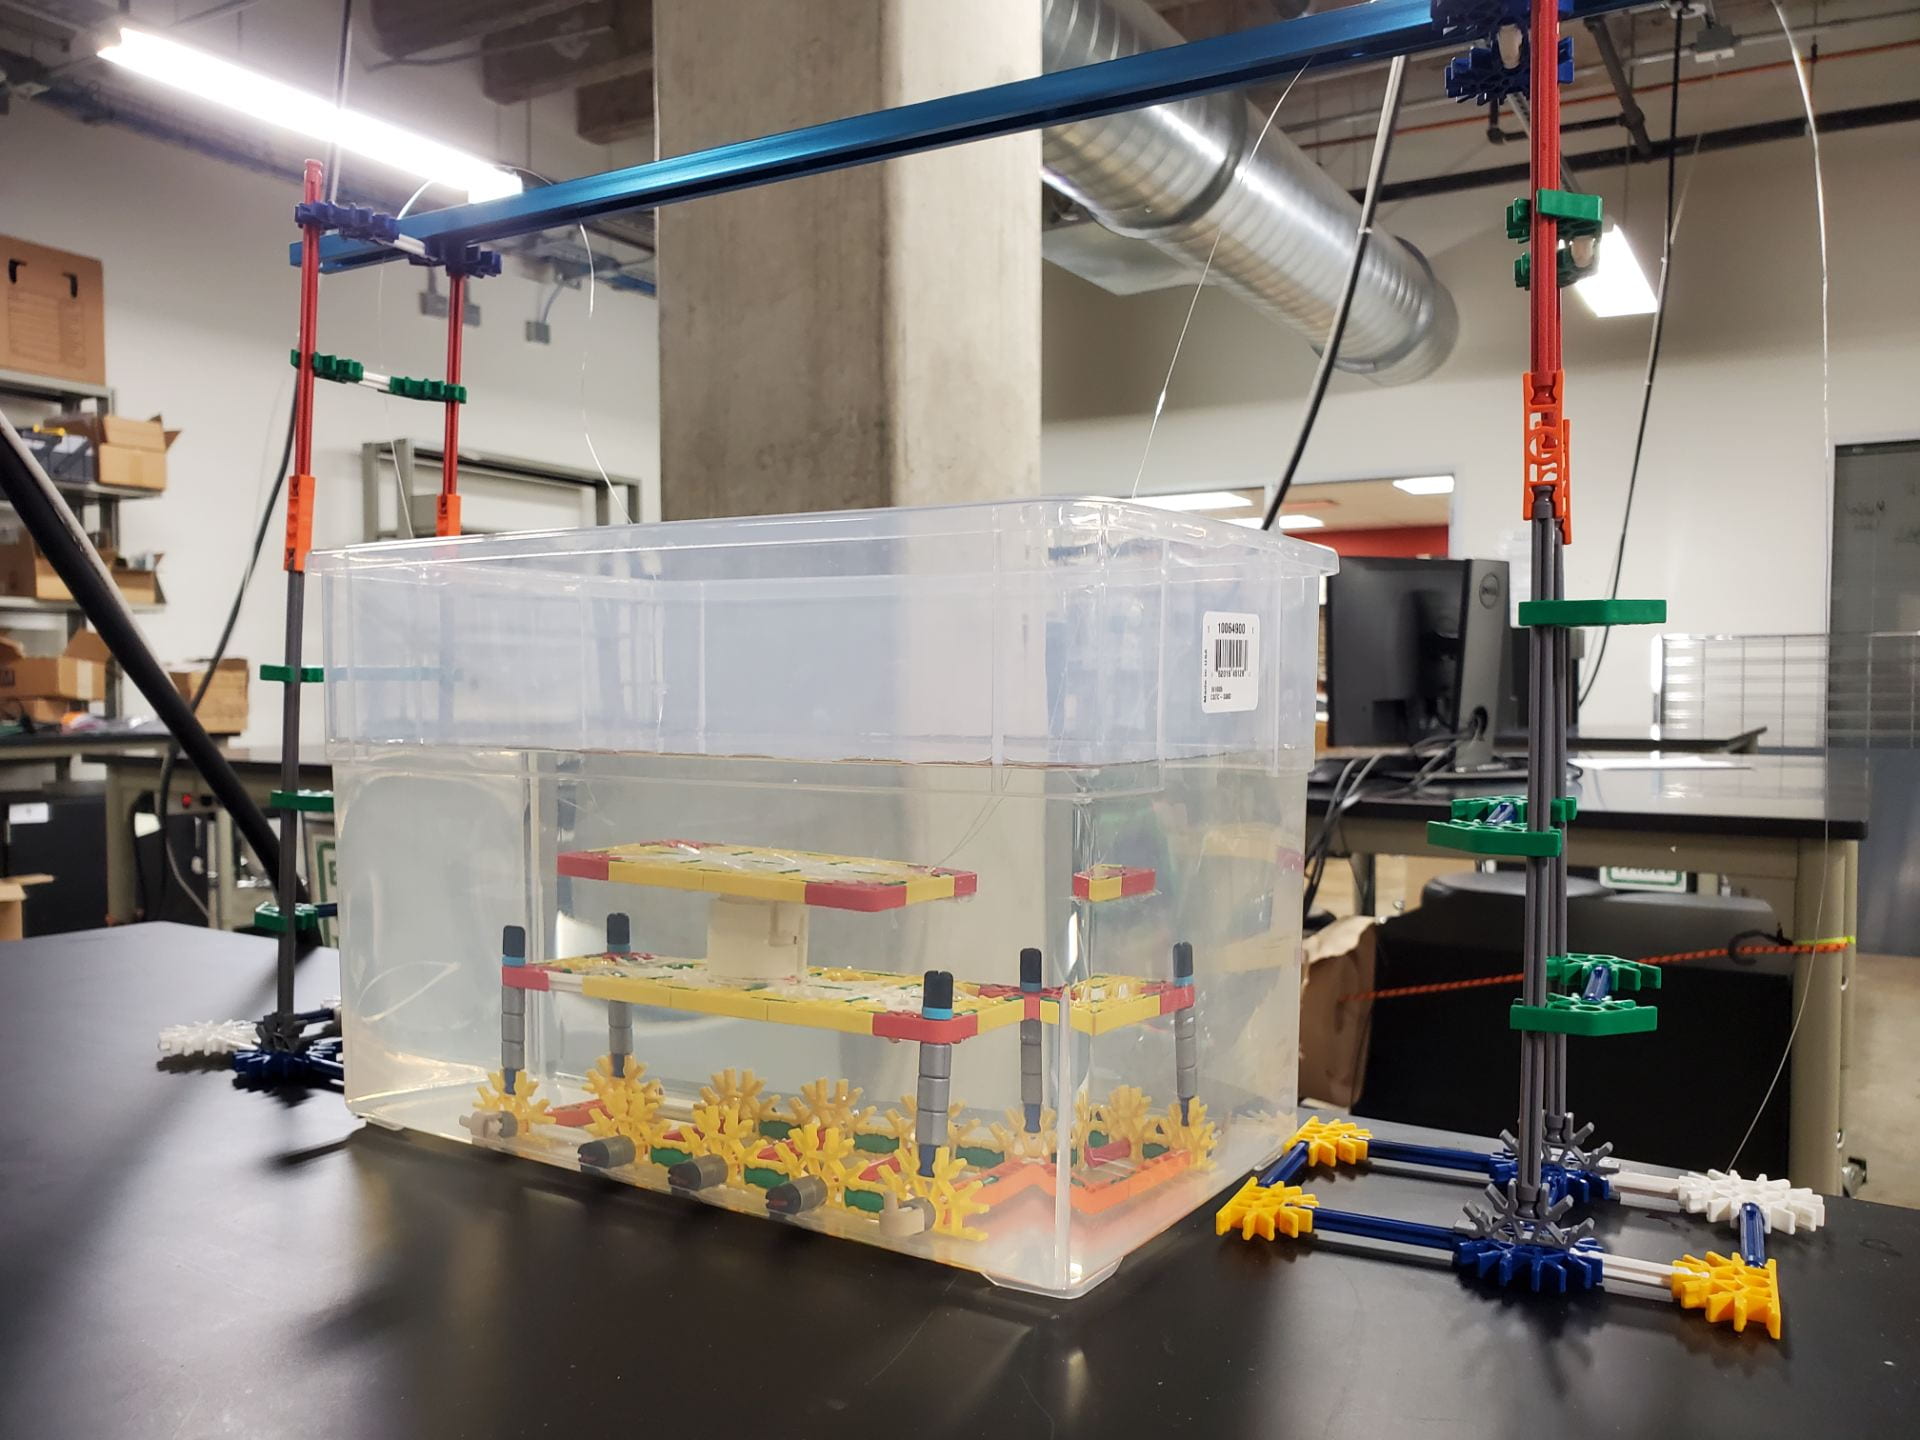
This was our setup for the meeting with Dr. Schmeler.

Overall, this week was tough; it’s difficult to work on certain things for a bit, only to pivot to something completely different midway through the week. However, I think our u-turn was ultimately necessary in equipping us to finish our project on time. Despite our crazy week, we left feeling optimistic about our plans moving forward, and we truly believe we can finalize a viable pediatric pelvic model by the end of the internship. Stay tuned for the final two weeks to see how our project wraps up!

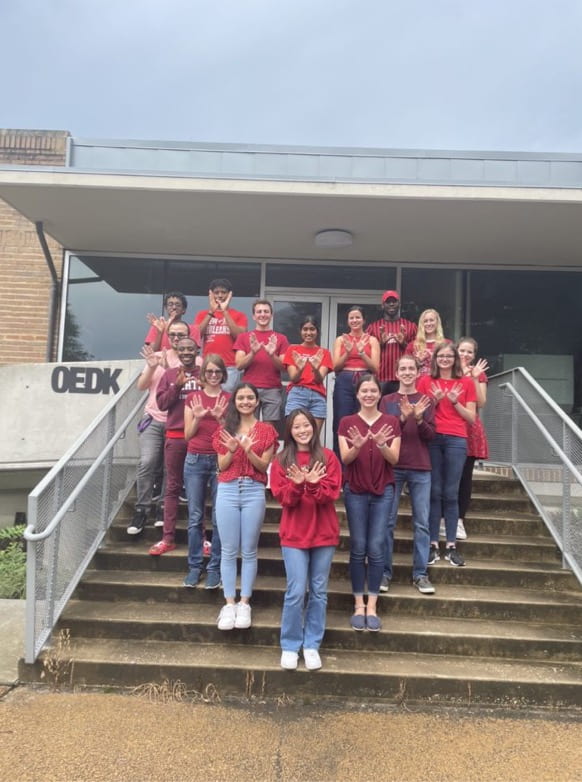
All the interns wore red one day this week, so we took this cute heart picture. Go Owls!

See y’all soon,

Shannon

Week 3 Reflections

This past week has been really great!
Closing out the third week, we had the opportunity to undergo a prototype evaluation by Dr. Wettergreen that gave us some constructive insights into our design and testing process moving forward. More specifically, Dr. Wettergreen highlighted that, as our final device would need to be submersed in saline, our early testing should be performed in saline to prevent eventual issues with our design. To illustrate this concept, he brought up the lesson of the spaghetti noddle-marshmallow challenge that he typically presents to his students. While I did not take ENGI120, I had the opportunity to participate in this challenge during my GLHT360 course. In this challenge, the students are tasked with building the tallest structure made solely from spaghetti noodles and tape that is able to support a single marshmallow. The trick to succeeding is to test early and often with the marshmallow rather than waiting until the very end. Based on this insight, we developed our next iteration in a manner that would allow for submersion in a saline solution.
The following day, after our midsummer presentations, we had another client interview during which we updated the THI team on our past week’s progress. The THI team liked our proposed solution’s track system that sought to facilitate the vertical (lung) motion and advised us away from the rocking motion. Instead, they suggested looking into creating a motion that was representative of a sine wave within a sine wave. In other words, have the heart motion be a sine wave of a particular frequency and amplitude while also having the lung motion be a sine wave of a particular frequency and amplitude. Once coupled, these sine waves would be able to represent the wanted cumulative heart and lung motion. With this new approach to the heart and lung motion in mind, we set about adjusting our prototypes.
With this new direction in mind, we decided to explore two possible solution avenues: (i) a solution in which the combined heart and lung motion is instigated by a singular motor and (ii) a solution in which the motion is initiated by an iron solenoid (heart motion) and a motor (lung motion). Both of these solutions would, in theory, create the heart and lung motion mentioned by our clients. As a result of our pursuit of the two prototyping directions, we decided to split up different aspects of each solution among group members. Rachel worked on creating a functional prototype of solution (i) out of K’nex and PVC pipe (Figure 1) while also working on a higher fidelity version of the prototype that made use of 3D printed parts.
Figure 1: K’nex and PVC pipe version of solution (i)
Meanwhile, Sam and Chris further developed solution (ii) and started working on a functional model. At the same time, I continued to work on the Arduino code and circuits for both solutions. Currently, I have coded and built a circuit that allows the user to use a dial to vary the frequency of the servo motor’s sine waves (Figure 2) and see the set values of both the breath rate and heart rate on an LCD screen. Moving forward, I plan to work on coding the combined sine wave motion and also finalizing the code for the iron solenoids.
Figure 2: Our circuit setup, including servo motors, dials, and LCD screen.
Outside of our project work this past week, we also got to participate in some fun intern activities arranged by the TAs! This included a group scavenger hunt around campus which was a really great way to bond with other interns who are not on Team Heartache. My team ended up tying for first place!
Until next week!
– Kaitlyn Heintzelman

Week 3: Making the Most of It

Changing focuses from the past couple of weeks, this week I want to focus more on the TA-led experiences that have happened in the past week. To begin with, last Thursday after we were done with work for the day, there was a scavenger hunt that a bunch of us took part in. I was on a team with Vanessa, Abby, and Teja and we went all out for the win. We were sprinting all over the campus and we had a pretty good strategy for it. I went and read the clues so that they could all think about what they meant since they know Rice a lot better than me. We also tried to get to most of the clues first so that we could get the coins at the clues which counted for two points each. That strategy also led to me sprinting past Shannon and Shivani’s team to try to get to a clue before them, but unfortunately it was all kinda pointless because the coin wasn’t even there. However, it did lead to us tying for the win with the team that had Shannon, Shivani, and Kaitlyn. As a reward, we got to decide the new name and photo for the Group Me we have with all of the interns and TAs. We haven’t decided on a name just yet but I’ll let you know when we do.


Moving on into this week, we had another activity after work on Tuesday with a group of us playing sand volleyball for a couple of hours. It was actually really fun and an insanely good workout that everyone was dying from afterwards. I was covered in sweat and sand on the drive home which was not ideal for my car but I had a good time so who cares. I think we’re going to play again this week so that should be fun. Hopefully we can get more people to play, although it was still fun last time with like 8 of us playing. We also got lunch from the TAs on Wednesday and they catered Chinese food for us. It was probably one of the most satisfying meals I’ve ever had, almost just because I was really hungry and the food was good but I liked it. I really feel like these experiences that we’re having with our teams and with everyone in the internship is making everyone a lot closer. There’s definitely a noticeable difference in the conversations everyone is having just at lunch and in general. People are getting closer so more jokes are being made and I feel like everyone is just happier in general. It was a little awkward towards the beginning of the internship but that’s just kinda how it’s gonna go with a group of people who are mostly just meeting each other for the first time. I really like the dynamic now though, and I feel like I could talk to just about anybody in the internship, TAs included, for a long time.