We’re halfway through the internship already! Week three has been a lot of fun as we developed and iterated through our very own art projects — initial low-fidelity prototypes. We’ve been continuously learning more and more about the intricacies of our project, from the scalability of materials to the quantitative analysis of ultraviolet light dosage.
When I started this internship as a remote intern, I didn’t think I would be a huge part of prototyping. My idea of developing prototypes was using 3D printers and complex laser cutters while configuring electrical circuitry. While these are important components of prototyping, prototyping consists of so so SO much more (I didn’t expect prototyping to be as artsy as it is!), and I feel as connected to the project as the rest of my team members do.
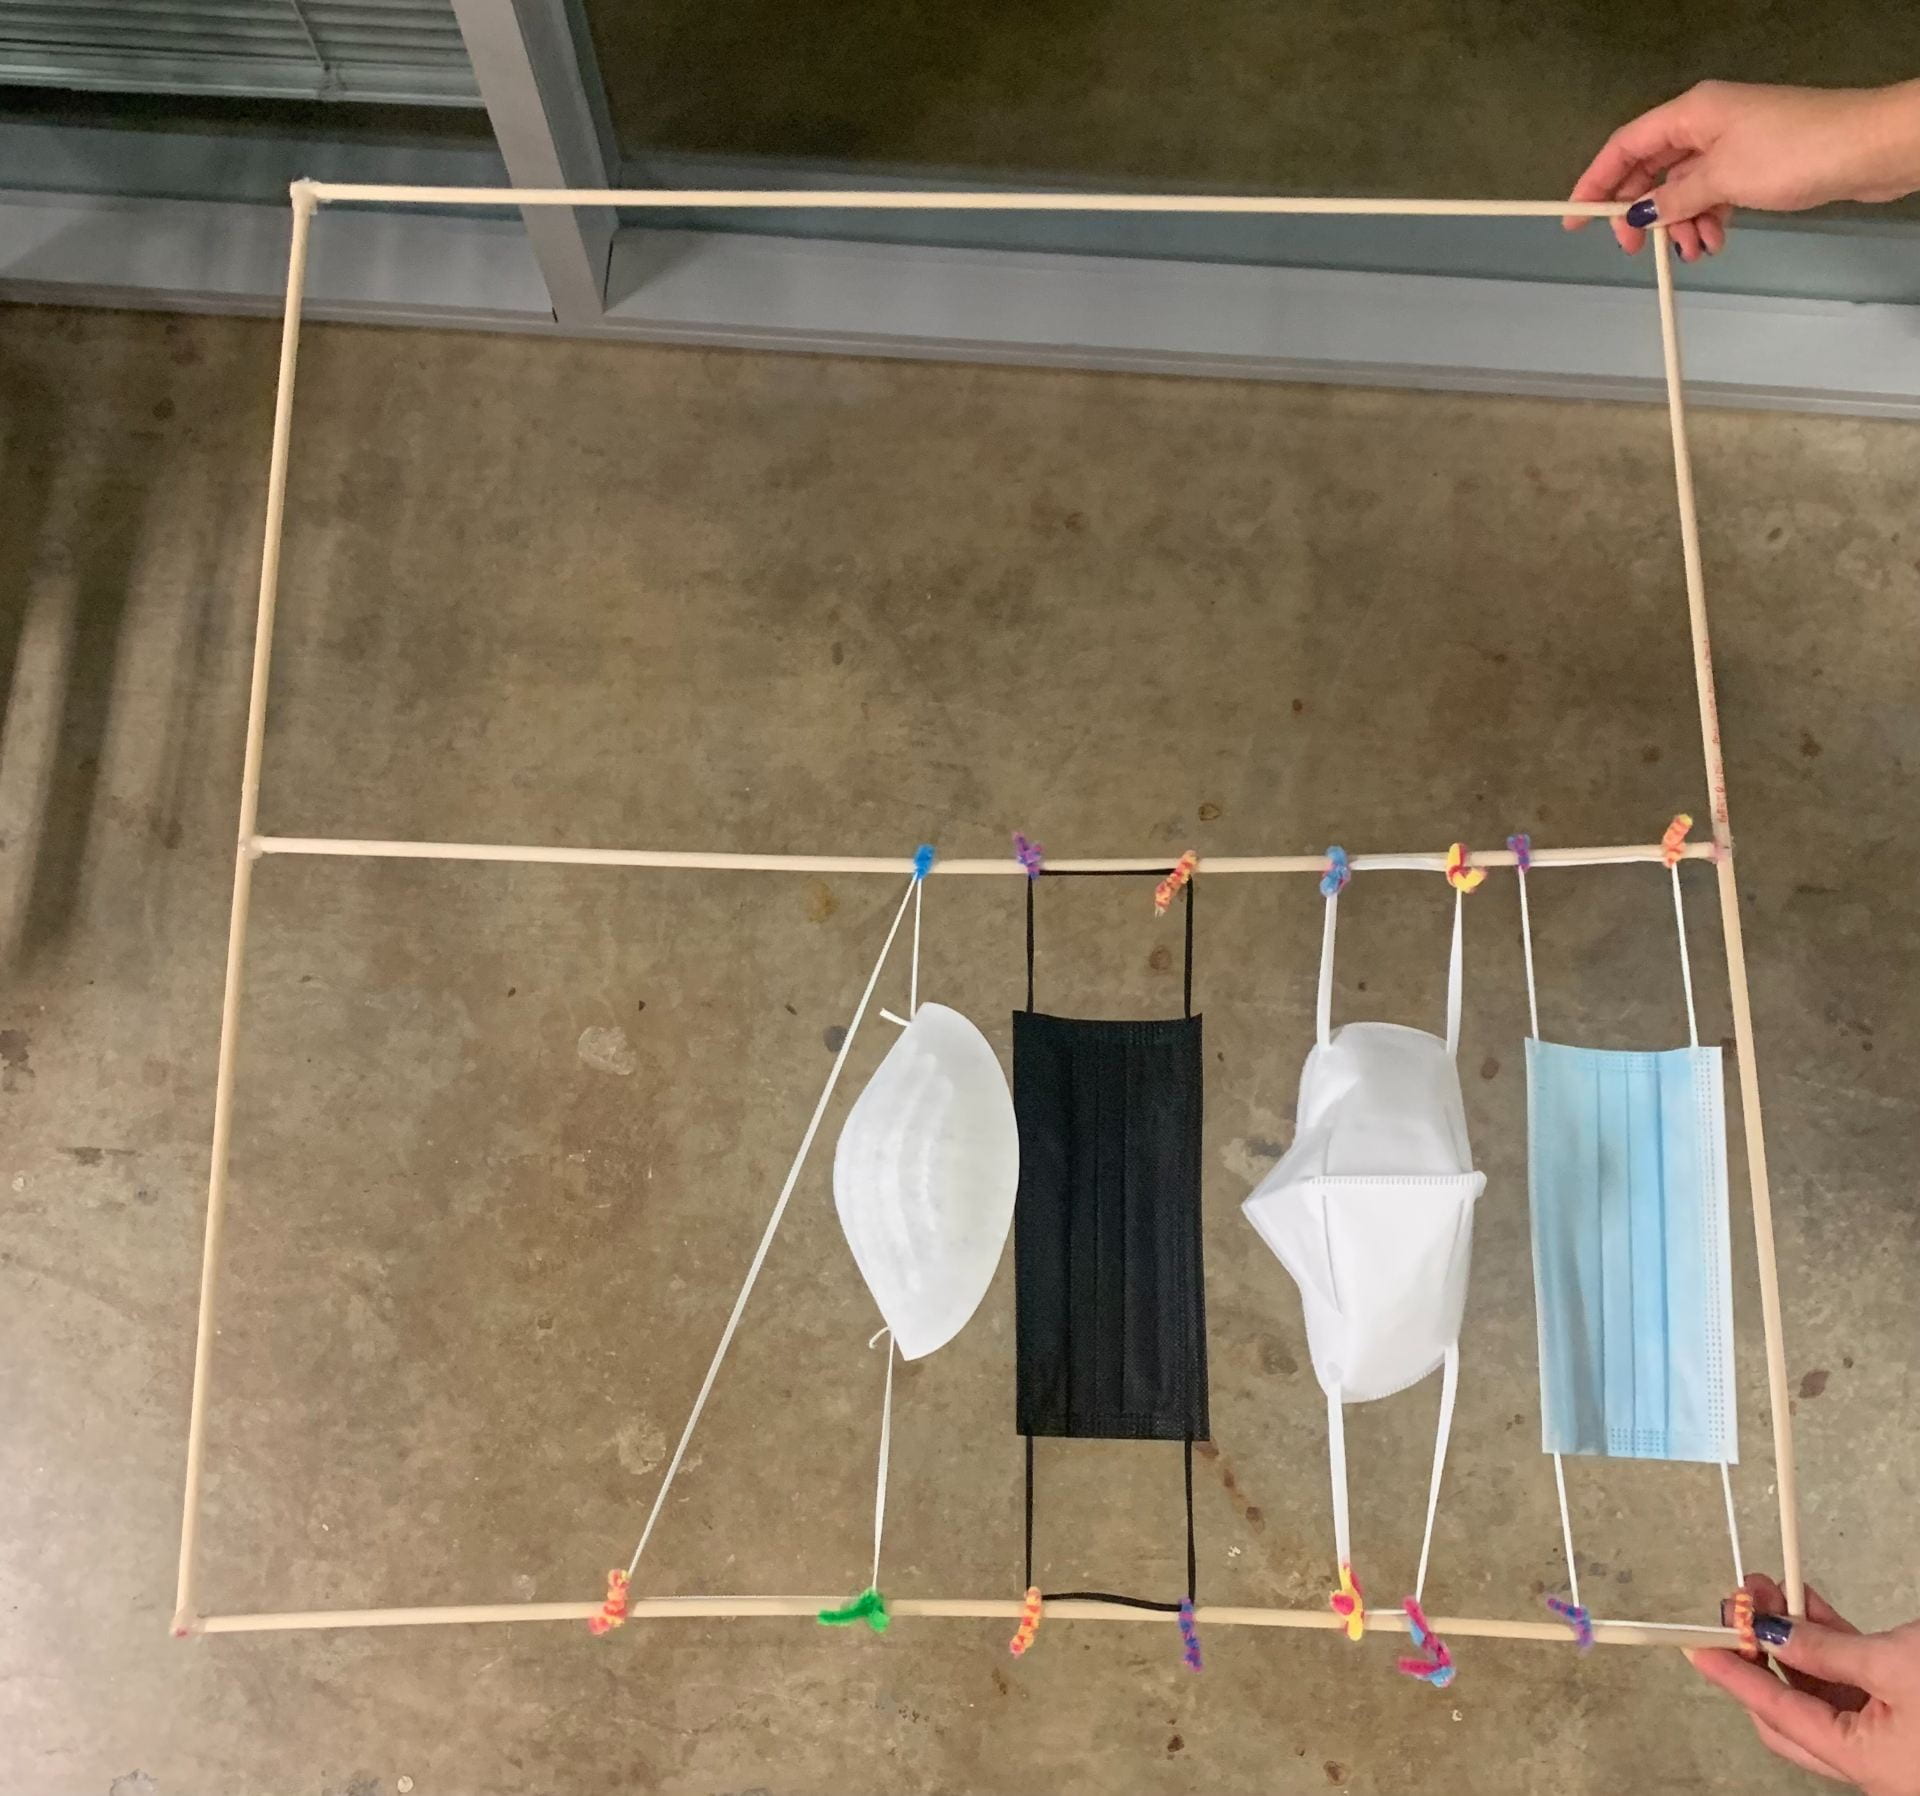
This week, I was able to learn the importance of low-fidelity prototyping, which so happens to be the first foundational step when engineering a new product. Our initial representational and ergonomic prototypes were an oil drum with a hanging framework attached to the lid, and a square box with a square framework that could be taken out of the box (peep the videos on last week’s blog!). Both of these prototypes have their pros and cons. On the one hand, the square box is much easier to produce and manufacture owing to its standard geometry. It is also easier to customize so that it fits our criteria and design needs. However, the oil drum, specifically chosen for its ease of accessibility in the settings we are designing for, can potentially allow us to produce at a large scale, despite having issues with usability and customizability.
To decide between our ideas, we met with international collaborators as well as the design coaches at Rice 360. After considerable deliberation, our team decided to go ahead with the oil drum idea. Despite the freedom a square or a novel shape may allow us, it would be useless if it could not be sustainably reproduced in a low-resource setting (or, worse, be imported from high-resource areas, only to end up in a graveyard of medical devices). With our overall structure finalized, we began work on designing the framework of UV bulbs and masks.
One of the hurdles of designing a framework is the exposure to UV light that the masks are allowed to receive. Too little exposure would mean the masks would not be sufficiently sterilized. Too much exposure might reduce the number of sterilization cycles masks can go through with their fit and structural integrity intact. After literature review on similar experiments, I found that a UV dosage of ~1.5 J/cm2 with the frameworks we are trying to engineer would ensure that the lowest dosage any part of the mask receives is 0.8 J/cm2 while the maximum is 3.0 J/cm2 (for reference 0.05 J/cm2 is usually enough to kill viruses and bacteria).
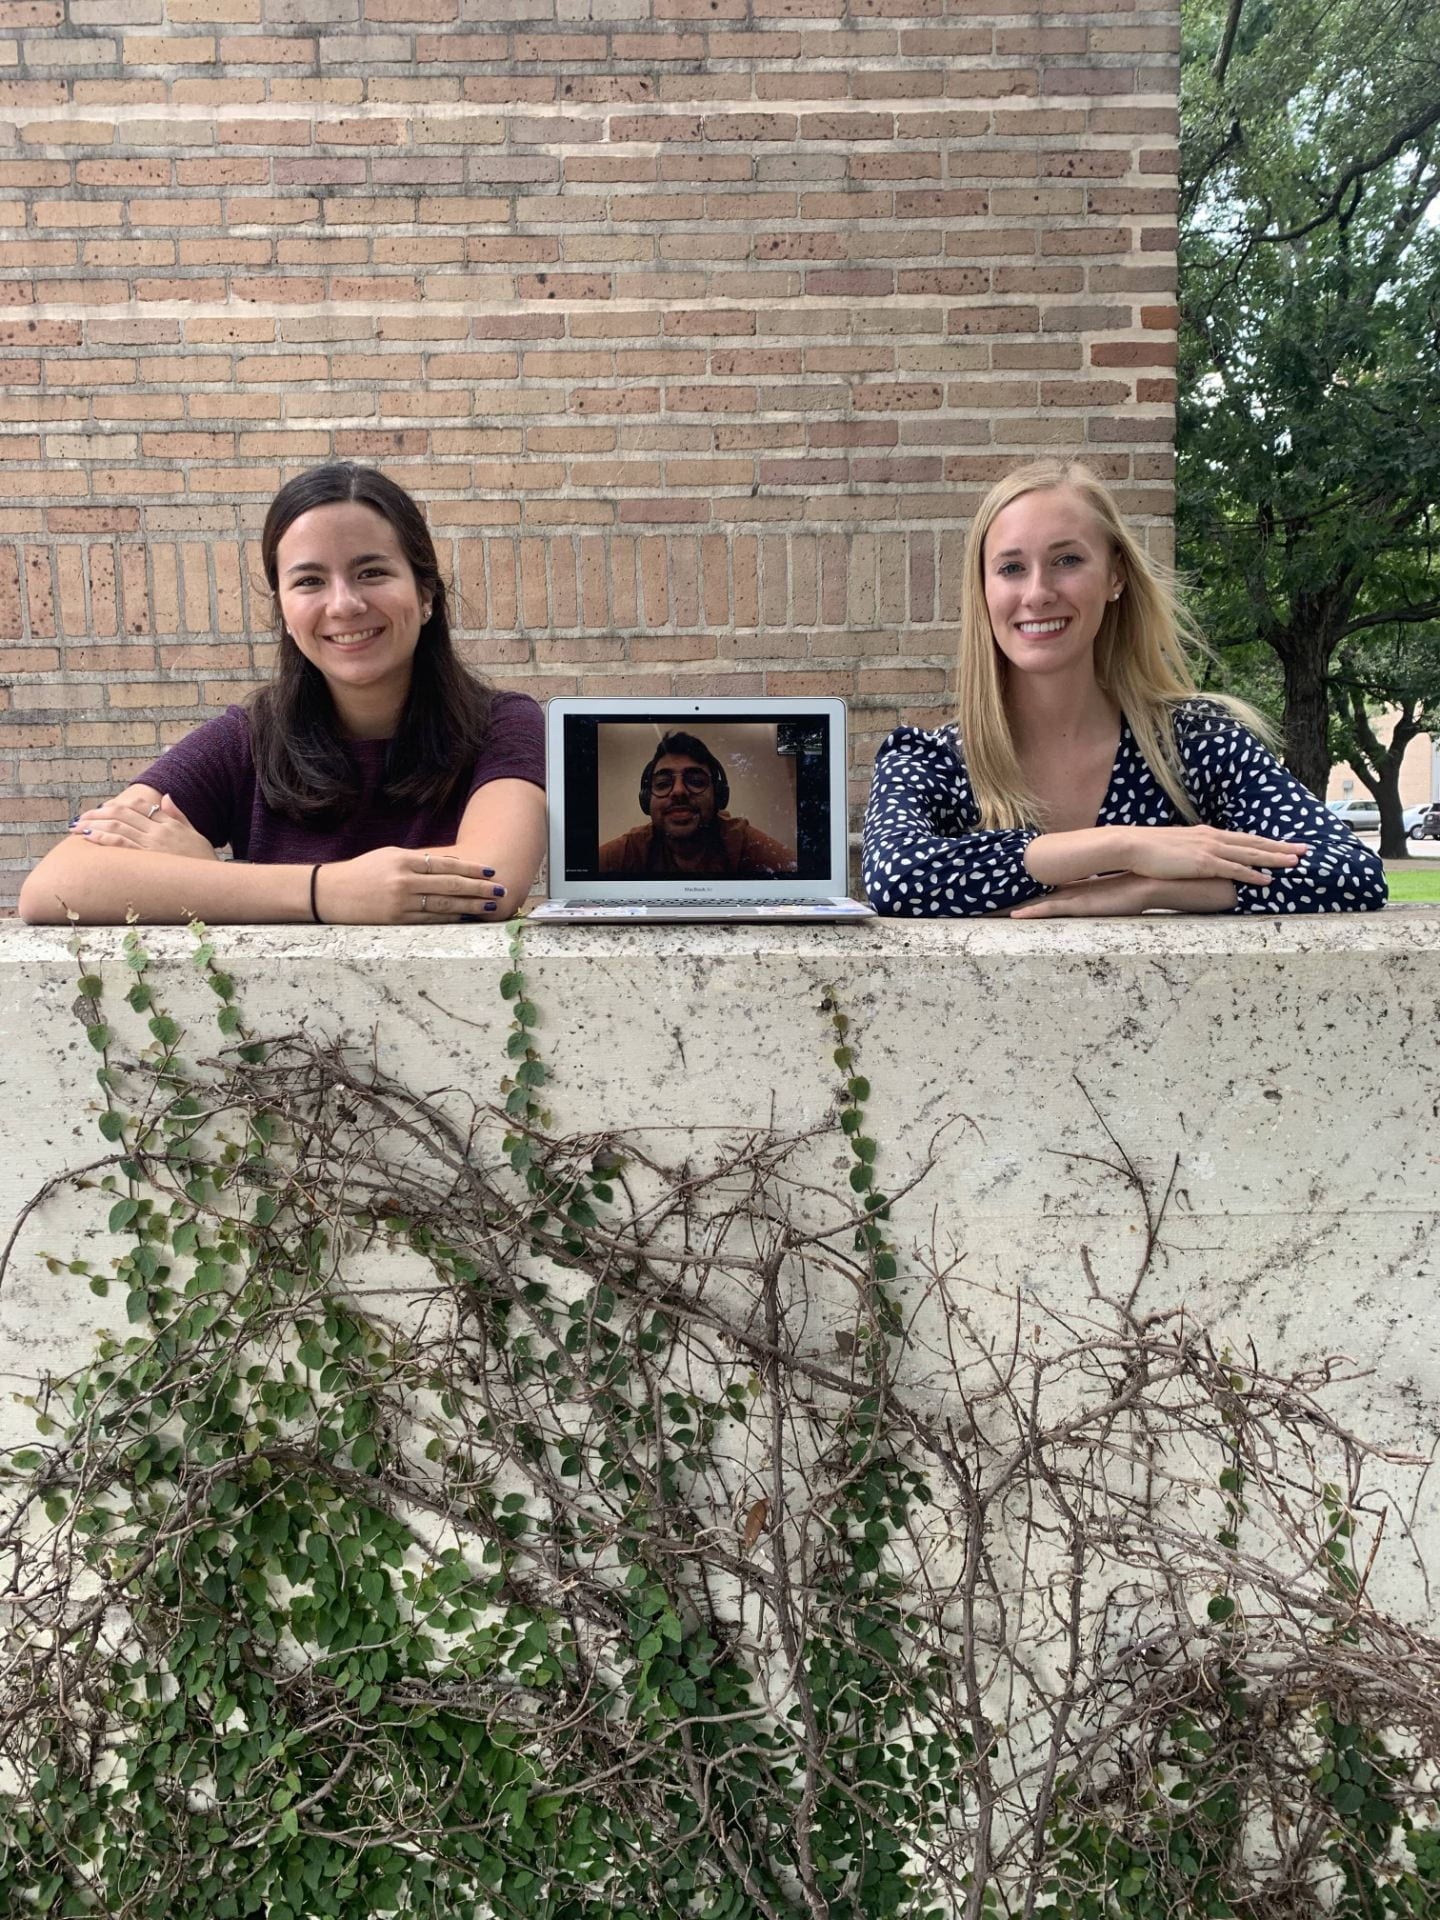
To end the week, we gave our mid-internship presentations. It presented a wonderful opportunity to learn more about the work everyone has been doing over the past few weeks. I was thrilled to learn about the feedback that everyone had to offer us! The occasion also presented a great opportunity for some team ~hybrid~ photos (see below). I’m excited for the second half of the internship!
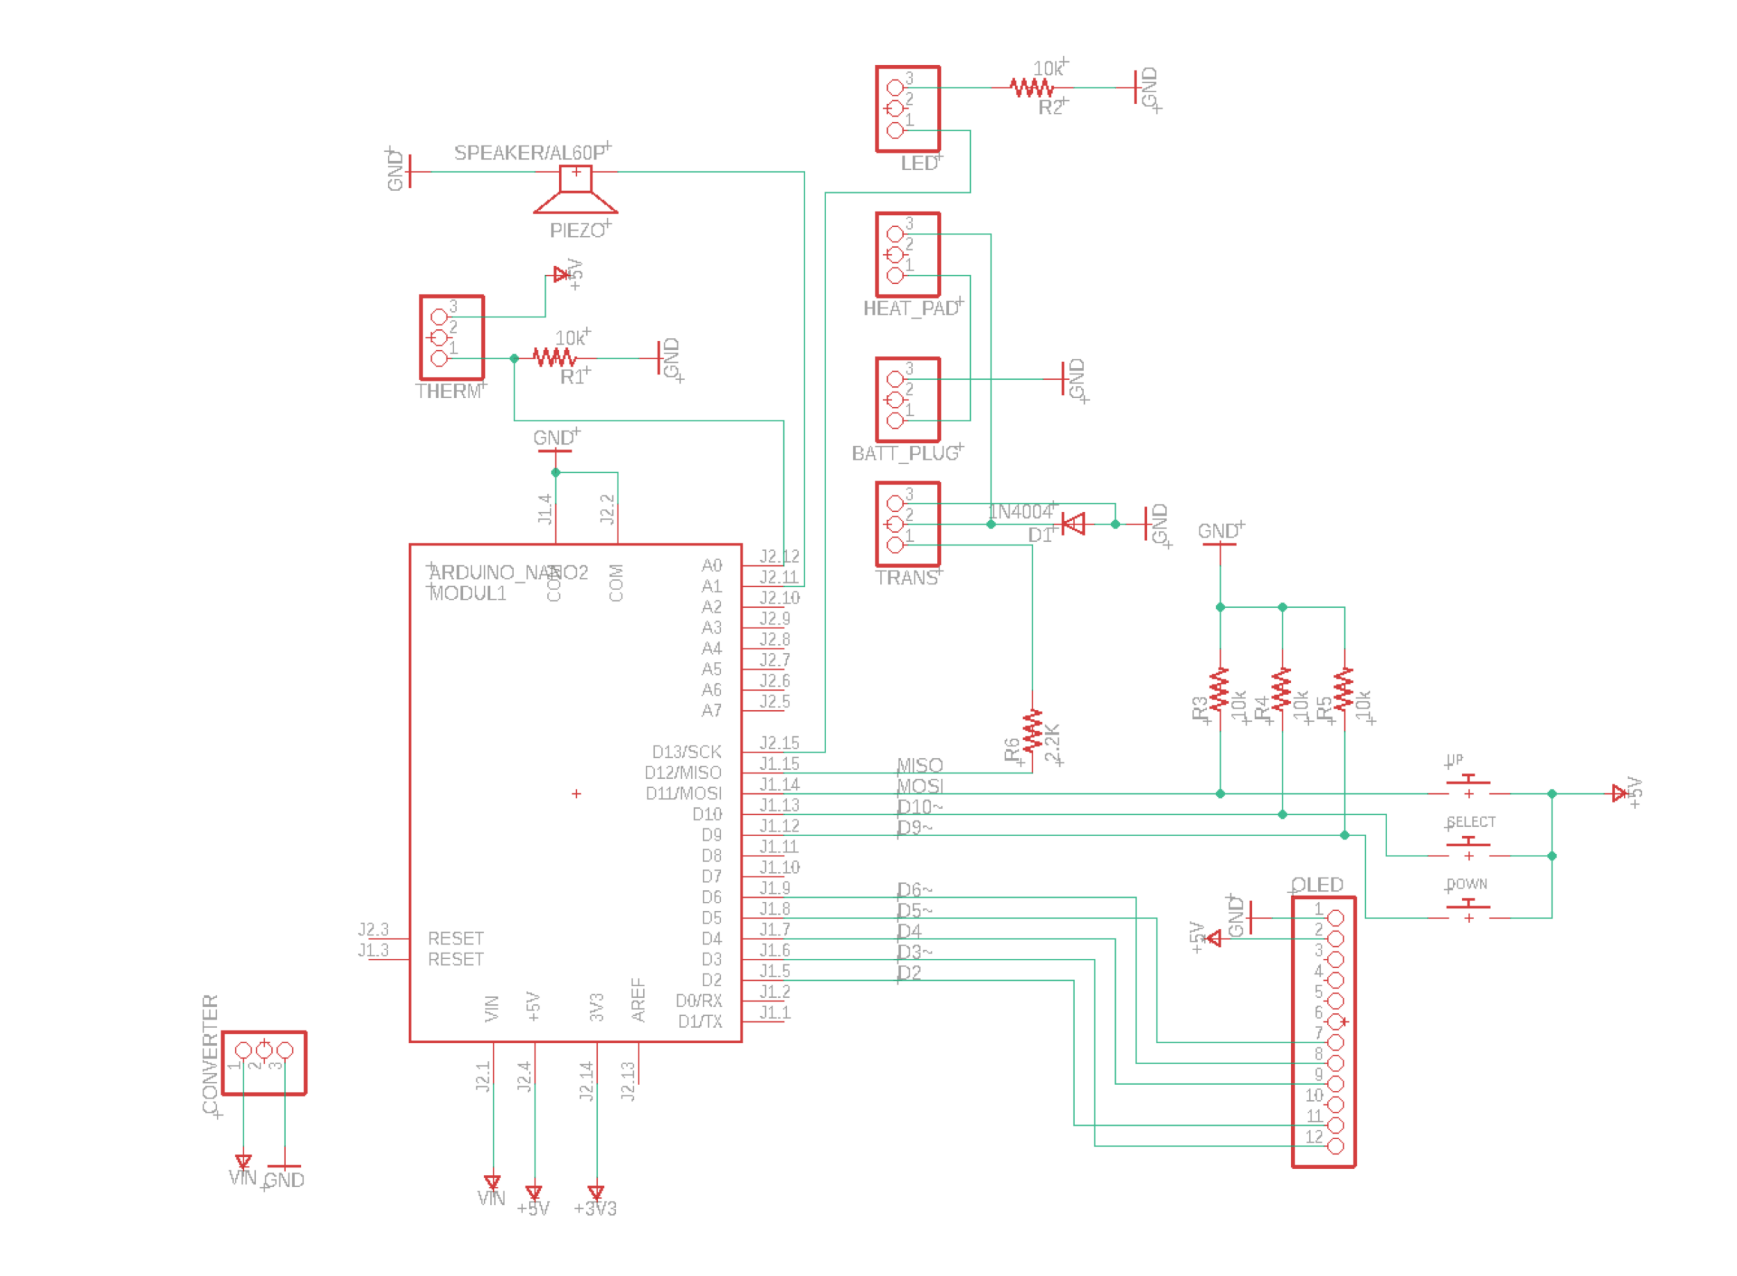
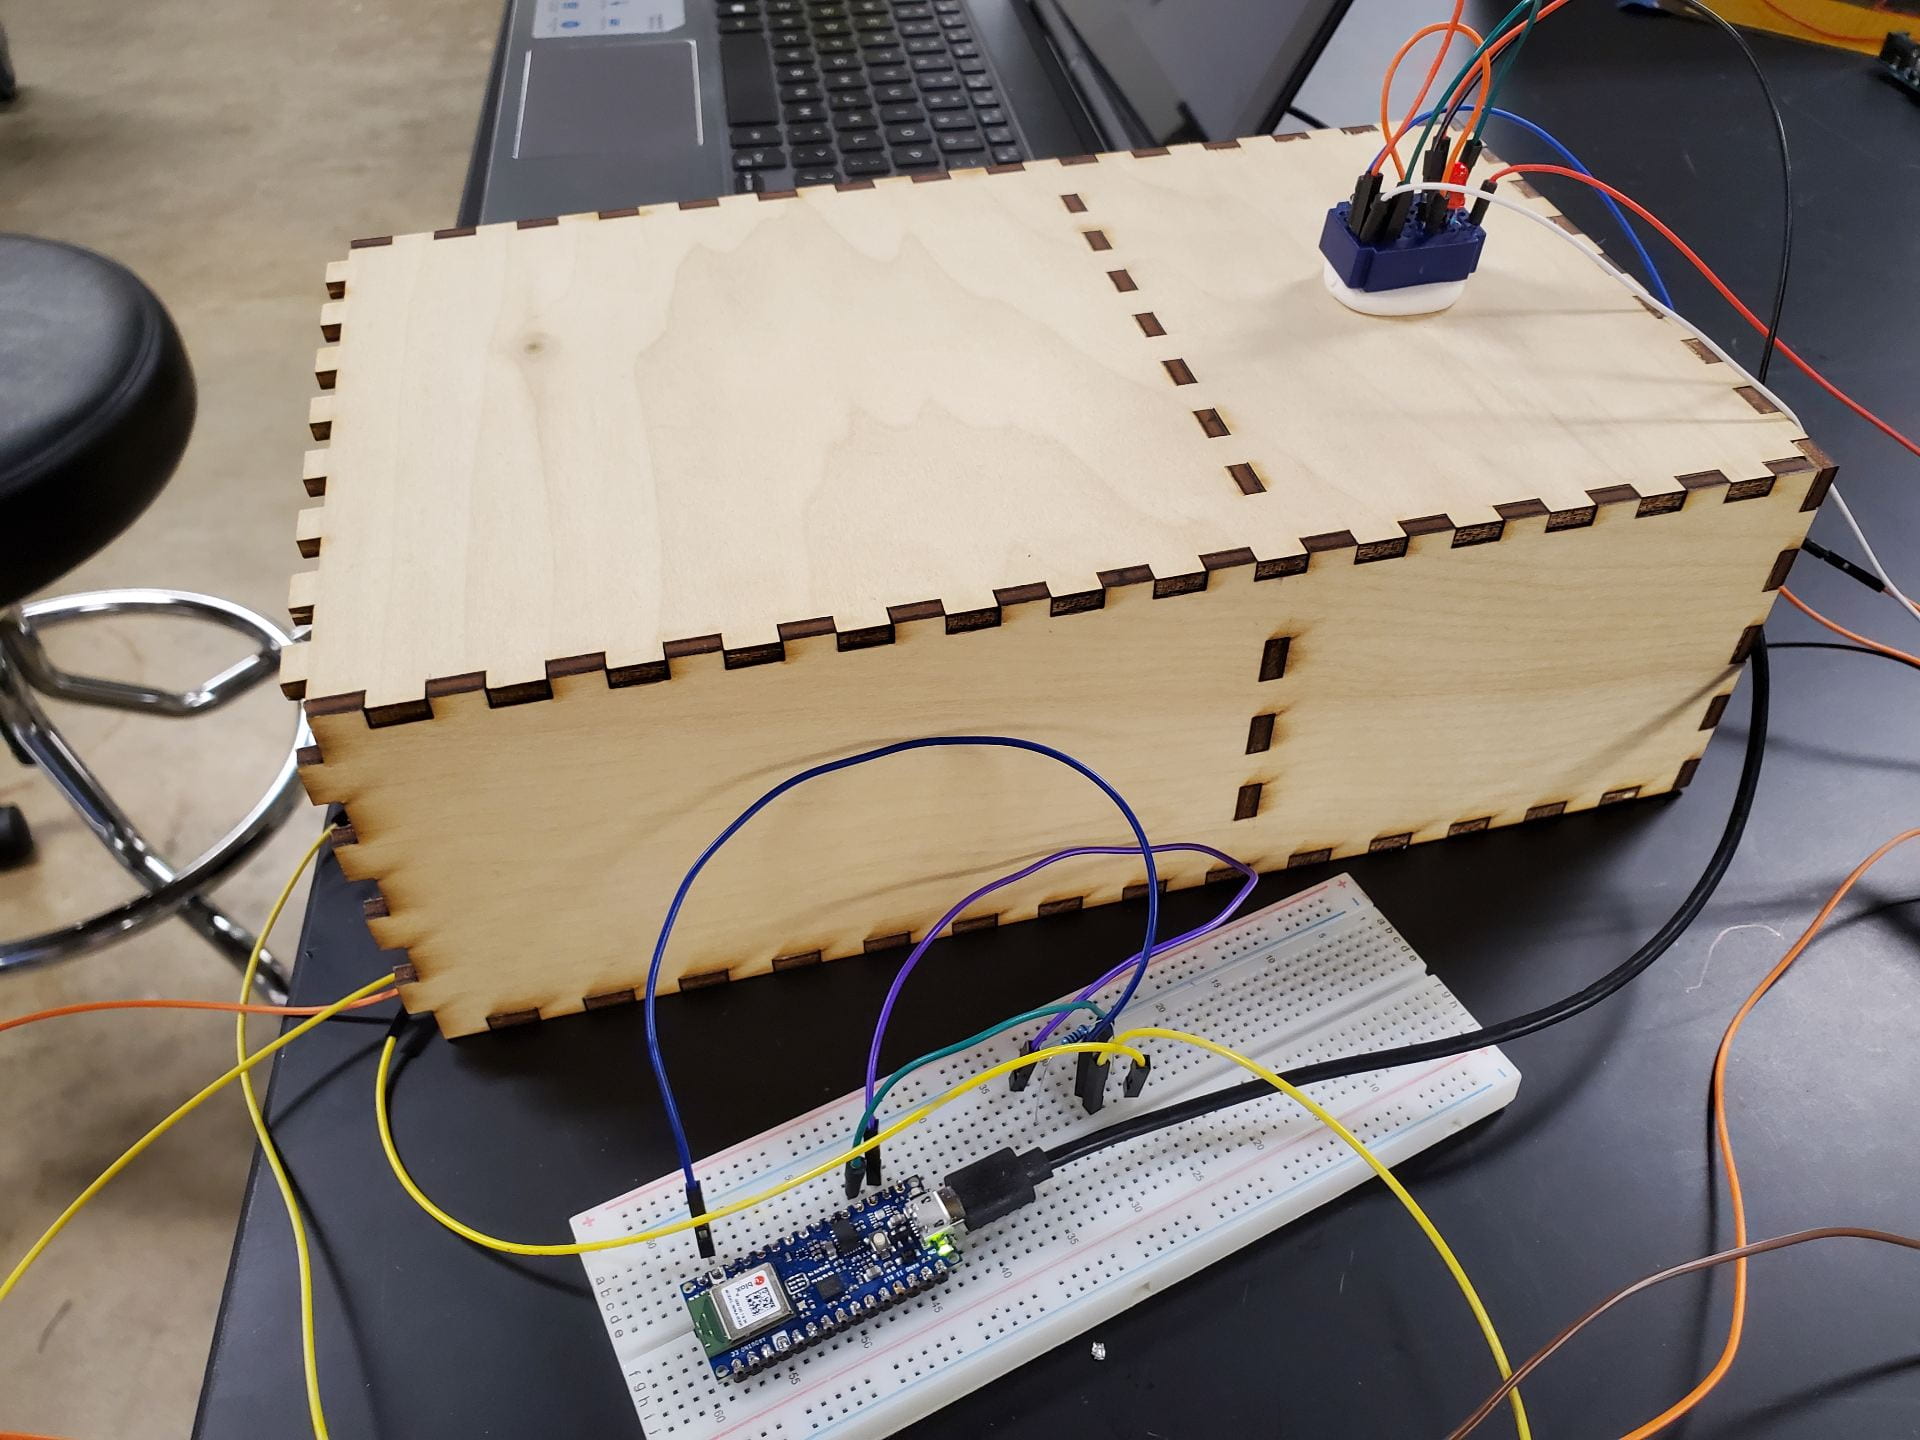
This week, our team shifted our design plan. Instead of using a thermos, lunchbox, or other pre-made container as our heating chamber, we decided to build our own.
This is the first prototype of our two-chambered device. The smaller section (front) is the heating chamber, and has insulation and a reflective surface to avoid heat loss. The thermistor and heating pad wires go through a small hole in the divider into the larger electronics chamber (back) which is not warm. We settled on this concept because it seemed like the easiest to make open-source as well as the most customizable.
Making this prototype was an interesting process. First, we needed a proof-of-concept to see if something like this could even retain enough heat to be effective, so we ran a few tests with a box made entirely of the purple insulation above. It worked, so we moved on to the laser-cut version. We started with an online box maker and then proceeded to make additional adjustments to add in the barrier in the middle. Then we cut it and began gluing the box together. Only the front and back panels are removable ‘doors’–– in the end the top was glued on as well. When we first opened up the wood glue, there was a sort of film of dried, yellowing glue blocking the tube, which was dubbed the ‘glue monster’.
After the prototype was fully assembled, it became clear that the electronics chamber is much larger than necessary. In our next iteration, we plan to make a ‘stacked’ design, where the electronics chamber is on top of the heating chamber and shares the same small footprint, so it is much smaller and can more intuitively be put in a bag right side up.
Electronics
The other major project I worked on this week was continuing to troubleshoot the circuit. My teammate Kenton and I began disassembling the various components––thermistor, n-channel transistor (the component that tells the heating pad when to turn on and off), heating pad, display screen, and Arduino––to get them to work separately before combining it all together again. A very helpful electrical engineering professor explained how the transistor works to us, and we realized that the wiring had previously been wrong. The heating pad worked in our tests and so did the Arduino. We had two primary ‘Eureka’ moments; one with the thermistor, which after careful calibration now reads temperatures accurately, and another with the screen, which we were able to activate for the first time on Wednesday:
Unfortunately, we were only able to get it to work with an Arduino Uno (shown above), and not with our Arduino Nano, which is much smaller, despite using all of the same pins and the same code. According to online help forums, many people have had this problem in the past, and we were unable to find any satisfactory solutions. We have a meeting with the senior design team member who previously figured out how to make it work with the Nano on Monday, but if that does not work we may need to switch to using the Uno.
Next week, we plan to reassemble the entire circuit, and if everything works properly, graduate to soldering it on a perfboard, since soldered circuits are much more permanent and no one can accidentally knock out a wire. Once this and the new box is done, our first high-fidelity prototype will be complete and we can move on to the testing and evaluating stage of the engineering design process.
What a week! These past couple of days have been exciting to say the least.
Dr. Wettergreen came in for a prototyping workshop and gave us great feedback on our designs and helped point us in the next direction. He brought up the true lesson of the spaghetti noodle-marshmallow challenge (a design challenge presented to ENGI 120 students) which was to build under existing constraints. For the marshmallow challenge, the trick is to test continuously throughout the building process by placing the marshmallow on the structure while creating the tower instead of waiting until the very end to test it. For us, this meant that our next iteration would need to be designed to be submersible in saline.
The day after, we had midsummer presentations where we gave an overview of our work for the past three weeks. Afterwards, we had a client interview where we had the chance to update them on our progress and our prototypes. The THI team liked the track system for the vertical motion but also directed us away from the rocking motion and suggested trying to create a motion of a sine wave inside a sine wave, with each sine wave representing the individual heart and lung motions of different amplitudes and frequencies, with the coupled waves representing the cumulative motion.
We had our work cut out for us and launched into adjusting our prototypes.
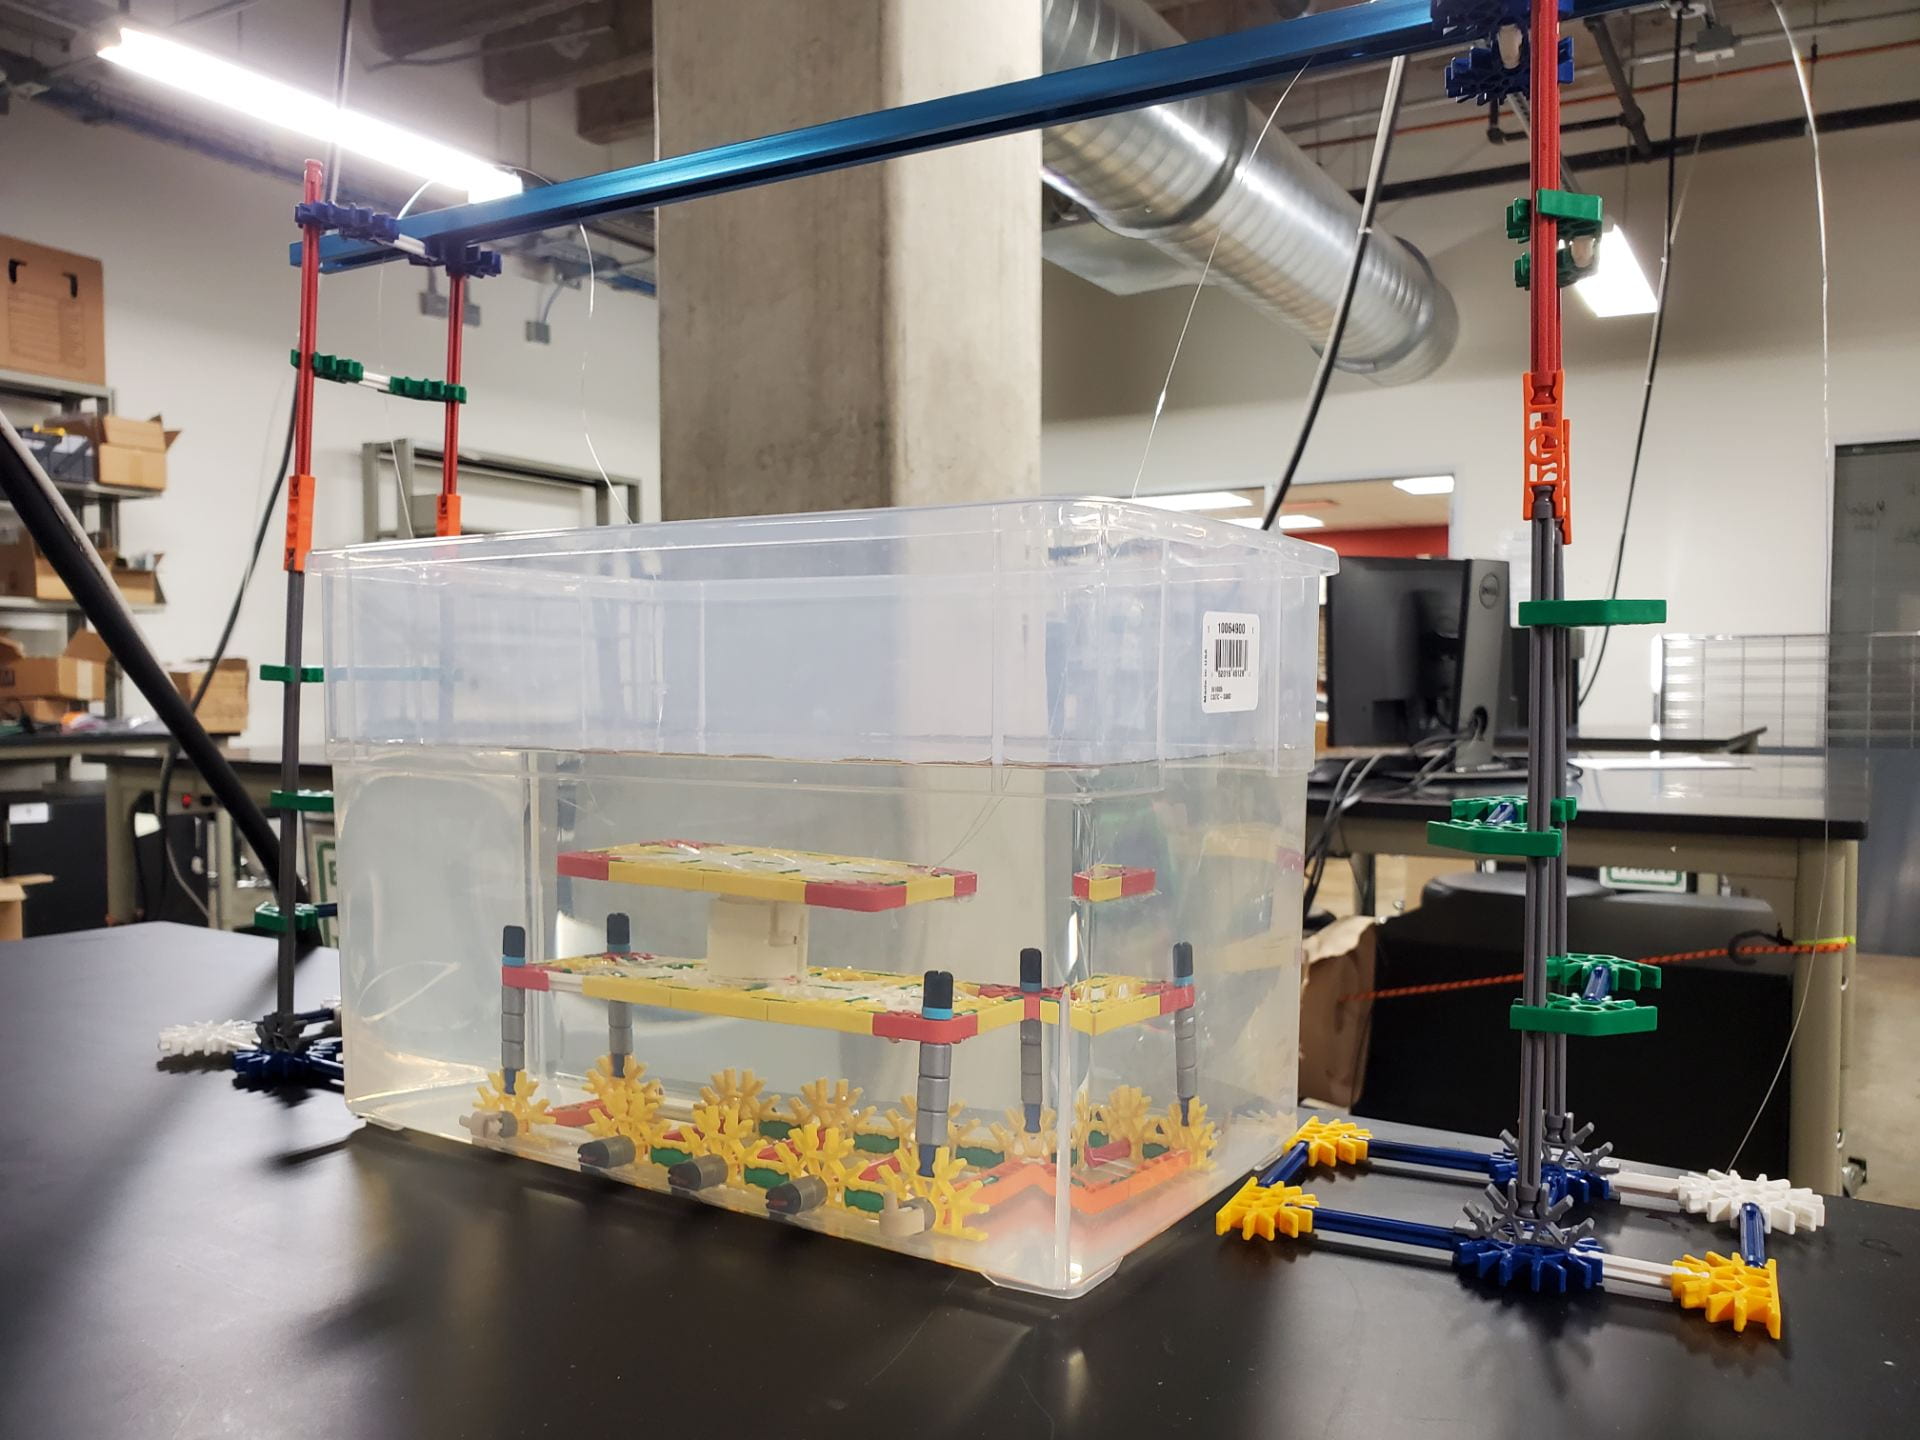
Following Dr. Wettergreen’s advice, I constructed a functional prototype out of K’nex and PVC that could be pulled up and down under saline. Kaitlyn continued to work on the Arduino code while Sam and Chris explored another possible direction using solenoid coils.
The next steps I took involved a lot of CAD in SolidWorks. I had no experience with Solidworks or any CAD software (excluding a Fusion 360 workshop presented by Magdah) so I definitely struggled initially. With plenty of help, I became more familiar with the software and by the end of Monday, I was able to 3D print a track system involving concentric tubes with a notch to prevent the “inner tube” from slipping out. Thankfully, there were no huge problems with the design, but I did have to adjust some heights and dimensions. Additionally, I had to take one of THI’s existing designs and adjust it so the entire setup would not exceed the maximum height.
Like I said, it was a jam packed week.
Thankfully, we also had some time for relaxation and even a special surprise by the TA’s – catered lunch from Tiger Noodle House <3. Some of the interns also got together for a fun game of sand volleyball which was a blast.
I realized late last week that our team was moving too fast for me to remember all of our activities each day. Especially when reflecting on a full week of progress, it was incredibly difficult to pinpoint what we had been doing on Monday. This week, I started keeping a daily log of meetings, workshops, team discussions, and prototyping progress. Looking back upon Monday, I am stunned by how much we’ve learned this week. Even though one week will always be just 10,080 minutes, it feels like Team Petri-FI was able to stretch this week to its maximum.
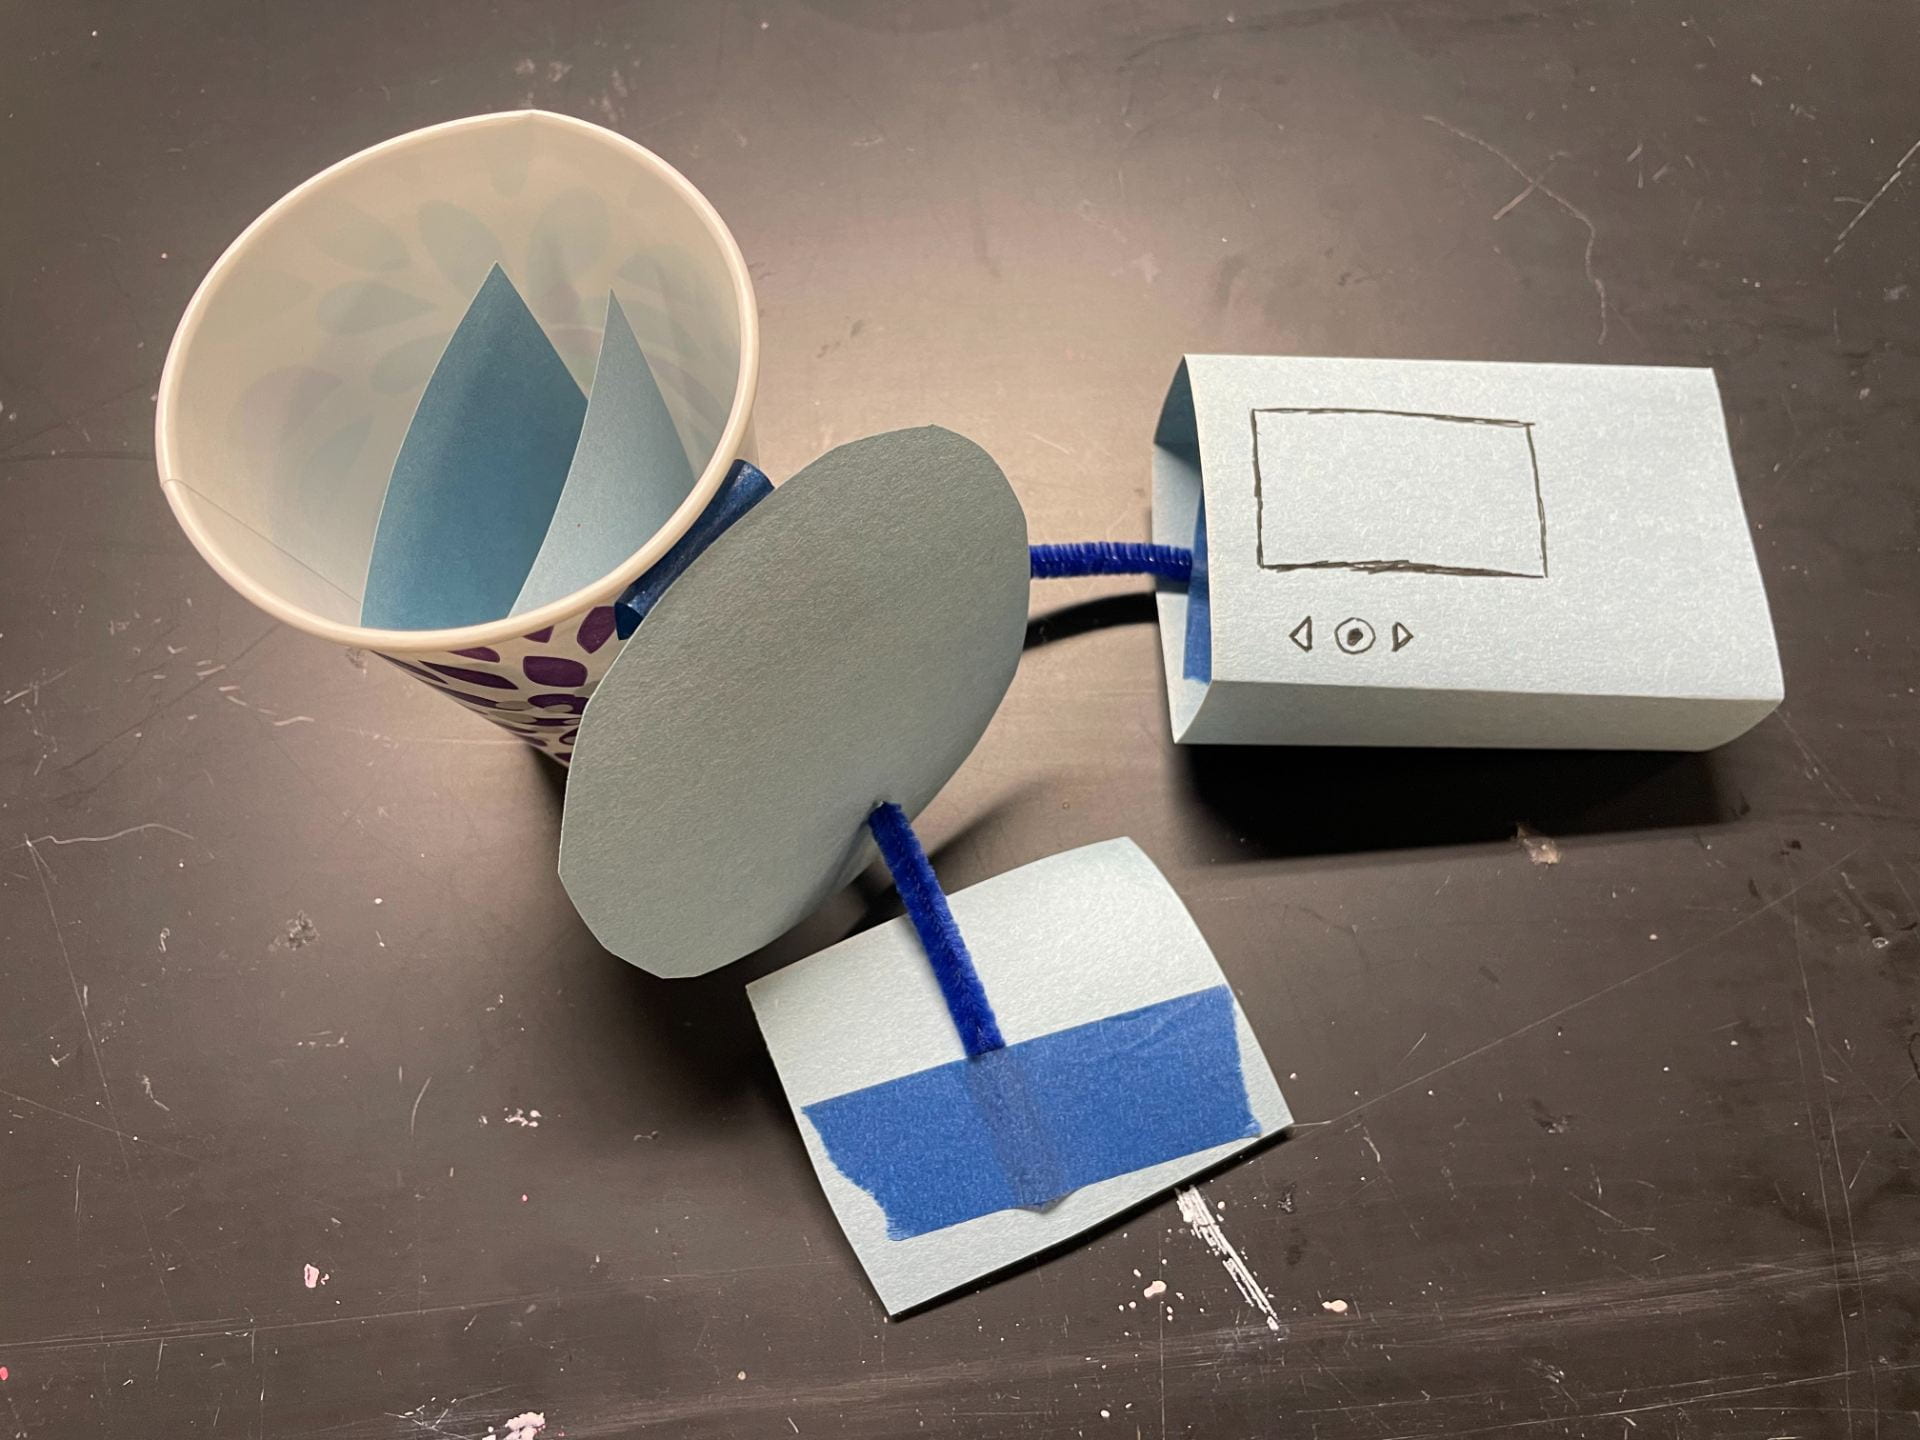
My low-fidelity thermos prototype of a thermos incubator. The paper cup (left) represents the heating chamber, while the paper box (right) represents the control unit and user interface.
We walked through the OEDK doors on Monday with many question marks. We still had not completed the breadboard circuit for our incubator, so we had yet to test the code or the heating pads. So far, we had formed a stronghold of bright ideas, but we hadn’t the time to apply them to our project. We were nearly satisfied with our heat transfer spreadsheet, which could now help us to estimate how small of a battery we may be able to use. However, we were still itching to bring our ideas to the physical realm and begin to test our theories against reality. Monday’s engineering design workshop was about low-fidelity prototyping. The principle behind creating prototypes out of the cheapest materials possible is that it helps teams to develop a tactile feel for their product. It can also aid communication within a team about physical specifications that would otherwise only be visible on a piece of paper or a laptop screen. Our team made a few prototypes out of construction paper, pipe cleaners, and aluminum foil, which helped us to learn about the overall form of our incubator designs and the connections that would need to be present in the final design. Also, after having worked mostly with the previous Minicubator and Moonrat prototypes, this was an excuse to make some designs of our own.
Troubleshooting
I have made another realization this week. Sometimes, progress doesn’t look like a new “thing” or a problem solved, or an item checked off of a list. Sometimes, progress exists only in your head. When approaching the problem of electronics, I had a mental hill to climb. On Tuesday, we spent some time with a faculty member, who walked through the previous team’s entire circuit and answered our electronics questions wonderfully. I came out of that conference room with an entirely new understanding of circuits, breadboards, and Arduinos. Before, I had seen our messy breadboard and thought to myself, “I never, ever, want to touch that thing.” However, I quickly found myself fascinated by all of the branching connections. There was a simplicity, or a new frame of mind, that I had just unlocked, as though my brain had received a firmware update.
I spent much of the week applying my new knowledge of breadboarding and circuits. After the initial build of the breadboard, we noticed a few obvious mistakes, and many more that were much less clear. On a similar front, I worked hard to read through the previous team’s code in order to better understand how the Arduino interacted with the overall circuit. I added dozens of comments within the code to function as a bread trail for our team, so that all of us would eventually be able to understand the programming behind our device. Even as we made steady progress through team discussions and delegated work, much of our effort was spent on mental progress, the kind that doesn’t show itself as a physical prototype or symbol of advancement. However, we made an exciting leap on Friday afternoon.
Zero to Sixty
On Friday, we had our mid-summer presentation, in which we detailed our team’s progress in the engineering design process. It was wonderful to see the progress of the other internship teams as well, especially after only three weeks had passed. Our team had to shift focus as we prepared to share our discoveries with everyone else. When the show was done, we had a fresh perspective on the overall project goals, and we apparently had a great dose of inspiration after lunch.
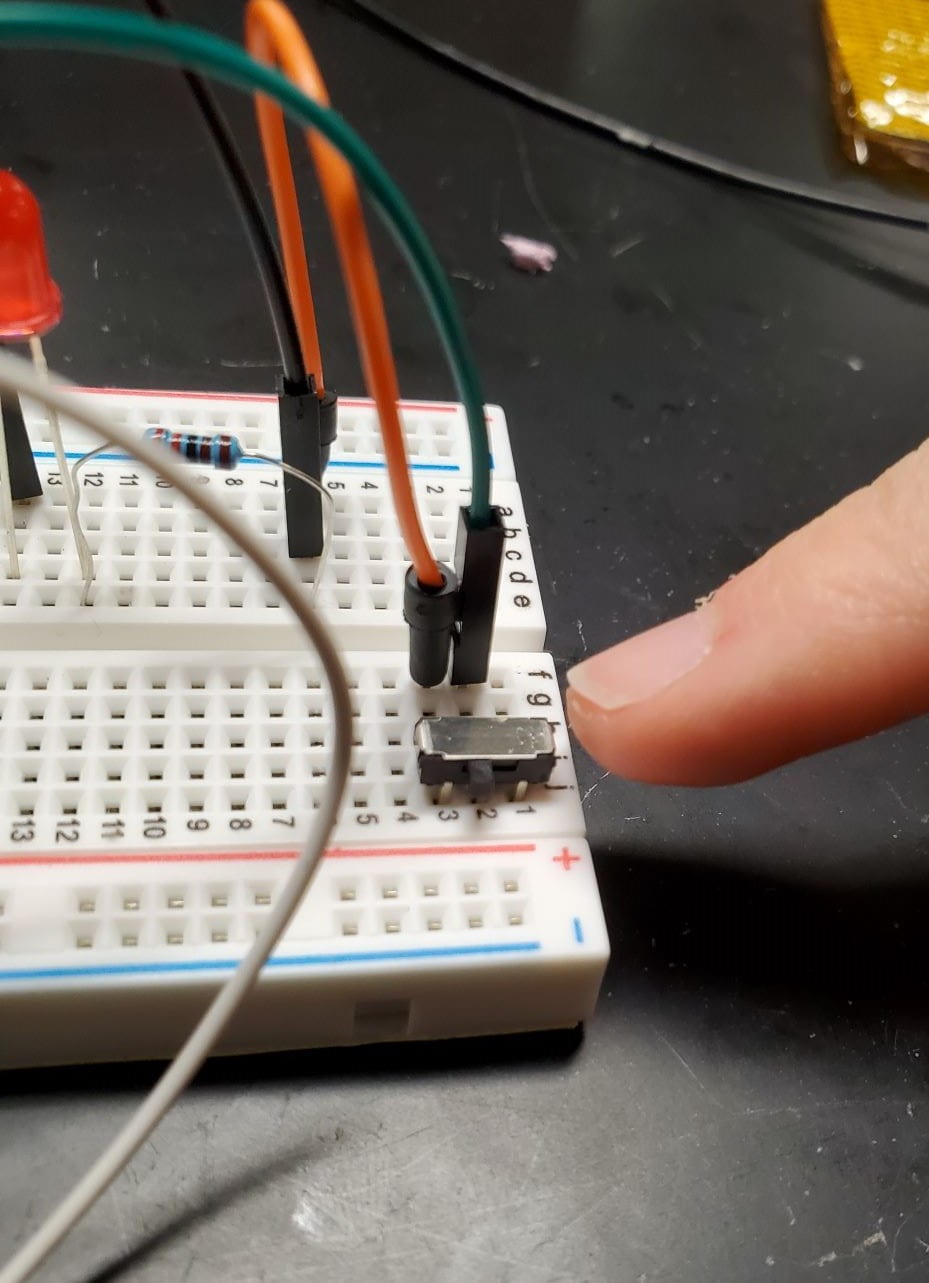
Our adorable little switch. It’s a shame we haven’t given him a name. Finger for scale.
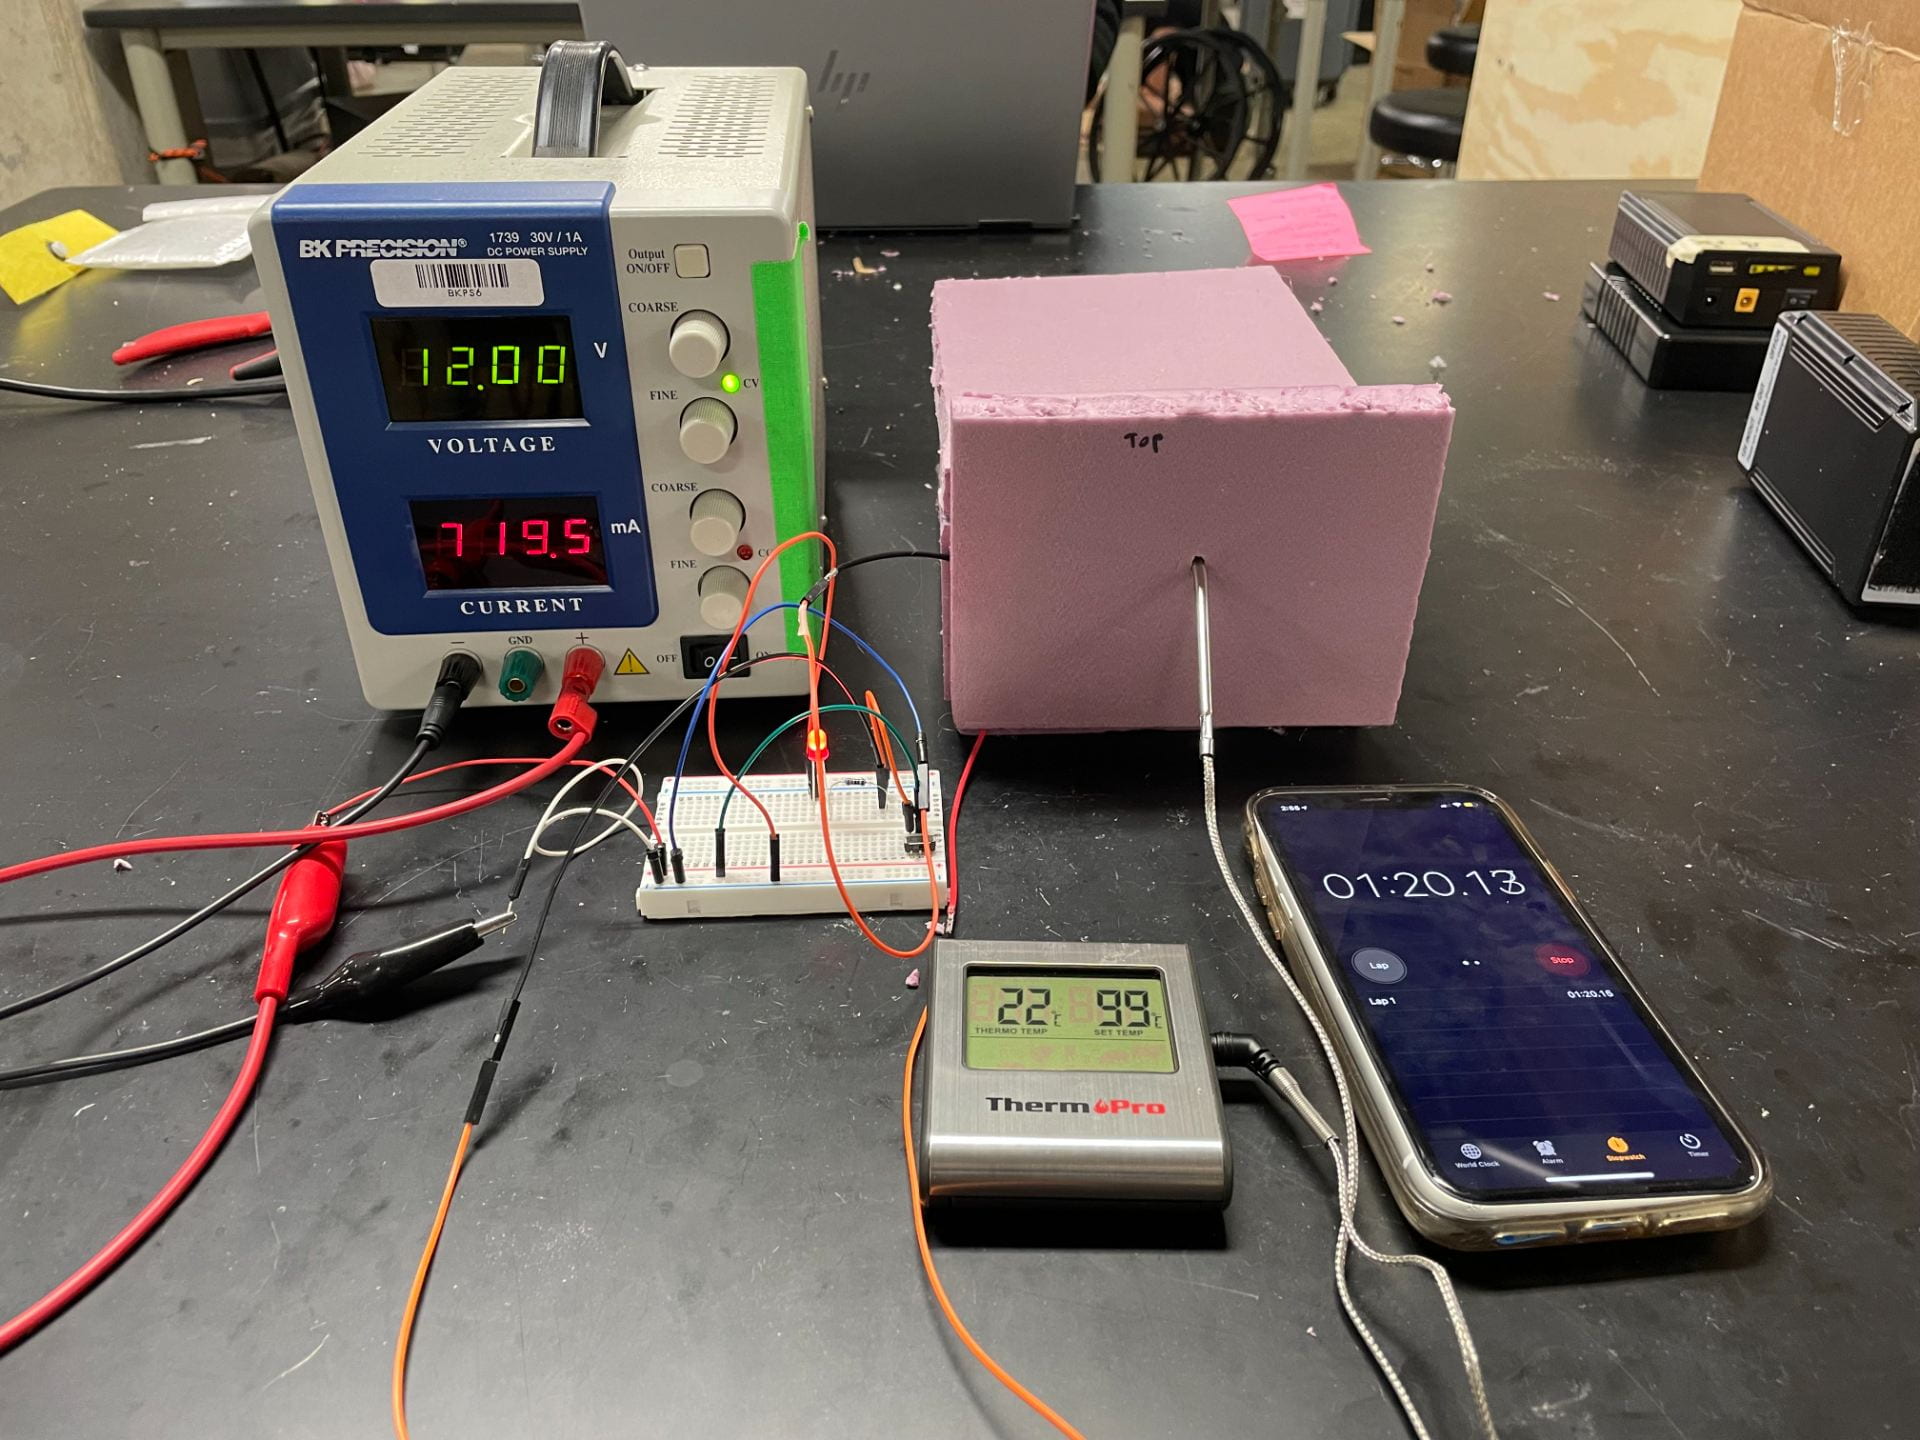
We knew the importance of testing our heating chamber prototype idea as a proof-of-concept for an incubator. We already had a power supply, excessive breadboarding materials, and pink insulation foamboard; we had a vision, and we pursued it passionately. We epoxied together an insulated box, complete with a heating pad and a stand for our Petrifilms (the biological material that we would be incubating). Then, with my entirely newfound breadboarding skills, I created my first (and most adorable) circuit, equipped with an LED and a tiny little switch to turn on the heating pad inside.
We turned it on. The instant the thermometer ticked up from twenty to twenty-one degrees Celsius, our team was beaming with delight. We’d done it! We’d conquered thermodynamics to heat our little chamber! Afterwards, it took no time at all to heat to the desired thirty-five degrees, and we collected data from a few heating and cooling cycles, until we were satisfied with our findings. Then came the main attraction.
Our testing setup. The power supply (left) is connected to our breadboard, which allows us to heat the pink incubation chamber (right).
“How about we turn it on, and just don’t turn it off, to see how hot it gets?”
“Sure.”
Now, believe me, this test was very useful for us. It would give us a theoretical limit on our chamber’s heat loss at high temperature differences, as well as informing us of any potential safety concerns in the case of malfunction. So we waited, and waited. And waited some more. Fifty. I was betting it wouldn’t get over sixty degrees, because our chamber was clearly not airtight. Fifty-five. Now, it was ticking up about a degree every five to ten minutes. Fifty-nine. Sixty! In fact, our chamber was losing so much air that we could smell something not quite right from the inside. Sixty-four. Sixty-five. Now, it was going about fifteen minutes between jumps. We swore that if it made it any further, we would stop it. Sixty-six! That’s sixty-six degrees Celsius (one hundred and fifty-one degrees Fahrenheit), or about as hot as a parked car during the Houston summer. We opened the chamber tentatively, not sure what we would find.
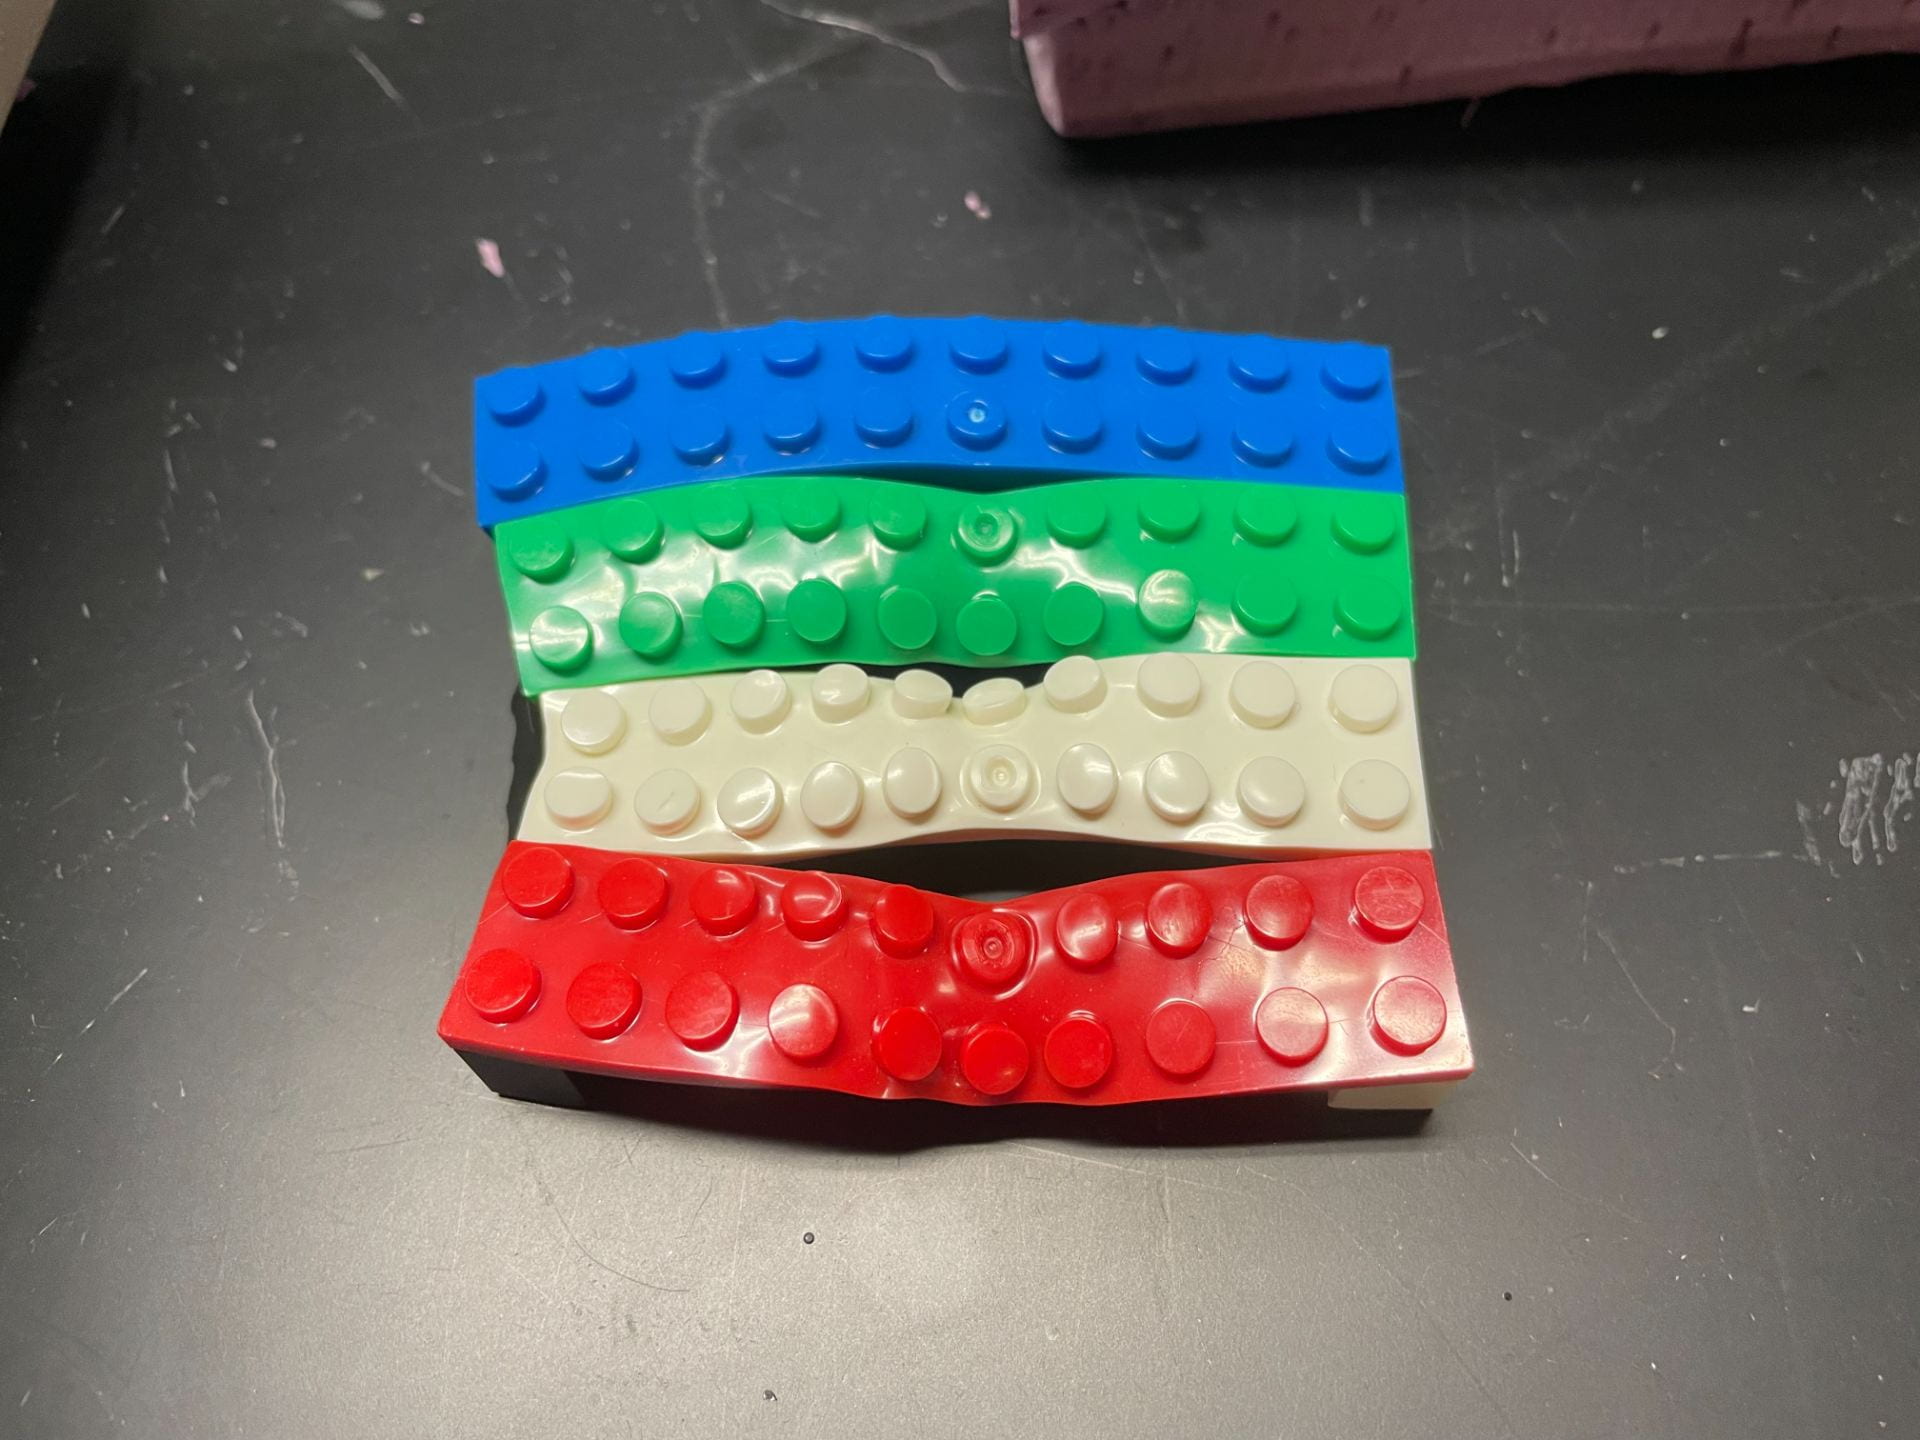
Melted Legos. The heating pad was stronger than we thought.
As I extracted our Lego Petrifilm stand, I immediately understood the smell coming from the inside. The heating pads, and their warm air, had melted the Legos! After extracting the heating pads themselves, I could see the crater of melted foam underneath. We understood the potential safety concerns, but we also knew that we would never expect temperatures anywhere near 60 degrees Celsius. While some teams would have been horrified by the power of their own device, we cheered for the success of our heating chamber. If melting Legos was this easy, we could surely keep a device at thirty-five degrees Celsius! Overall, Friday’s testing session concluded a long week, but we were energized by the tangible progress we had made.
I can’t believe another week has passed! Though a short week with the long weekend, week 4 has proven to be the week where Team PetriFI has made some of the largest breakthroughs in the internship thus far. While we are still trudging through debugging our breadboard, we have fortunately been able to meet with multiple mentors to work through the issues. In the meantime, we rigged together a circuit to begin testing the efficacy of our planned heating chamber.
Pictured below is the first iteration of the chamber: a box made of polyiso cut with an exacto knife and fashioned together/made air-leak proof with epoxy. The inside surfaces are covered in foil to aid in insulation and the heating pad simply rests on top of a bed of insulation so it’s not touching the foil (if it touches the foil, a lot of energy will be lost heating the foil before the air temperature increases significantly). We aptly called this low-fidelity prototype “Pink Box.” The most exciting part of this prototype for me though, was the tiny tiny tiny switch we used in the circuit to power on and off the heating pads. Upon some preliminary testing, we found this box to be quite robust in its incubation ability: even with a sizeable hole for the thermometer, it reached body temperature in under 8 minutes, at which point we switched off the heating pad, and then held that temperature (with the heating pads off) for 19 minutes. This was enough of a proof of concept for us to move forward with a more higher fidelity prototype.
For the next iteration of this prototype, we decided to laser cut a plywood chassis for the polyiso insulation attached to a chassis for the electronics and circuit. This time, we cut the polyiso with a saw more neatly and assembled it into the plywood box along with foil. Shown below is the setup:
:
We were lucky enough to be able to start testing this iteration with our knowledgeable client’s circuit system which automatically calculated the duty cycle (the percentage of time the heating pad needs to be on to hold body temperature over the course of a period of time). We found this iteration to have a duty cycle of under 10%. This is very exciting as it likely means our battery will be sufficient to incubate samples for 48 hours. To confirm this result, however, my teammates Kenton and Sara decided to run a variable voltage test where they hook the circuit up the a benchtop power supply and adjust the voltage until the chamber equilibrates to body temperature. The voltage at which this is reached can be used to create a ratio with the voltage of the battery we plan to use and then this data can be used to extrapolate how long our power source will last.
Next week, we will be meeting with our client and mentor, Dr. Read, to create a “code skeleton” to implement the user interface we designed. Because none of the team members have much experience coding Arduinos, I am not expecting to have a complete user interface coded by the end of the internship, but hopefully we will set up a framework for a new team to be able to quickly finish and iterate upon our design. To facilitate this, I also started a technical memo in the form of a journal article which will include all design files, code files, and assembly instructions along with motivations and justifications of the choices our team made.