Remember the story we started with? Well, that little girl… She’s all grown up now.
She’s taking a hold of the chances that come her way. She’s being careless enough to make the most of whatever she has. Even if she knows it’ll wear it out.
Because she knows things are worth more when they hold memories. Of the good, the bad, the stressful, the blissful, the frustrating and the rewarding. It’s because she knows that’s the essence of living. Actually living the moment.
And she has a few things to say to anyone like her. Enjoy the present moment. It’ll disappear one day and you’ll miss it. Make as many experiences as possible. Just like situations, your life’s moving towards an end too.
Say what you feel, feel what you say. The moment is very short and it’s fleeting.
What would it be worth to live a life with risks, without challenges, without ups and downs?
Enjoy it. Make that a priority.
If you can’t tell already, then surprise! The little girl, she’s me. And I’m glad I stayed true to my resolve and made the most of this trip.
Congratulations to everyone on this edition of the SEED program for a project well-done and especially to team FlowMetrics (Brandon Bravo, Deepak Narayan, Olorundarasimi Akojede, Motunrayo Sanyaolu) for being amazing teammates.
Special thanks to our supervisors Dr Holmes, Prof. Nodskov and Dr Moninuola, Rice360 and Chevron.
It was an absolute pleasure spending the summer with you Rice360 2024 SEED interns. Till we meet again.
And remember there’s so much out there that’s yet to be created. You’re amazing, go and build the awesome future you dream of.
Just as Jim Whitehurst, former president of IBM and Red Hat, said at the Rice Engineering Leader Speaker Series on September 12, 2023:
“Great innovation typically is NOT from a single individual. It’s getting people together to build off of each other’s ideas.”
Nothing beats working alongside others, especially those from diverse backgrounds. Each person brings unique experiences, ideas, and perspectives, all contributing towards the same goal. What one person has, another might lack, and vice versa.
Teamwork is the heartbeat of my journey at the OEDK. It goes beyond mere collaboration; it is the driving force behind innovation, creativity, and success.
Team GelTech at The Galleria to ice skate. (L:R – Alinafe, Rohan, Precious, Brooke.)
I work in a team of four: Alinafe Lipenga, a Biomedical Engineering student from Malawi; Rohan Palavali, an Indian pre-med (Biosciences) student from Rice University; Brooke Barksdale, an American Mechanical Engineering student from Rice University; and me, a Petroleum Engineering student from Nigeria.
Such a diverse team, right?!
Notable engineering innovations such as the Internet, space travel, advancements in renewable energy and medical devices among many others testify to what can be accomplished when people from different fields or disciplines come together to achieve a common goal. Teamwork is evidently at the core of achieving these remarkable feats.
This diversity fuels our creativity and allows us to approach our project from multiple angles.
Over the past few weeks, we’ve tackled several challenging aspects of our project. One notable achievement was when we successfully iterated our prototype to enhance its functionality based on feedback. Each team member’s unique perspective was crucial in refining our approach and overcoming technical hurdles.
Working in this team has taught me the power of effective communication and the importance of being open to different viewpoints. I have learned to pay attention, leverage each other’s strengths, and remain resilient in the face of setbacks.
I can’t agree any less with Helen Keller that: “Alone we can do so little, but together we can achieve so much.”
Indeed,
“Team work makes the dream work!” – John Maxwell
It’s been a blissful ride and I’m super excited about the potential impact of our findings and prototype in revolutionizing healthcare in the world!
Towards the very end of the internship, our team made a lot of progress, and overall we are quite happy with our results. Our final prototype is complete and functional, despite lacking two features we wanted to implement: the new user interface and the perfboard.
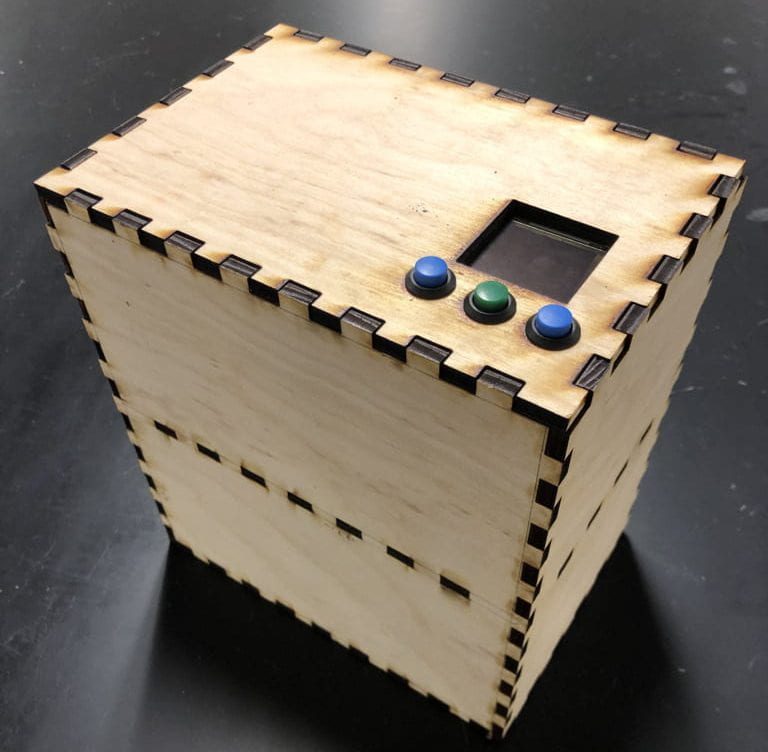
The Incubator
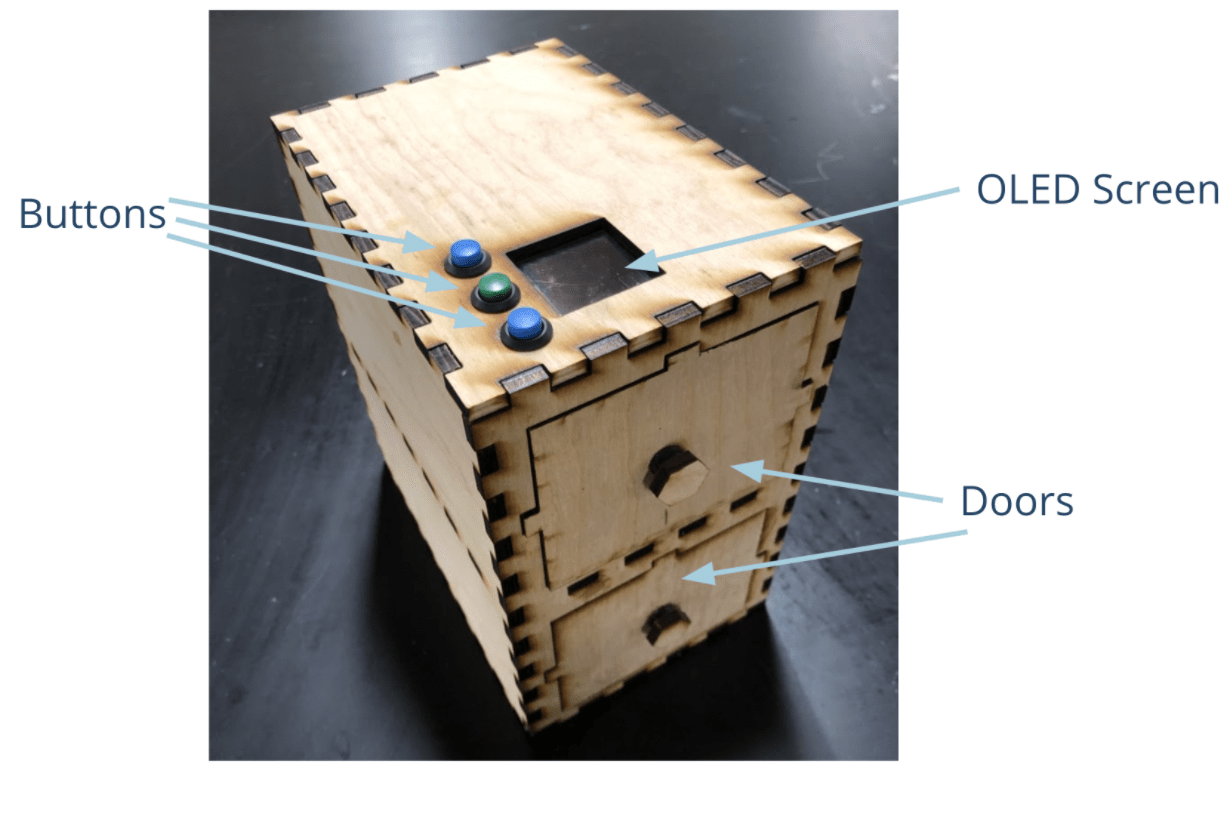
Here is what the final box looks like when the doors to both chambers are open:
Here is what the final box looks like when the doors are closed, which is what the user would see and interact with during incubation:
The buttons are up, select, and down, from top to bottom.
As you can see in the first of the images above, the perfboard is complete. Unfortunately, there were still a few issues with it not working properly, most likely because somewhere a wire is shorting part of the circuit. Because of this, we re-assembled the prototype with a breadboard to make sure all of the functionality was there before presenting it and performing more tests.
This version worked fully! We handed it off to our client. Instead of continuing down the road of building a perfboard, we suggested that our client use a schematic based off of the current, functioning breadboard to order a custom PCB, since PCBs are much less prone to wires shorting out or breaking.
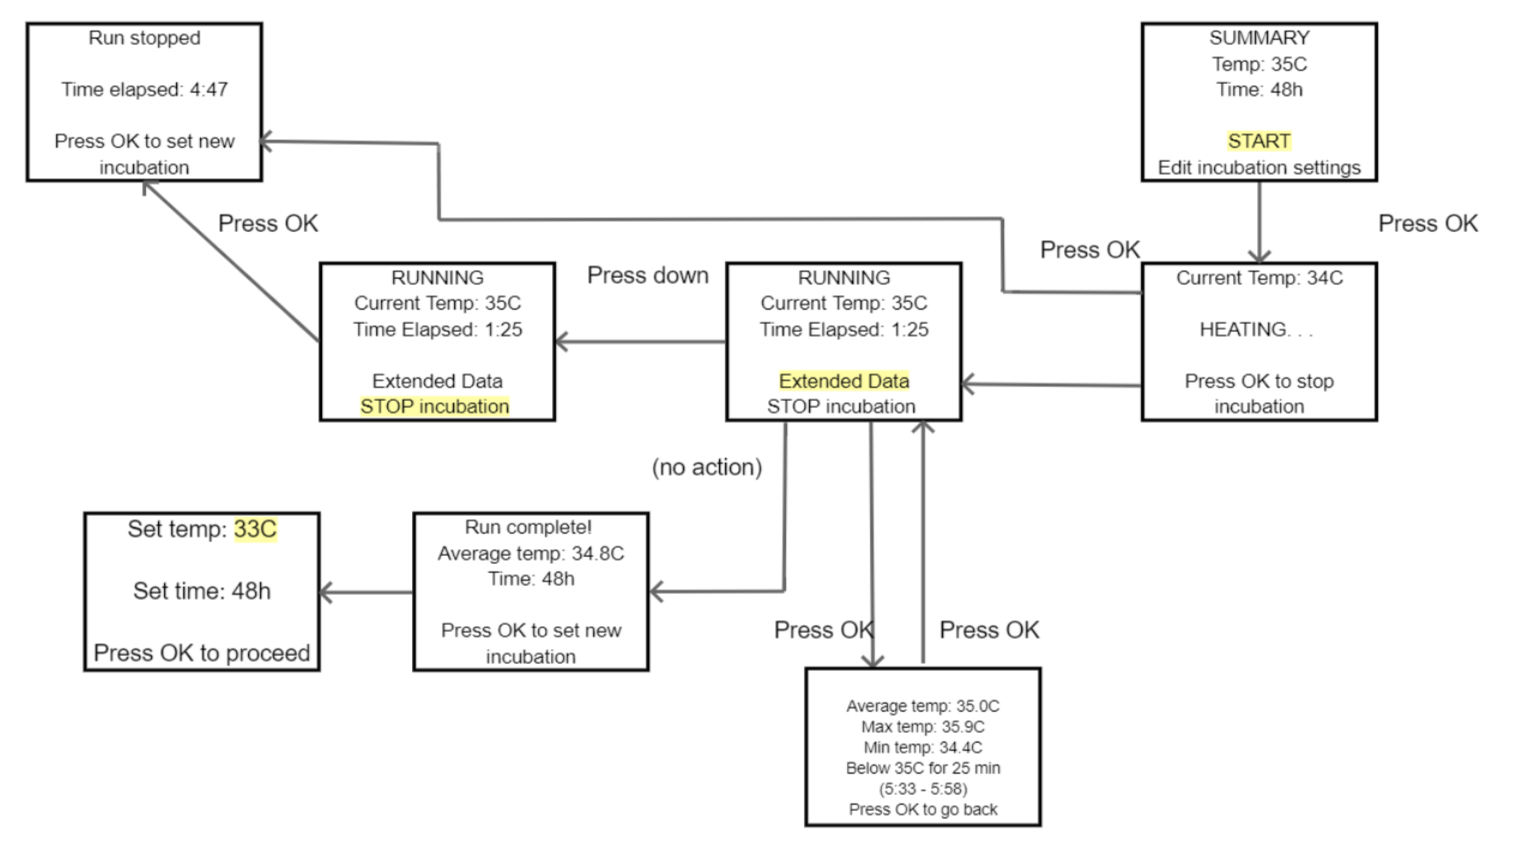
The User Interface
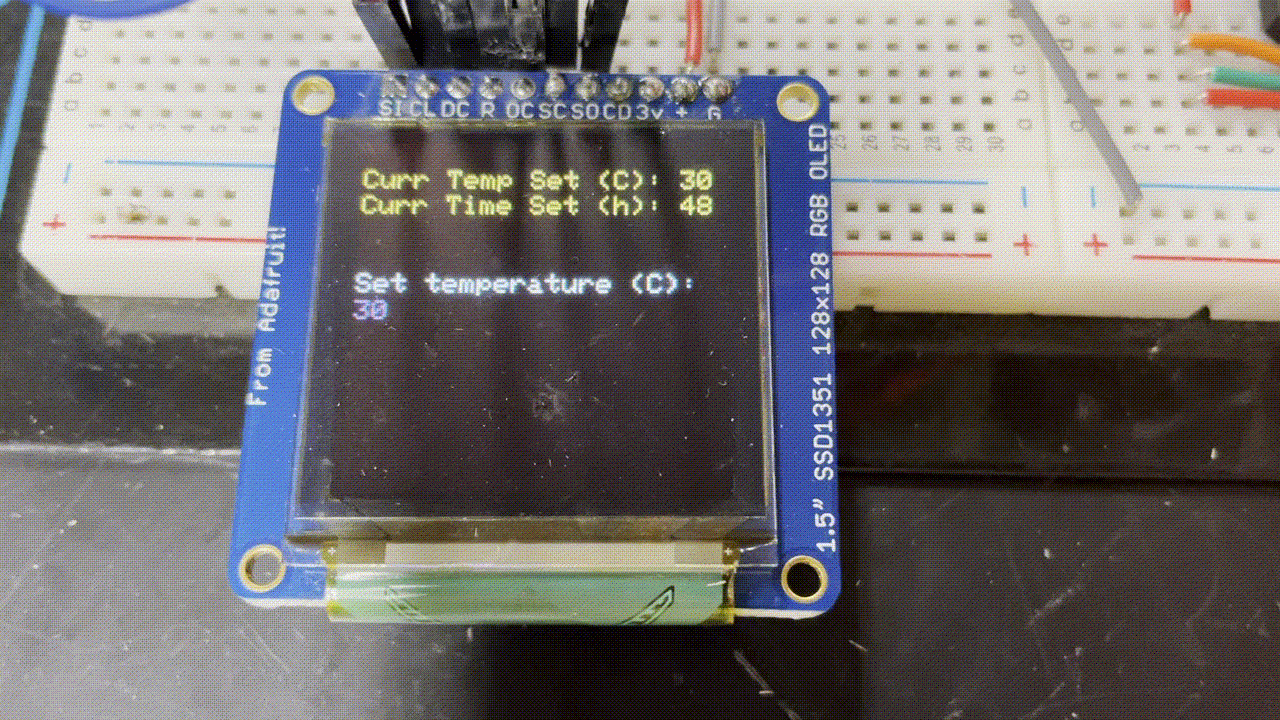
This is what our current user interface looks like. Using the up, down, and select buttons, the user can set the temperature and time of the incubation. Once the incubation starts, however, there is no further user interaction with the device.
We wanted to make a user interface that had more opportunities for interaction, especially during incubation. So we made a flow chart of all of the different screens and how to get to them. Below is the portion of the flow chart that details what our improved interface would look like during incubation. This is about 40% of the whole flow chart, which also includes setting up an incubation, what happens when temperature falls out of range, and options for after the incubation has ended.
Due to time constraints and coding difficulties, we never got to implement this plan. Our client is very excited about it though, and he said that he plans to program a UI based on our flow chart later this year.
Comparative Testing
To test wether our incubator works, we did a side-by-side test with two samples from the same water source (Buffalo Bayou), where we incubated one sample in our prototype and the other in a commercial incubator borrowed from a biology professor. Here are the results:
As you can see, there is no visible difference between the quality of our incubator and a lab incubator. This test was a resounding success! Because the water had so much bacteria, though, it would be impossible to get an accurate quantitative count of E. coli colonies. The indigo spots on the petrifilms above represent E. coli, but because there are so many, and especially because some of them are so large, it is clear that in many places several colonies merged together.
Overall I am proud of what my team accomplished this summer. As sorry as I am that the perfboard doesn’t work, we still managed to create a functional, effective device that is much more portable than anything currently on the market. I hope that eventually a future iteration of this project becomes available for water testing in low-resource settings.
*Content warning: My project deals with pediatric sexual assault. Please exercise self-care while reading.
When I was younger, I would often take care to only step inside the little boxes whenever I walked on tiled floors or floors with square patterns. This sometimes meant that I would restrict my stride just to stay inside the boxes.
When I took my first step into the OEDK on day one of this internship, it didn’t just feel like I was stepping on a line…it felt like I was stepping off the floor itself, into some sort of gap where I didn’t belong. I was apprehensive and nervous. Would I be the only non-engineer in an engineering design internship? Would I drag teammates down because I didn’t have much of a technical background? Should I have restricted my stride?
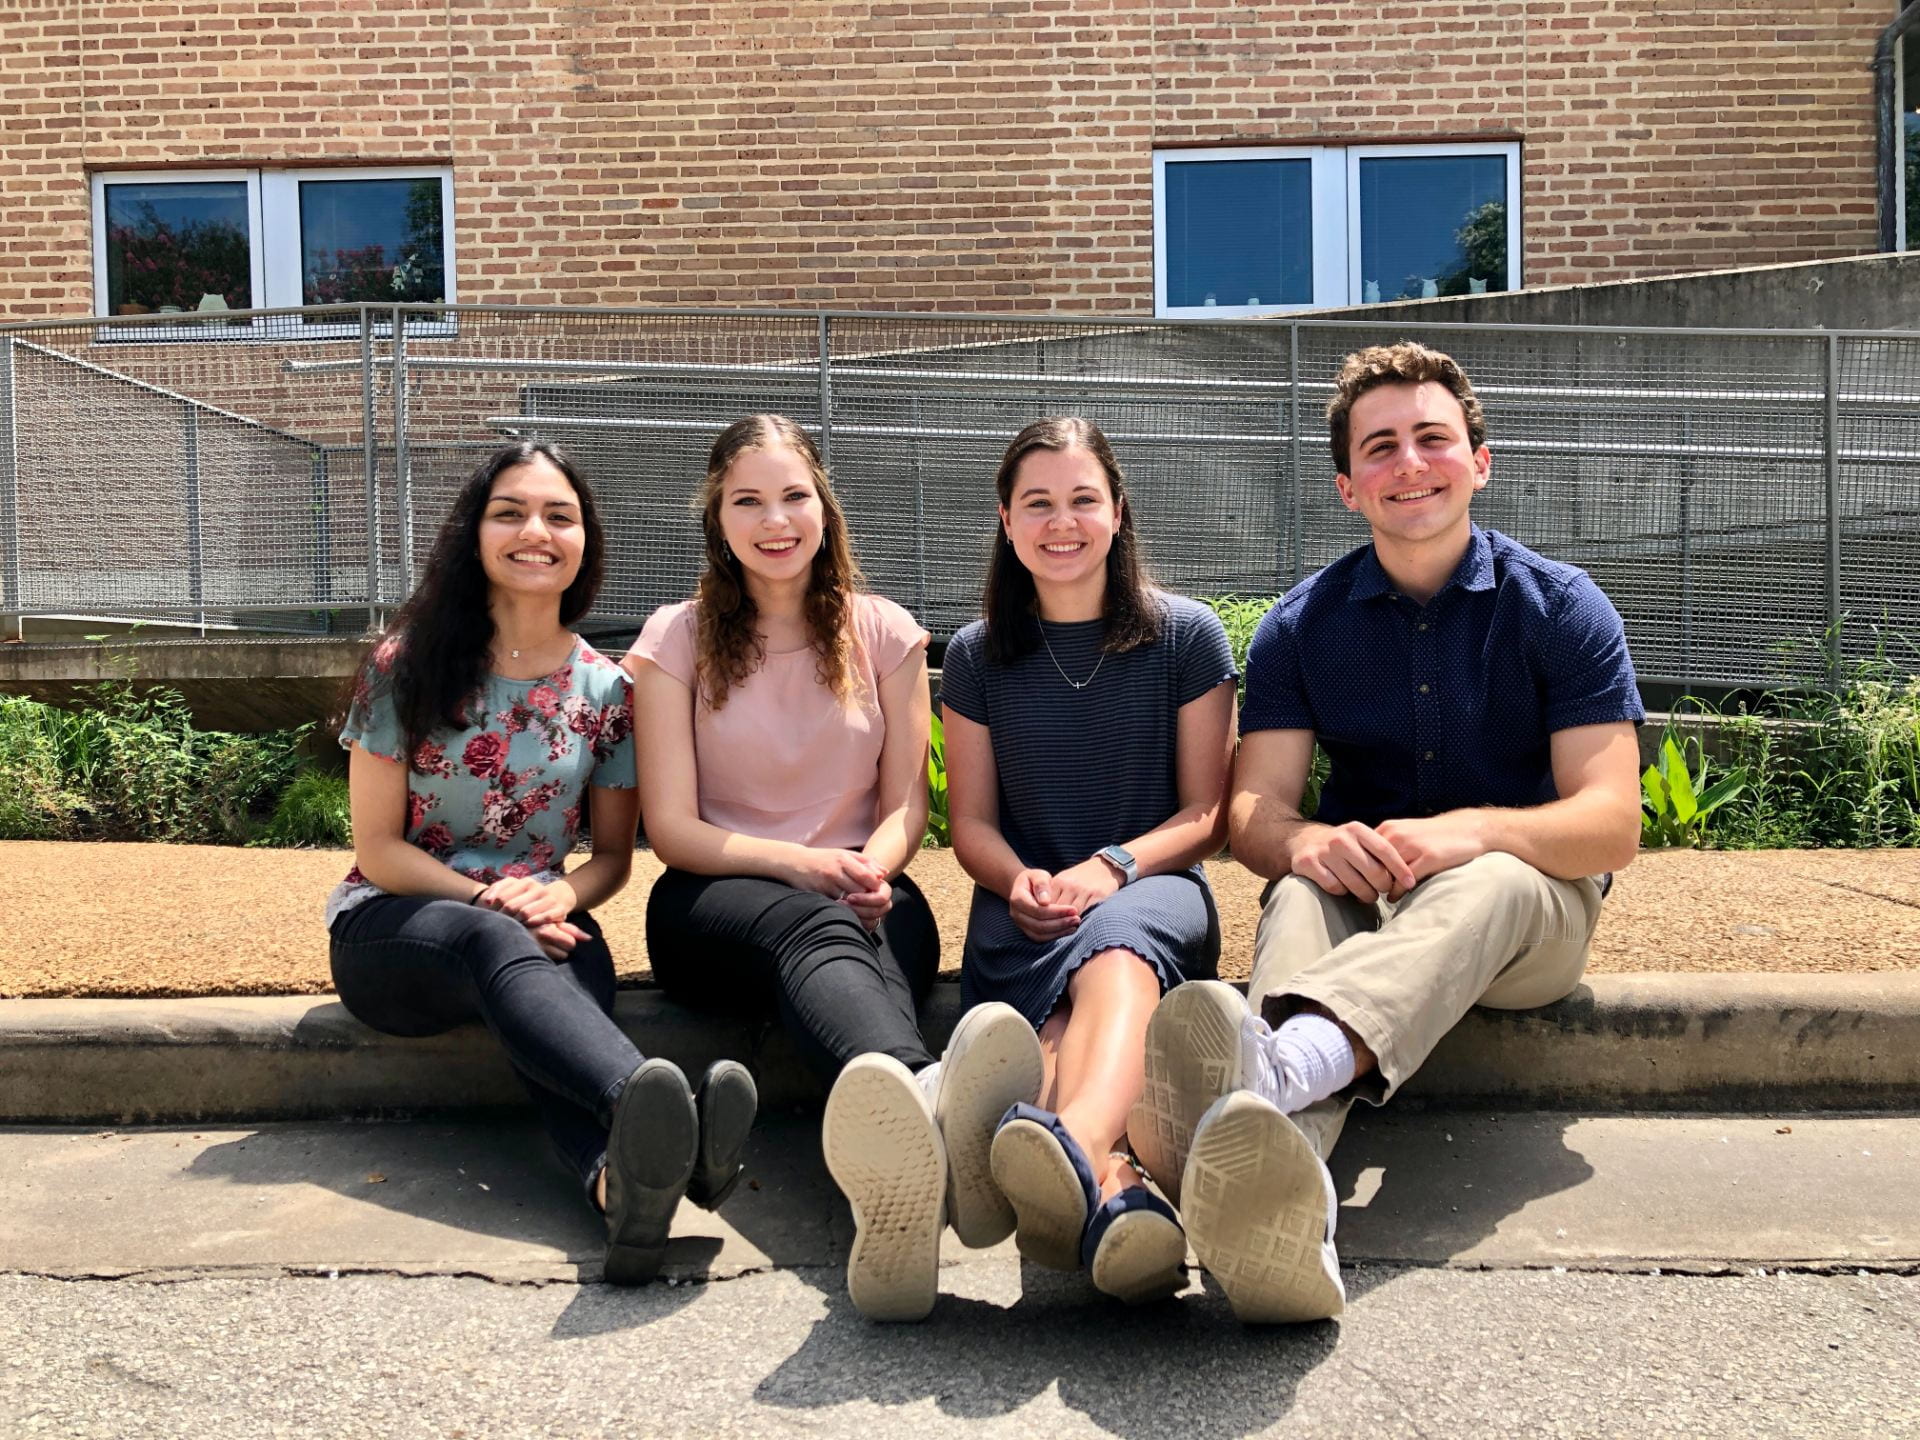
These past six weeks utterly transformed my perspective. Our internship cohort brought such an incredibly vast array of interests, skills, backgrounds, and life experiences, and I strongly believe that our diversity is in part what enabled us to accomplish as much as we did this summer. Team PIPER was no exception – Elise, Shannon, Alex, and I are such drastically different people, but we were brought together by our shared investment in our project (to the point that we’re now basically a family). I learned so much from each of them, whether it be technical skills or a stories about themselves as people.
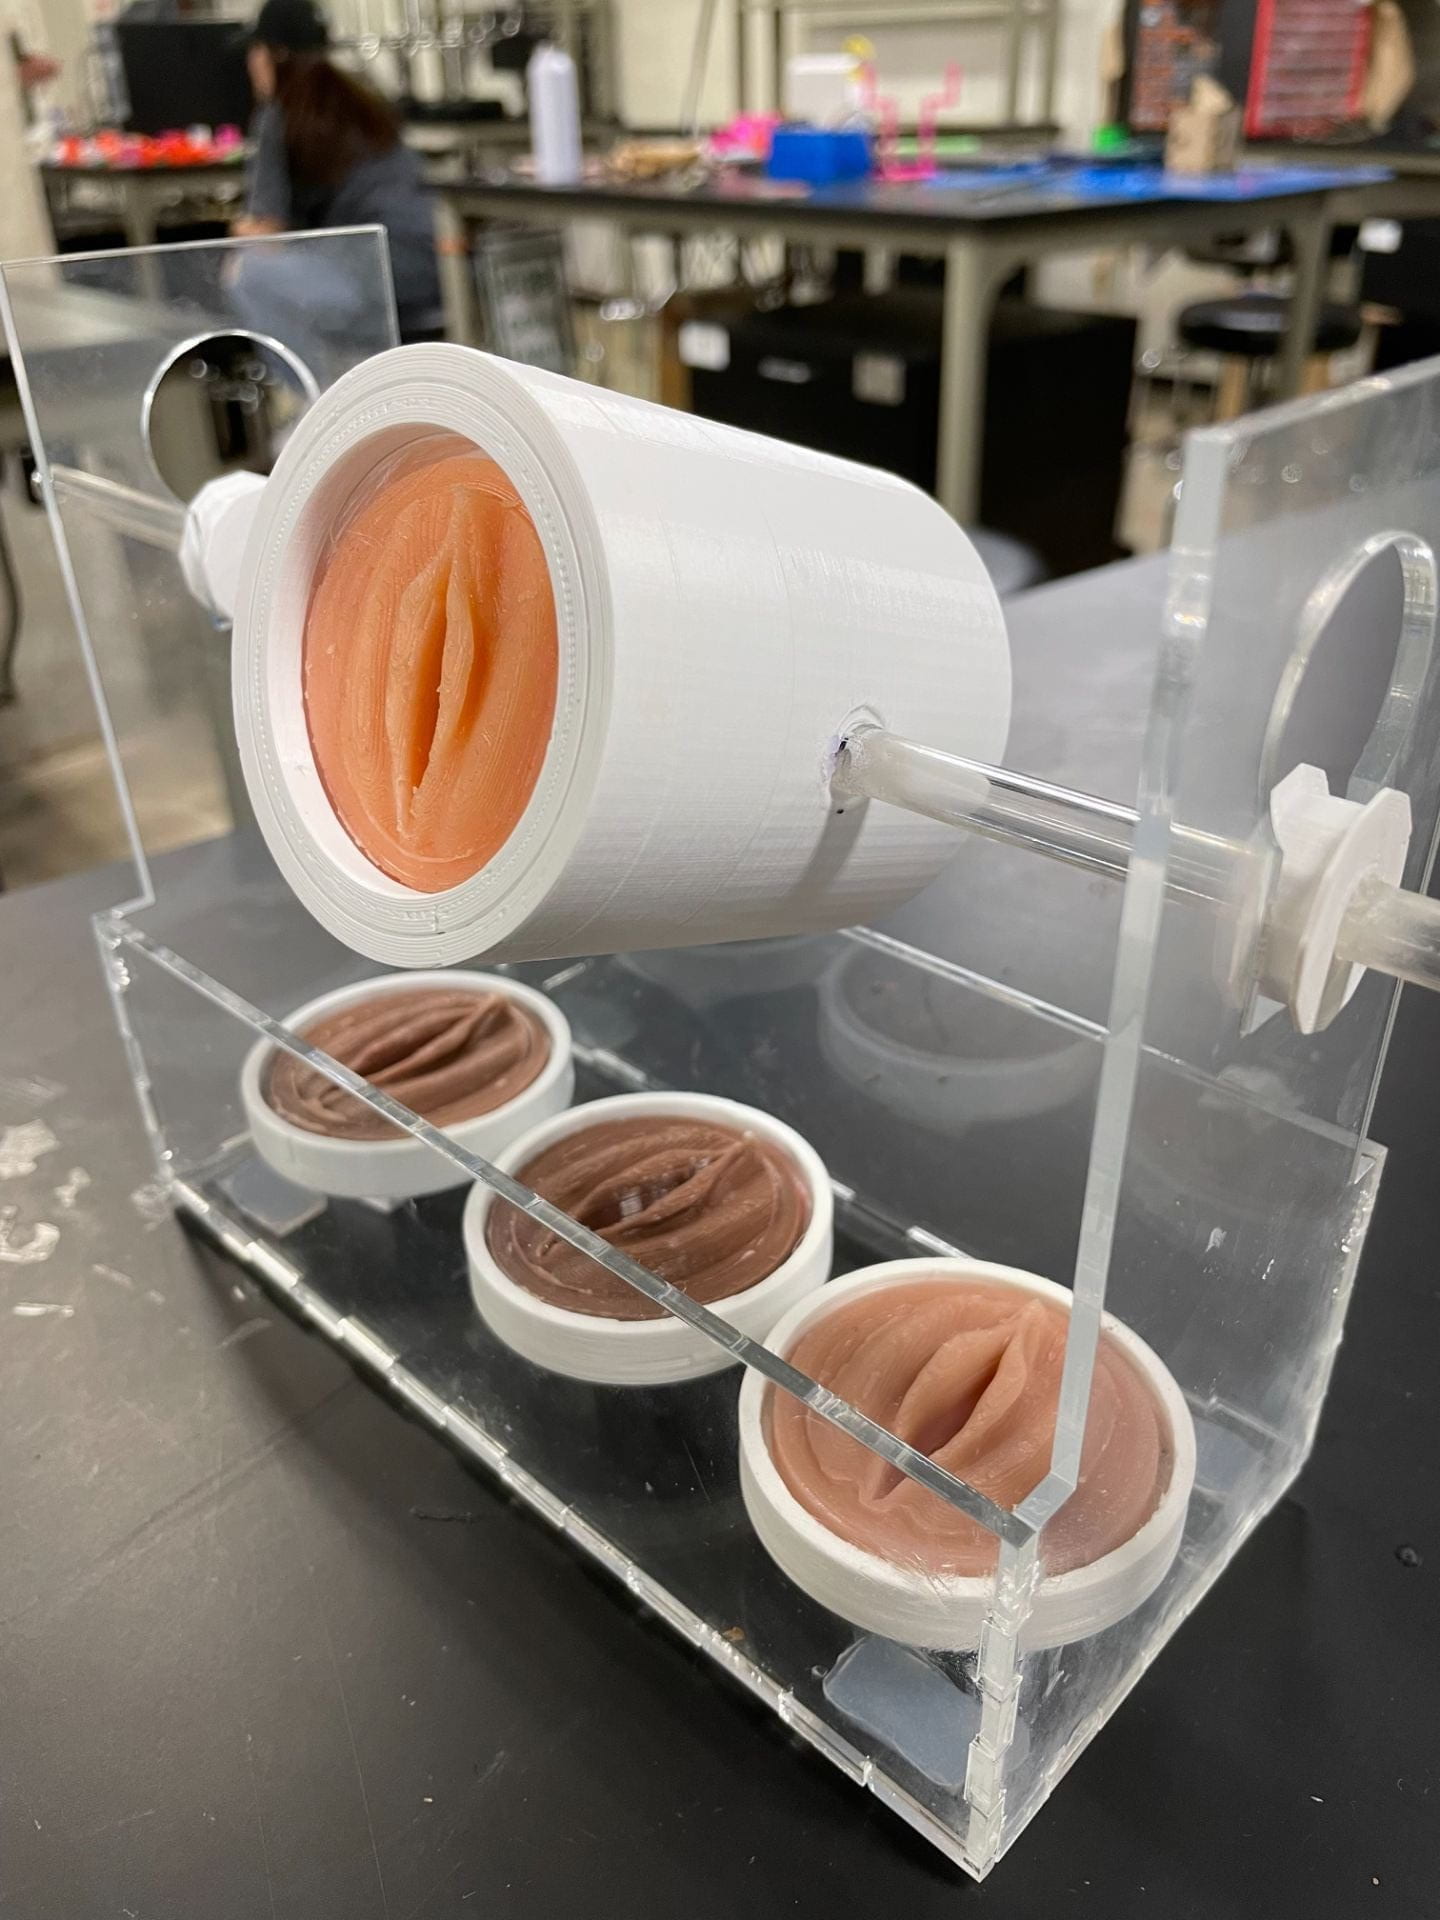
Last week’s final showcase was one of the most empowering experiences of this whole internship. I had gotten so used to listening to teams give small updates on their progress during our daily morning stand-up meetings that I had failed to realize the extent of what we had really done, and the impact of what we had done. Team PIPER had left our first client meeting at the beginning of the internship overwhelmed – how were we supposed to start a project completely from scratch, and produce a functional pediatric pelvic model in a little over a month? Seeing everyone’s presentations at the final showcase, I realized that the real beauty of the engineering design process, and of engineering solutions to health issues, is those small incremental steps of progress. It’s not about whether your steps are perfect, or placed comfortably. Instead, it’s about the little daily updates, the little suggestions you get along the way from your teammates, your colleagues, your clients, the little tweaks and iterations on tiny components of your design. It’s the stepping stones that eventually bridge the gap you’re trying to address. And this realization allowed me to understand that progress isn’t defined by producing a perfect solution – it’s defined by whether you laid the next stepping stone, or made the existing path a little more even, a little smoother.
PIPER prototype from showcase!
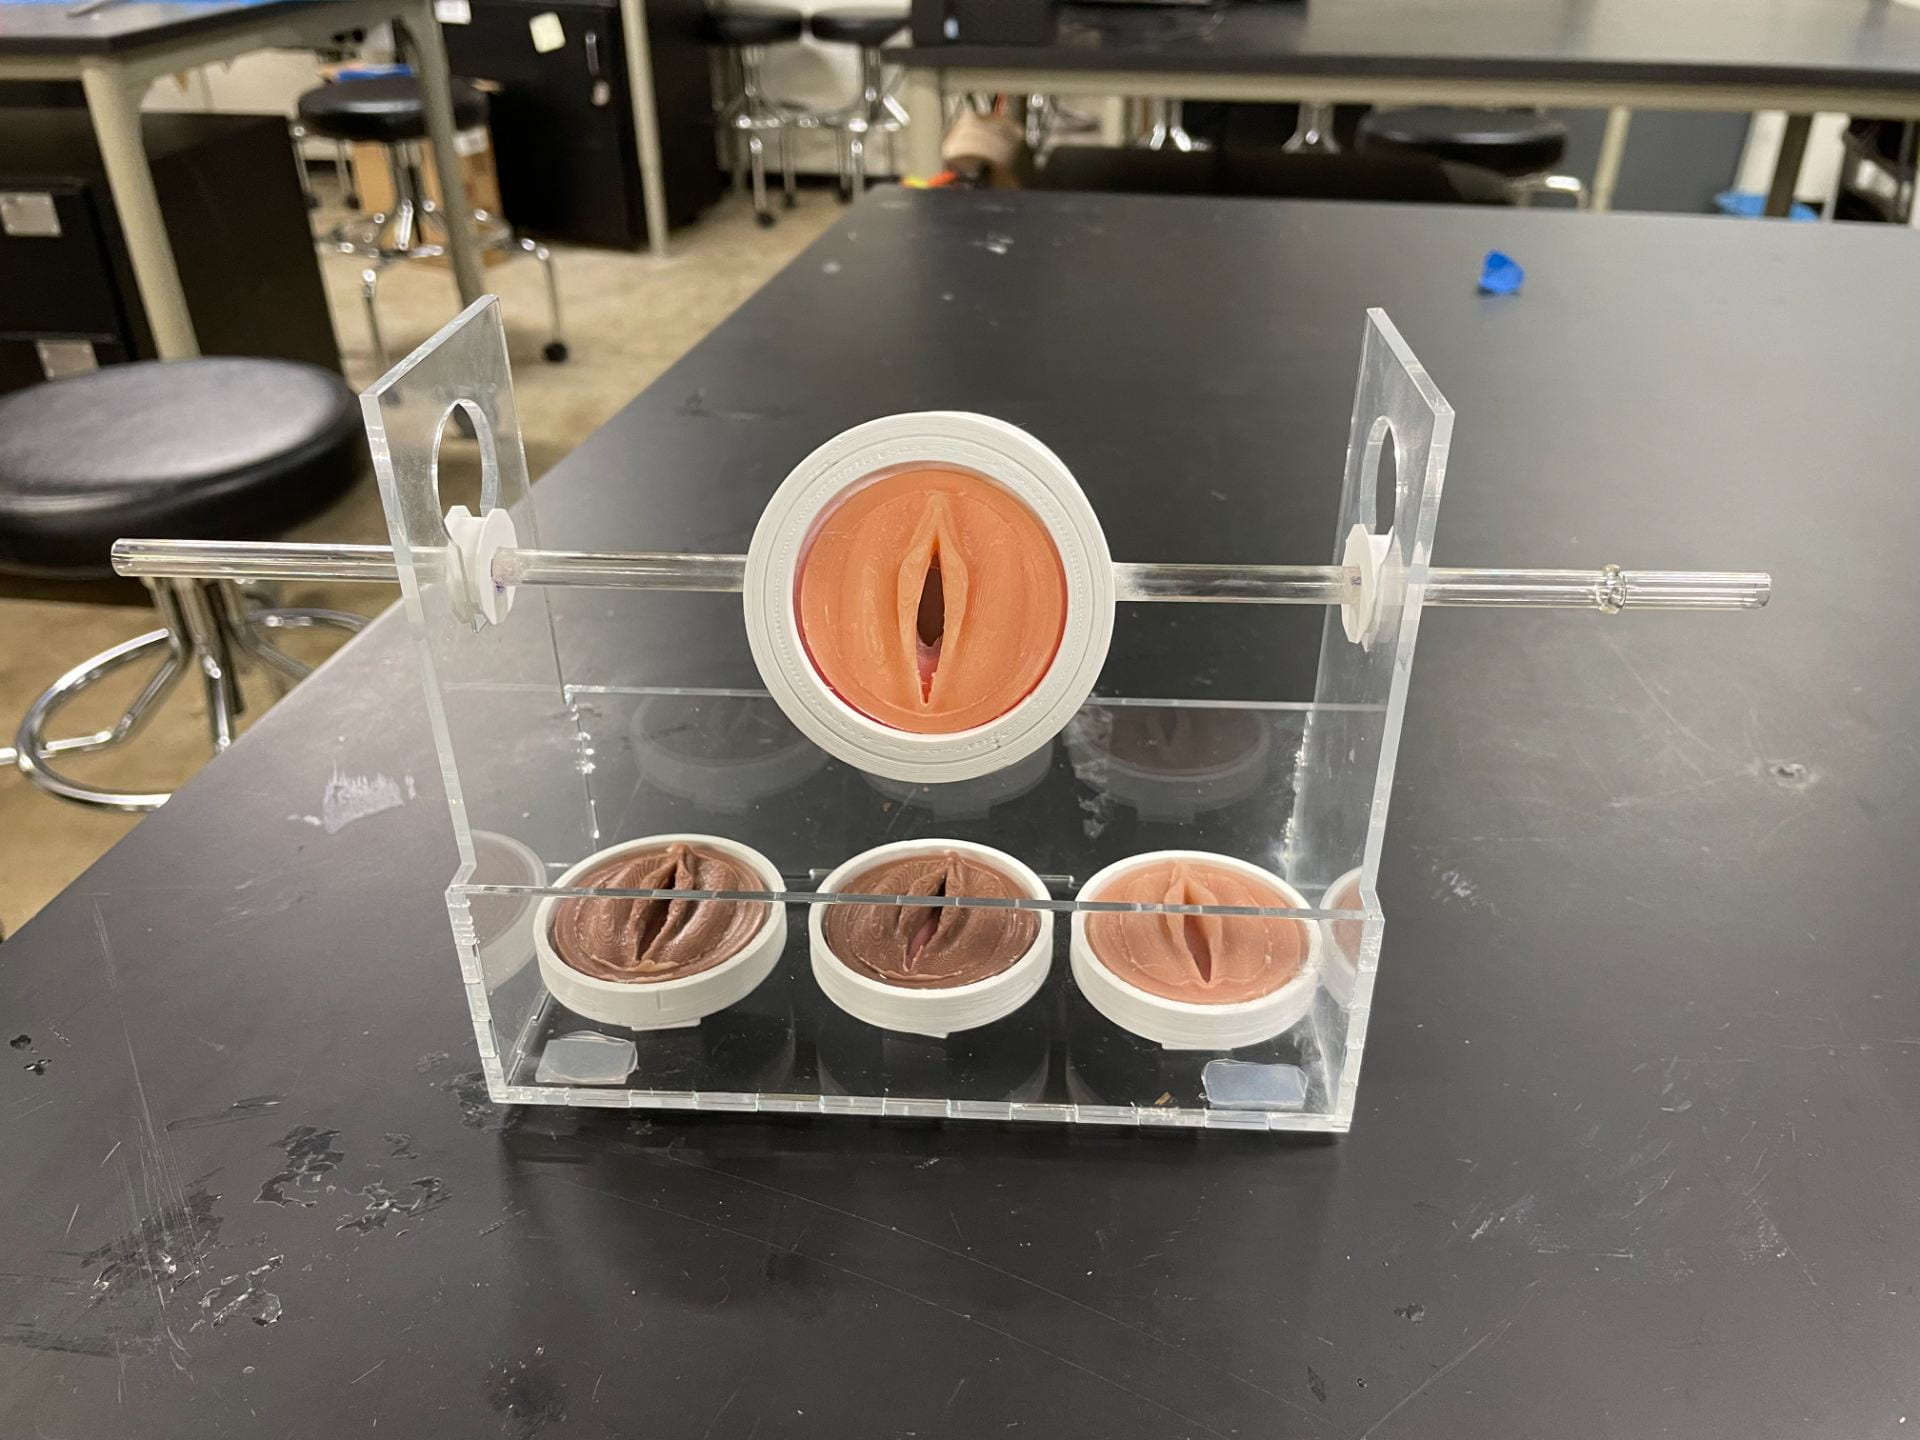
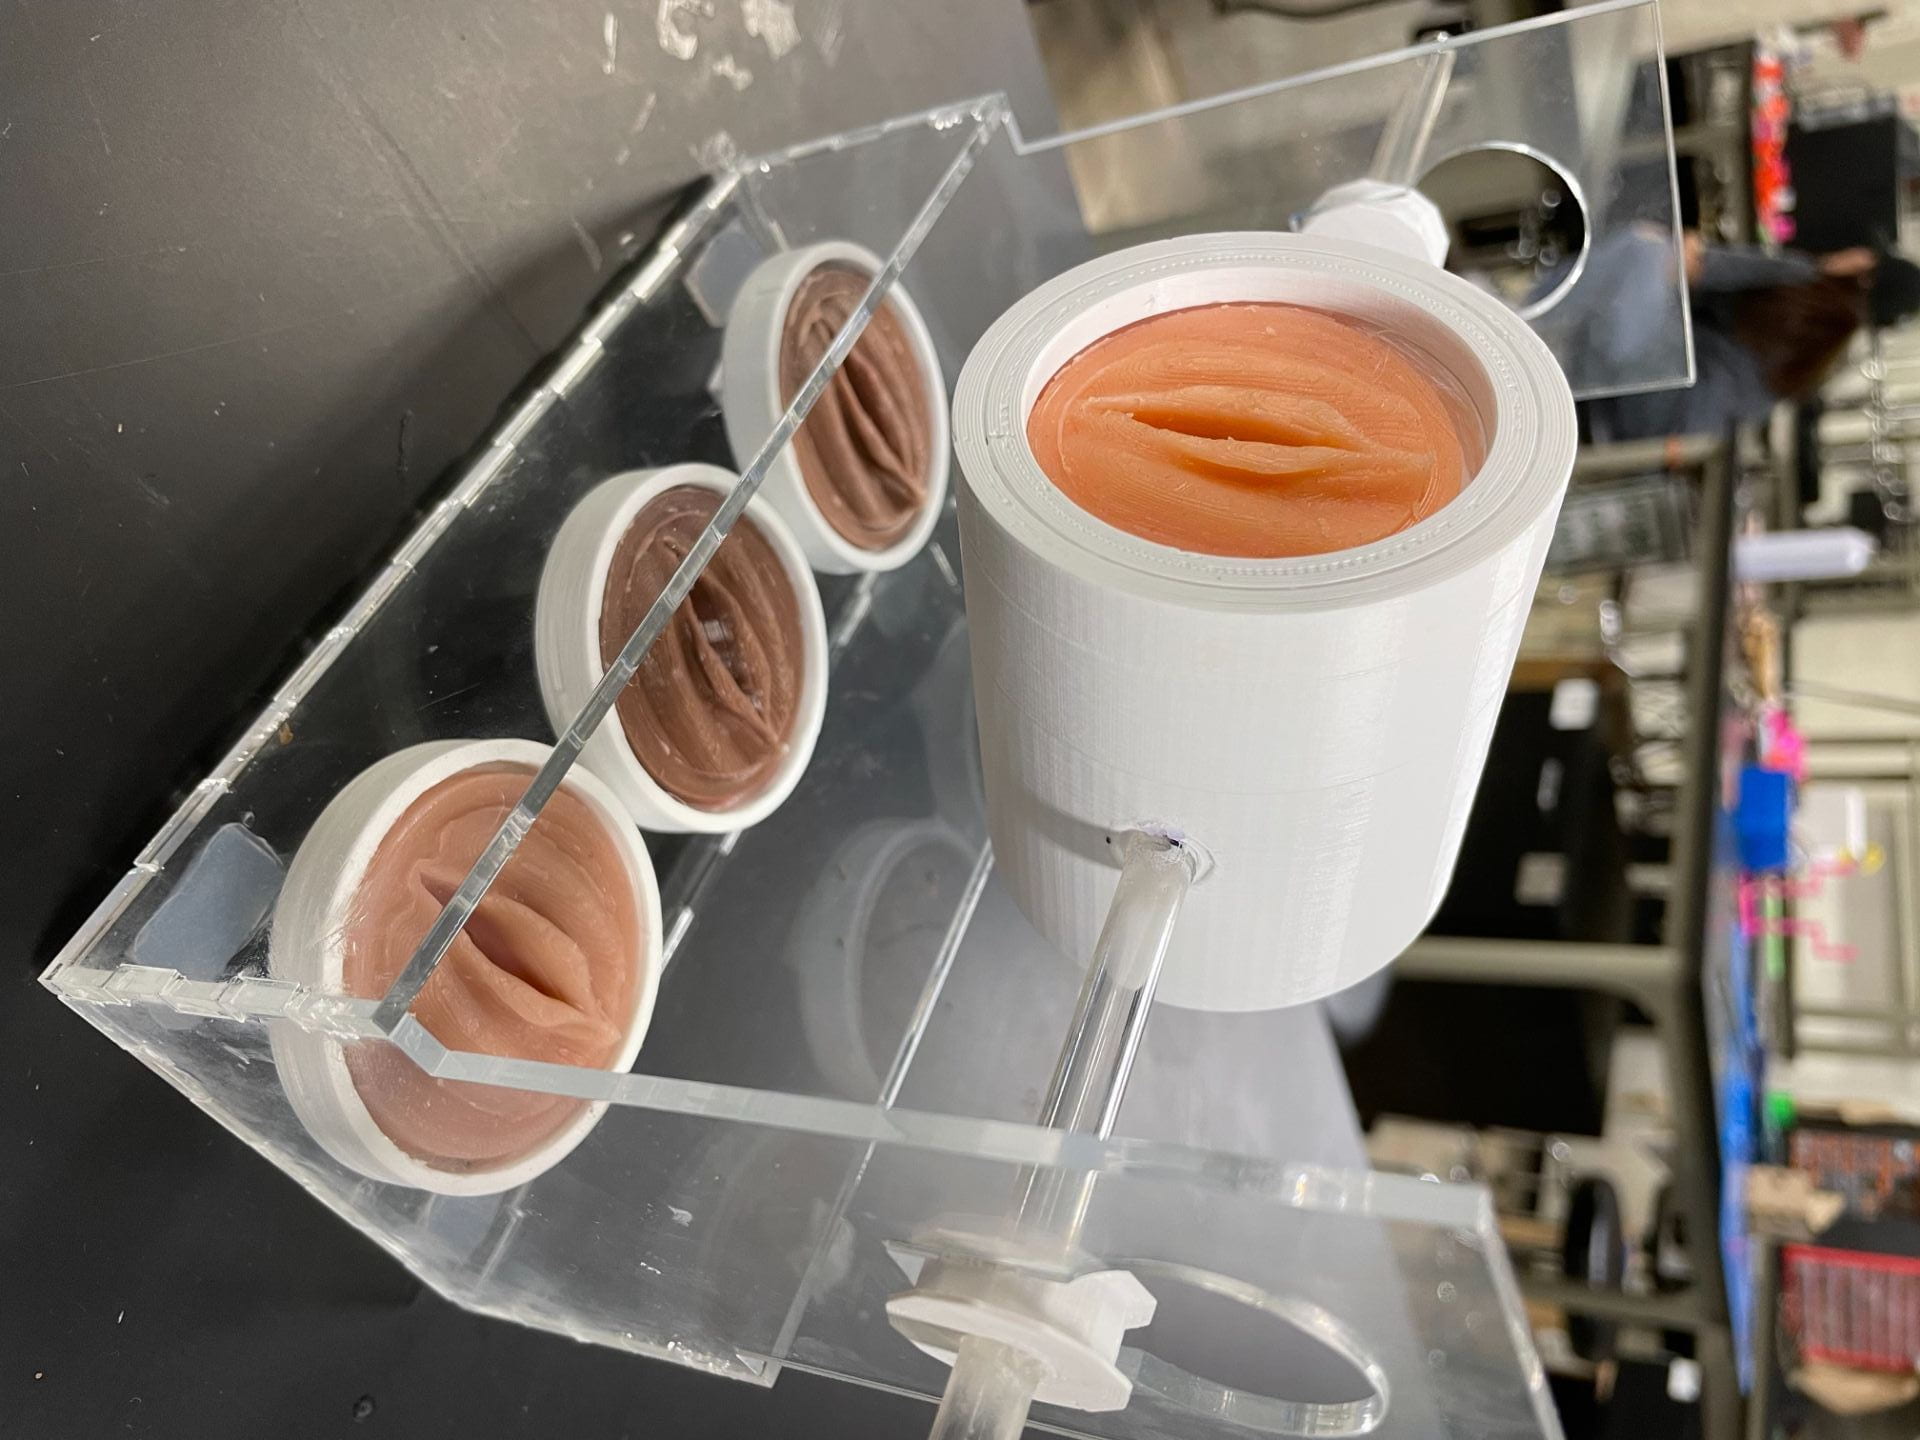
I’m so proud of team PIPER’s progress – though our prototype has some clear room for improvement, we still managed to develop a model that accomplishes many aspects of simulating a pediatric pelvic exam. Our model rotates properly between different positions, enables the interchange of labia and hymens, and facilitates realistic practice with labial traction and hymen observation. Here’s some images of the model we displayed at the showcase!
I’m intentionally choosing not to call our prototype, at the end of the internship, our “final” prototype. Why? Because we haven’t fully bridged the gap in pediatric sexual assault examination training. We may have laid enough stepping stones to get to the other side, but there’s still some gaps between steps, some rough edges, that can be worked on, like improving hymenal movement during rotation from supine to prone, or working more to standardize our molding and pigmentation process.
So what exactly are the next stepping stones to lay down? After our final presentation on Thursday, we found out that we may be able to get Institutional Review Board (IRB) approval for user testing of our model in time for a training event led by Ms. Harris (our client) in New York in early August. This is such exciting news – if we get IRB approval, we could publish our work in a journal! After a team meeting with Dr. Taylor and our client, we decided that we’d go ahead and start the process. While this is a short timeline and not guaranteed, we are hopeful that we will be able to publish data from user testing at some point in the near-ish future.
As far as next steps for the model itself, we will be sending our model to Ms. Harris soon so that she can at the very least get some informal feedback at her training. We also prepared documentation for project transfer, so that the PIPER project is prepared to be handed off to a future team. Elise, Shannon, Alex, and I are all interested in continuing to stay involved with this project, so instead of the end of this internship being a “goodbye,” it’s more of a “see you soon,” as Dr. Taylor phrased it on Friday. I’m incredibly grateful to have received so much support from Rice 360, the OEDK, and everyone else who made it possible for us to work on and contribute to such an important and impactful project. It still hasn’t sunk in for me that we started this project from scratch in June, and now have a functional pediatric pelvic model to send to New York for user testing.
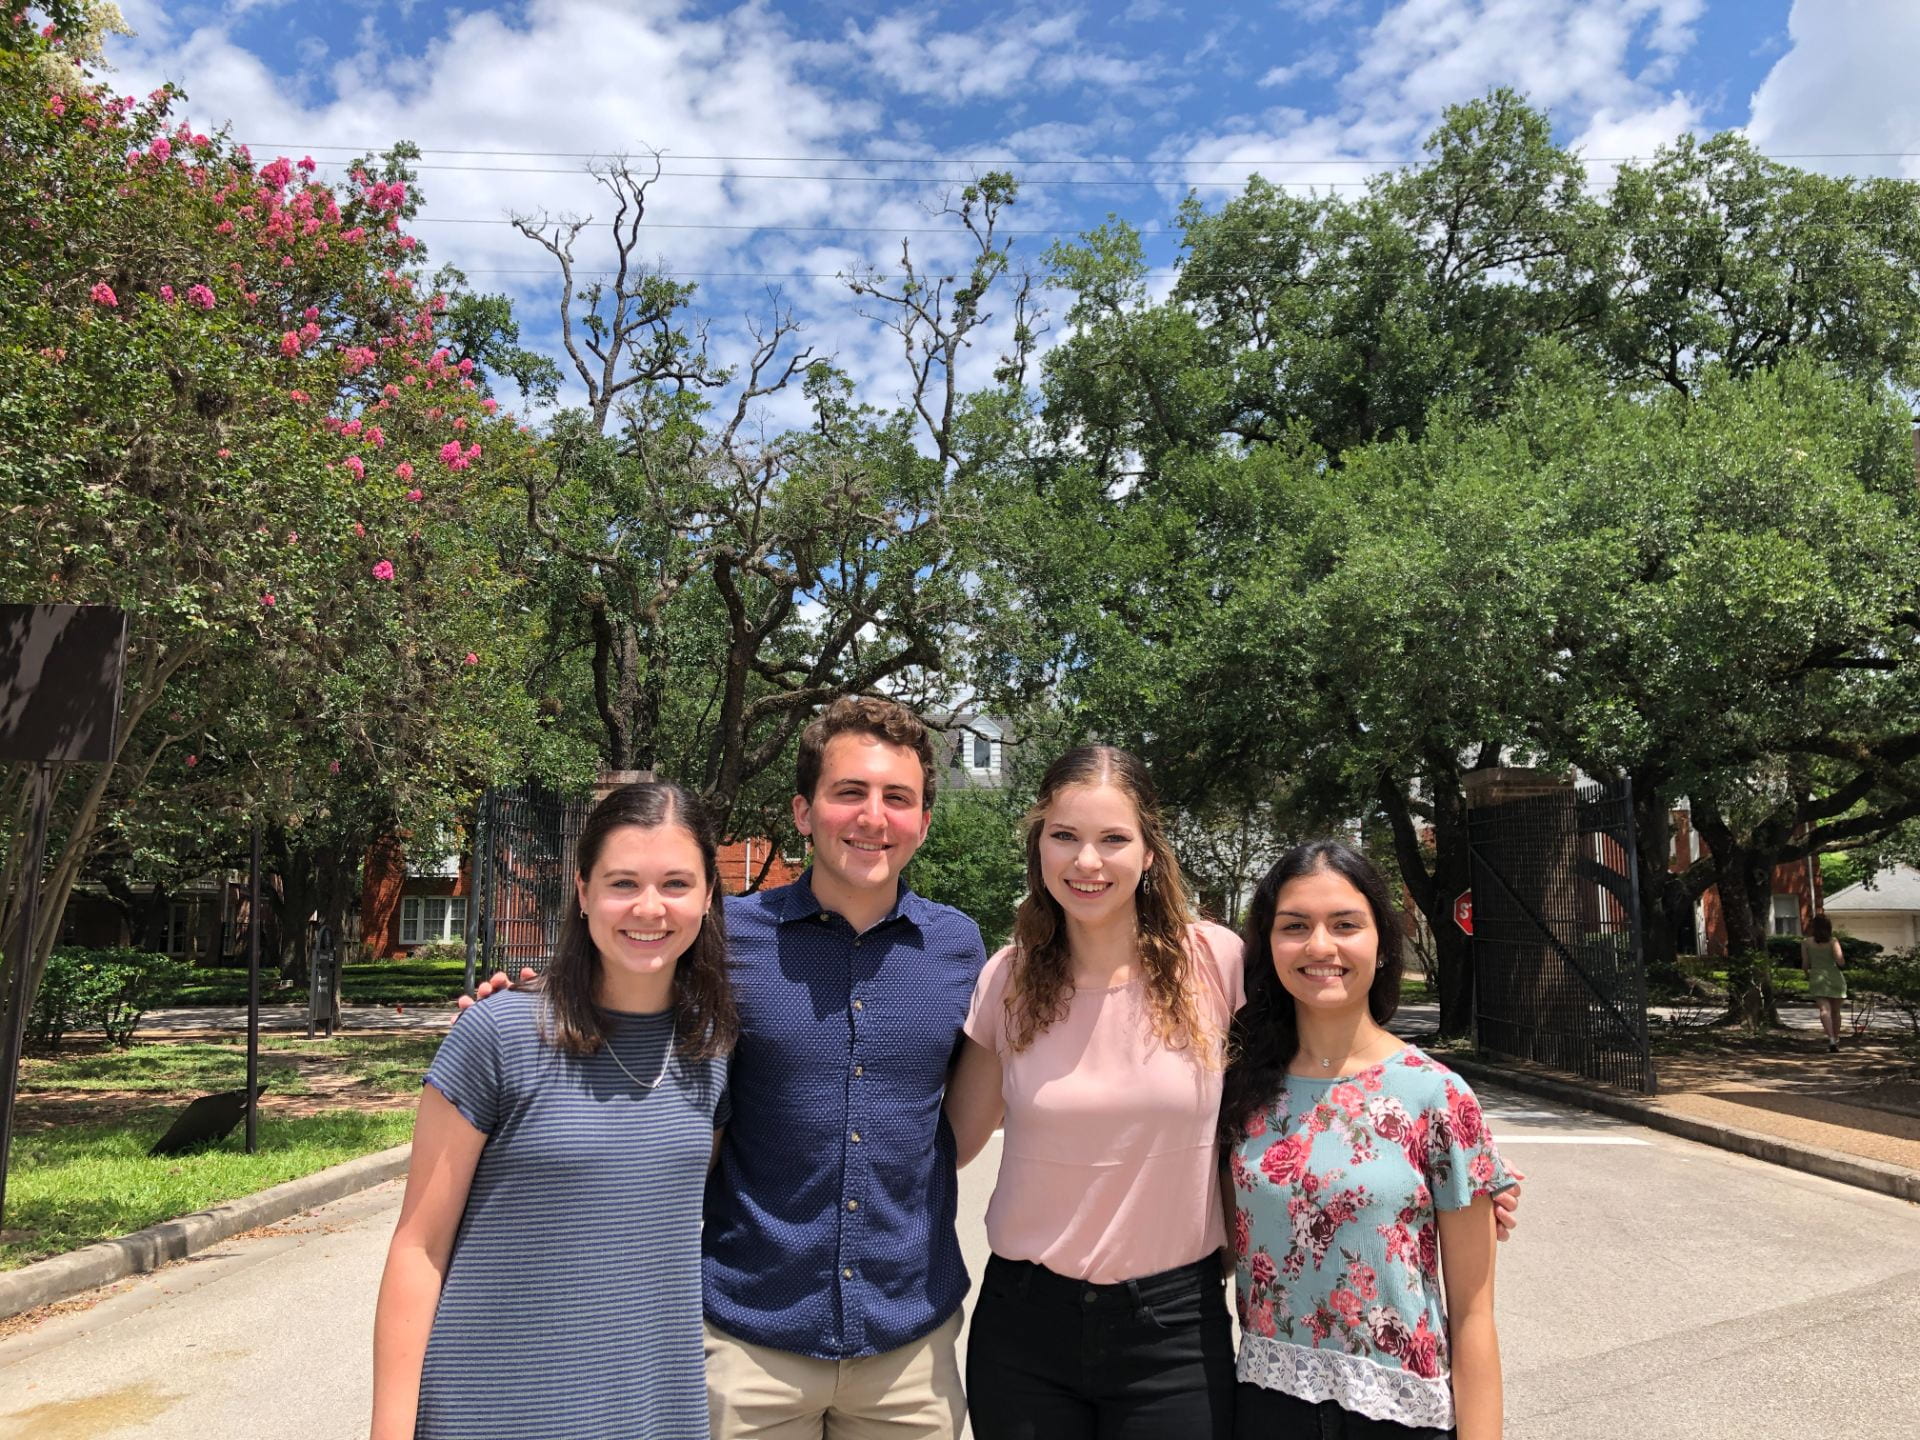
Elise, Shannon, Alex, and me after our final presentation 🙂
Overall, I’m so honored to have met, worked with, and learned from the amazing people in this internship, many of whom I can now say are really good friends of mine. And as for team PIPER, we have an incredibly close bond and I really treasure the memories we made together (and all the inside jokes and even our very own PIPER Spotify playlist) these past six weeks. I learned so much from my experiences this summer, and I can’t wait to see all the amazing things that my fellow interns will do in the future.
One of my biggest takeaways from the summer is that when you’re a global health engineer, or a health innovator, or just anyone who is trying to develop a novel solution to something, your job isn’t to find a bridge for the gap – it’s to make the bridge, stone by stone. As I take this lesson with me, I will look for ways to step outside of those little squares of comfort. Most importantly, I will know that building a bridge of stepping stones isn’t just one person’s job – addressing community issues is a community effort.
I’ve appreciated the opportunity to document and reflect on my experiences in this blog. Thanks to everyone for reading my posts throughout this summer, and I will see you soon!
Content warning: My project deals with pediatric sexual abuse. Please take care of yourself and feel free to forgo reading any parts of this blog.
Our final Monday of the internship was crunch time. We had our project showcase on Tuesday, so we had to pull together our final model and perfect our project pitch. After laser cutting our last acrylic base, we were able to finalize rotation pegs that fit perfectly in the model. We also successfully incorporated pigmentation to represent varied skin tones and glued our final labia and hymen sets to the caps. By the end of the day Monday, our model was complete and ready to present at the showcase on Tuesday.
Our final PIPER prototype that we presented at showcase and will send to our client for user testing in August!
Tuesday was a big day, as we were able to share our work with a broader audience. After traveling the long (and hot) journey to the BRC, we enjoyed a yummy lunch of Local Foods. Then it was go time- project pitch and showcase. The event went smoothly! It was wonderful to share our work in a large auditorium without masks- just like the old days! We received lots of praise and numerous valuable suggestions for future iterations on PIPER. All in all, it was a wonderful afternoon of sharing our team’s work with the larger community and supporting the work of our colleagues.
Team PIPER prepared to present our project pitch at the showcase!
At this point in the week, I still felt as though the magnitude of what we’ve accomplished hadn’t truly sunk in for me. That moment came Tuesday night. I called home to talk to my family, and inquired about my sister’s recent check-up. She mentioned that her doctor had asked how I was doing, and our mom explained a bit about my work this summer. Dr. DeSalvo had surprisingly already heard of team PIPER and the work we’ve been doing! His friend is a friend of one of the gynecologists we had contacted- what a small world! For me, it was satisfying to hear how our work was being talked about in the medical community. I was able to share this story with my team on Wednesday, and it amazed them as well.
So what is next for PIPER? We have decided to send our current prototype to Ms. Harris, so she can gather user feedback on the model during a training in early August. After our final presentation on Thursday, Dr. Taylor also informed us of the possibility of getting Institutional Review Board (IRB) approval for PIPER user testing. IRB approval would protect any data collected at the training in August for publication. As a team, along with our client and internship leadership team, we have decided to try and pursue IRB approval in the hopes of publishing our work in the future. While we are on a time crunch, we are hopeful that this work can be published in an engineering journal at some point in the future.
As far as further iterations and improvements to the PIPER model go, the project will continue on in some form in the future. Many of my teammates are interested in continuing work on the project. Personally, I have really enjoyed this project and its potential for impact, despite the heavy subject matter. It’s amazing for me to think I contributed to creating the first ever pediatric pelvic model. As a result, I would like to continue working on this project in the coming year(s), and I am currently looking into what that looks like logistically.
As the internship wrapped up, I found myself getting very sentimental. One of the reasons for this is because of the close bonds I have developed with all the other interns. Through social events, group lunches, and OEDK shenanigans, we have truly become a family. Each and every one of them brings such a unique perspective and talents, and it has been a joy to get to know and learn from them throughout this program. In particular, team PIPER will always hold a special place in my heart. Elise, Shivani, Alex, and I are like siblings at this point- we have countless inside jokes, the sweetest memories, and so much trust and love for one another. I am beyond grateful that this program brought me these wonderful teammates, and more importantly, these wonderful friends.
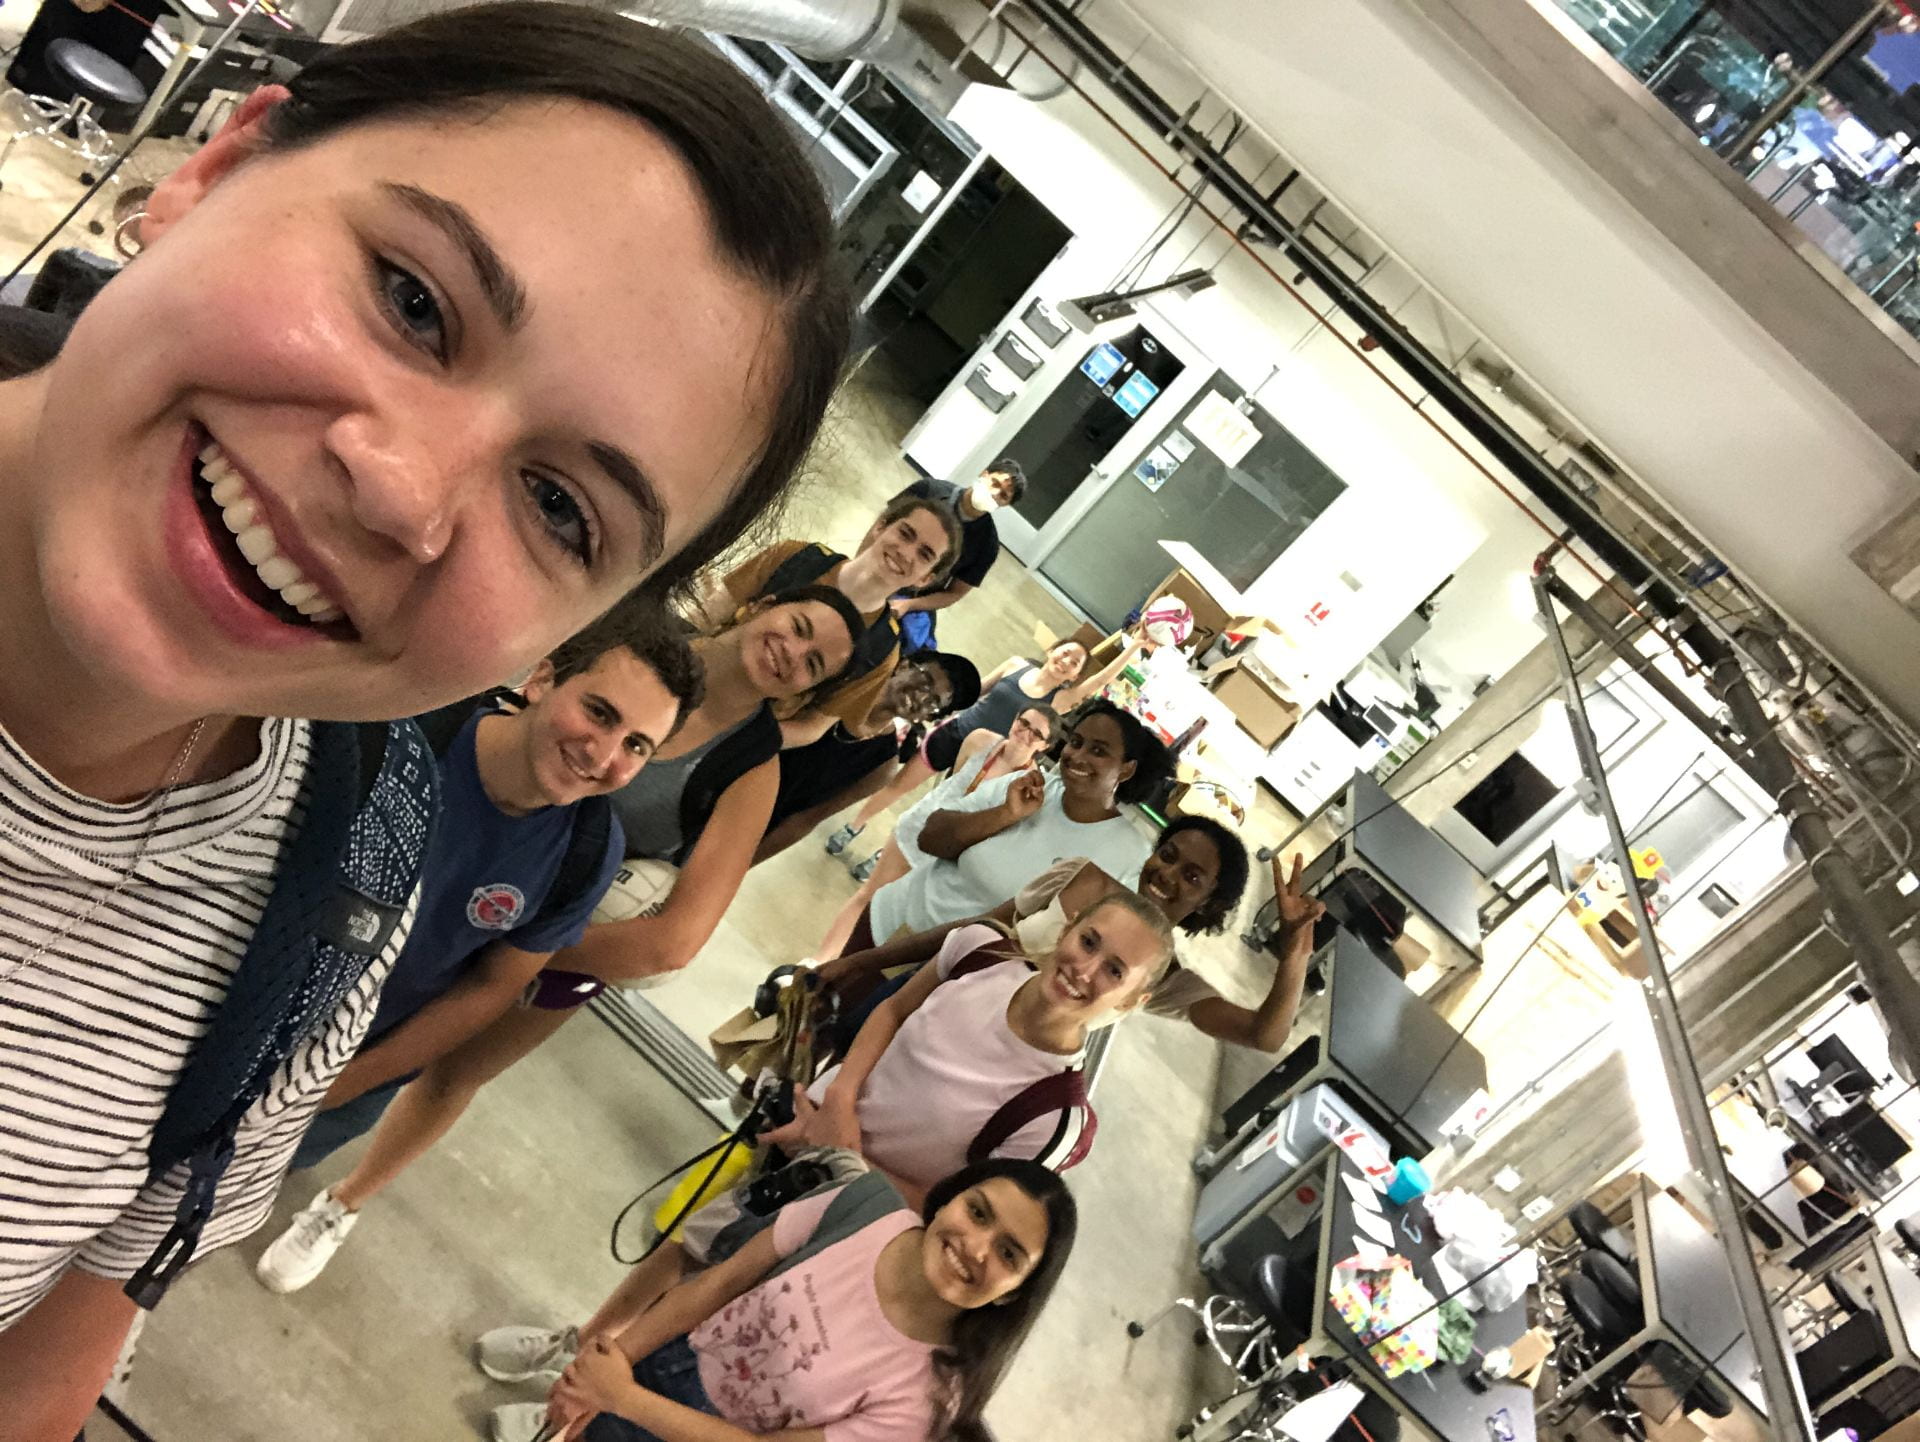
Left: Intern selfie walking out of the OEDK on our last day! Right: Team PIPER after our final presentation! So much love for these three 🙂
Personally, this experience has truly been one of the highlights of my year. I have learned so much about engineering, teamwork, communication, and myself. I have uncovered my passion for global health and bioengineering, and I am strongly considering adding the global health technologies minor as a result of this program. In her closing remarks, Dr. Taylor encouraged us to challenge the assumption that “it’s just the way the world is,” and really do something to change the disparities we notice in the world around us. There are so many inequities when it comes to global health, but I now feel empowered to play my part in changing this. I am hopeful that myself and my colleagues will go out into the world and do amazing things, and I am forever grateful for this internship that has equipped us to do so.
Thank y’all so much for reading my blogs throughout this journey. They have been a wonderful way for me to express myself and document this experience!
This week started off with a bang, and it didn’t slow down. Sometimes taking a short break from a project (a nice four-day weekend) can help a team to reset and refocus. Upon arrival in the OEDK on Monday, we immediately started making great progress. Knowing there would only be a little more than a week before our showcase presentations, we also realized how little time we had to make more progress on our design.
More Smoke
On Monday, we met with a previous team member to discuss some problem’s that we had observed with our circuit, and he was a reliable source of troubleshooting ideas. We had just a few things to resolve before we were comfortable putting our circuit all together. While we discussed over Zoom with him, we attempted to turn on our OLED screen to describe any problems we were having, and immediately smoked poured out from below the screen. We frantically unplugged the Arduino from the laptop, and examined our handiwork. Nothing. It seemed like a freak accident, and given that we had already performed a similar cooking operation on a previous screen of ours, we felt… well… discouraged.
A photo of our Franken-screen working like a charm!
We finished our discussion in the conference room, and brought back the corpse of our last remaining OLED screen. Since we had been spending much of the last few weeks perfecting separate pieces of the circuit and making adjustments, we knew that we might be able to put everything together today if it weren’t for the broken screen. Then, we remembered back to our previous screen, looked carefully, and made a realization: if only the two screens had broken in different places, we may yet be able to take them apart and put together a working screen. It was a massive longshot.
But we did it! The screens themselves were mounted on a small printed circuit board (PCB) with a small ribbon cable. After unplugging one screen and attaching it to the other PCB, we tried turning it on, with no luck. Finally, we tried the other Frankenstein screen (Franken-screen?), crossed our fingers, and watched the screen light up with no issues! Electronics can be tough to work with sometimes, but for Team Petri-FI, anything is possible—even “un-frying” an OLED screen!
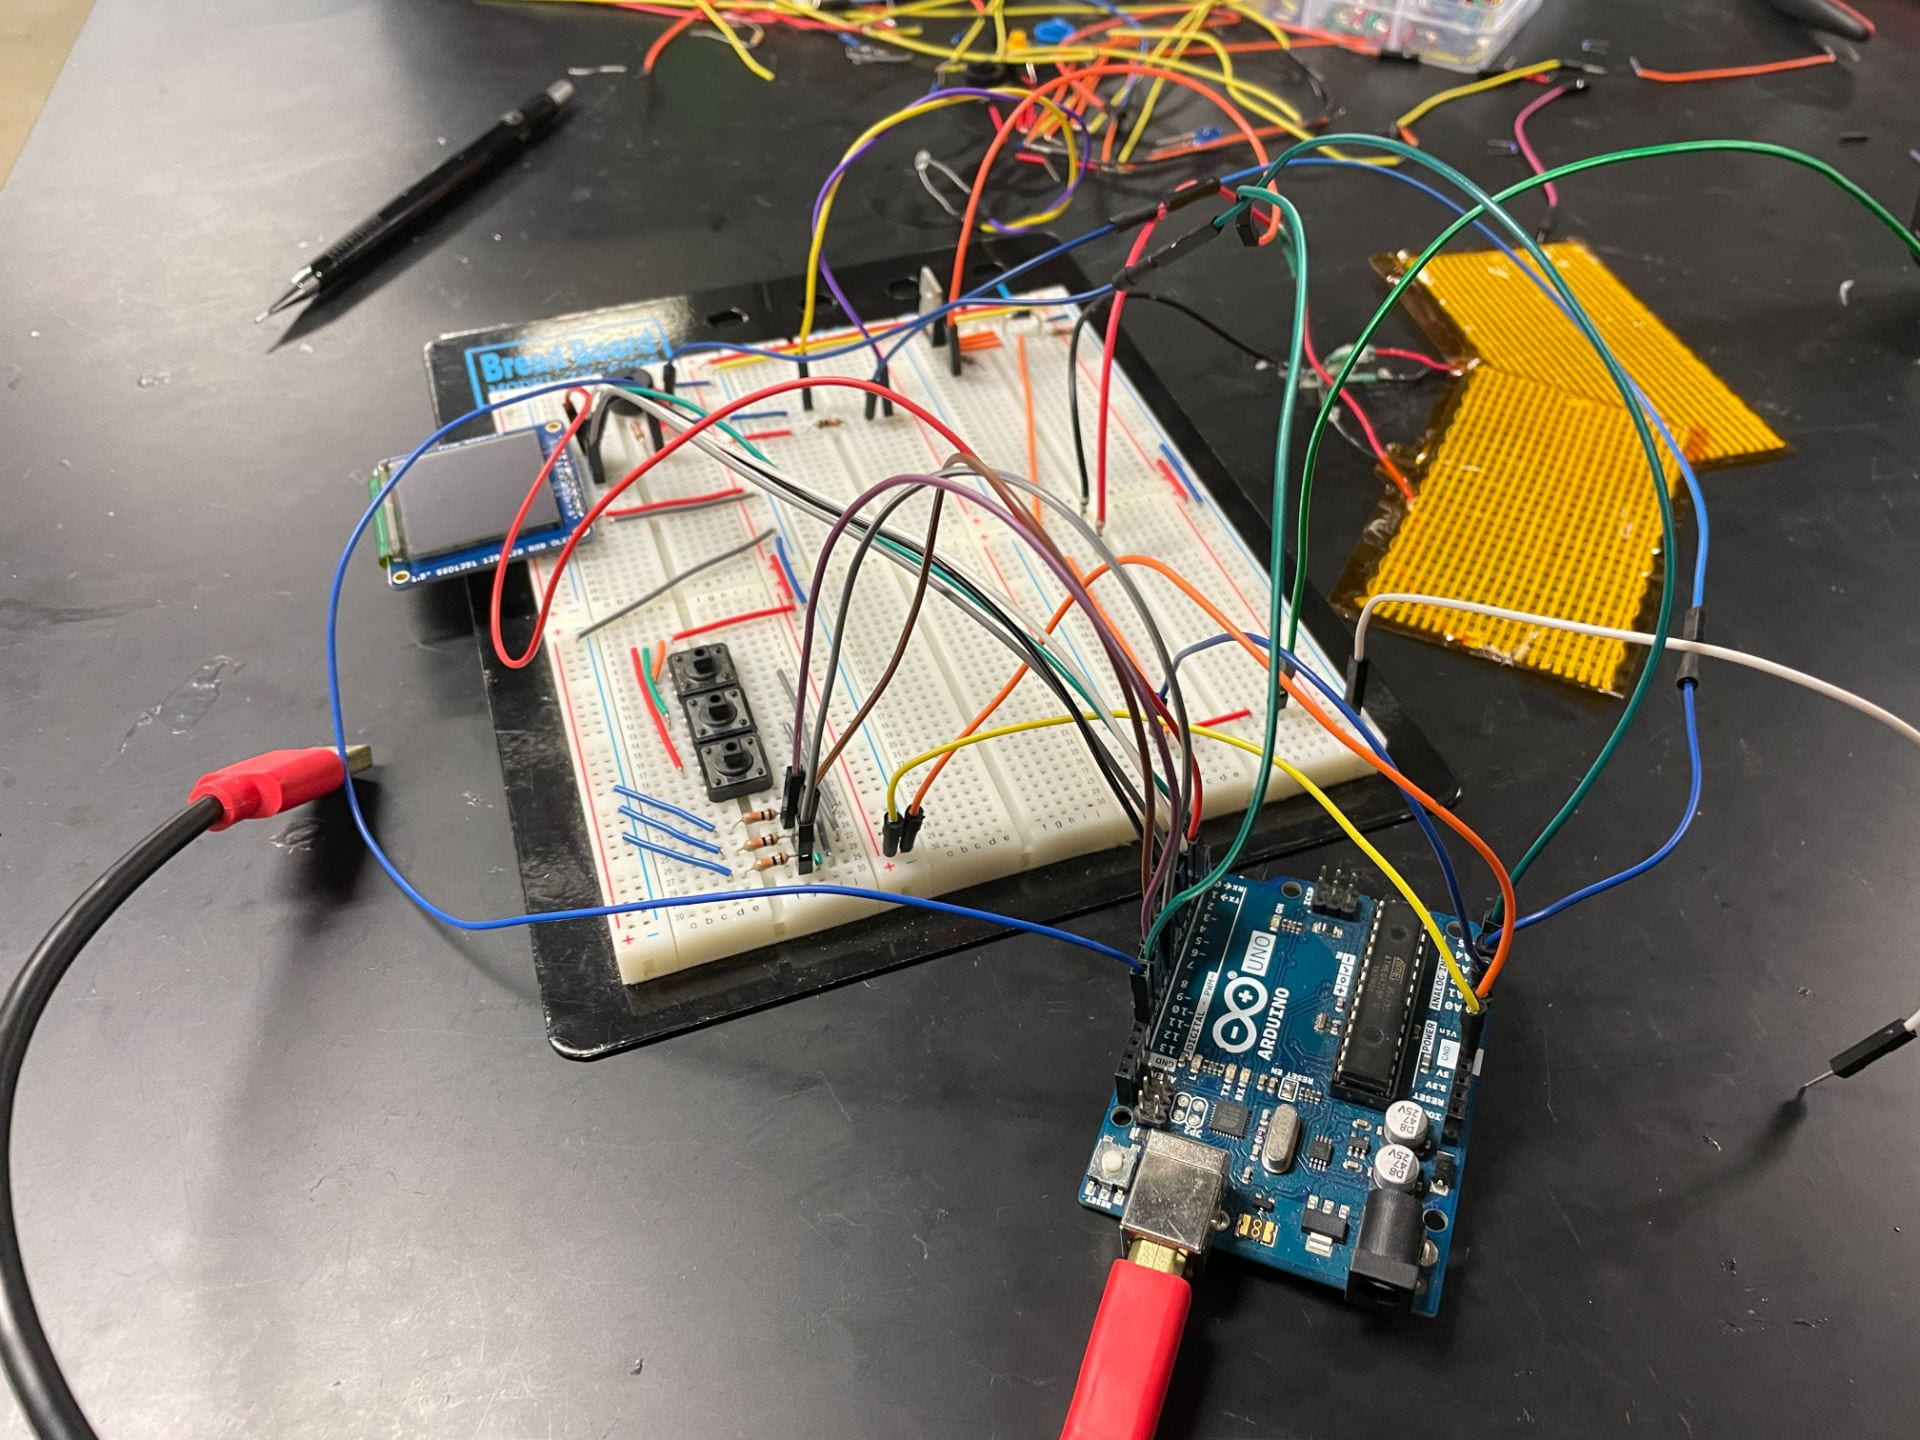
The Breadboard
Our breadboard connected to an Arduino Uno. It still looks like a mess, but it is so much more manageable than our previous breadboard circuit. Just trust me.
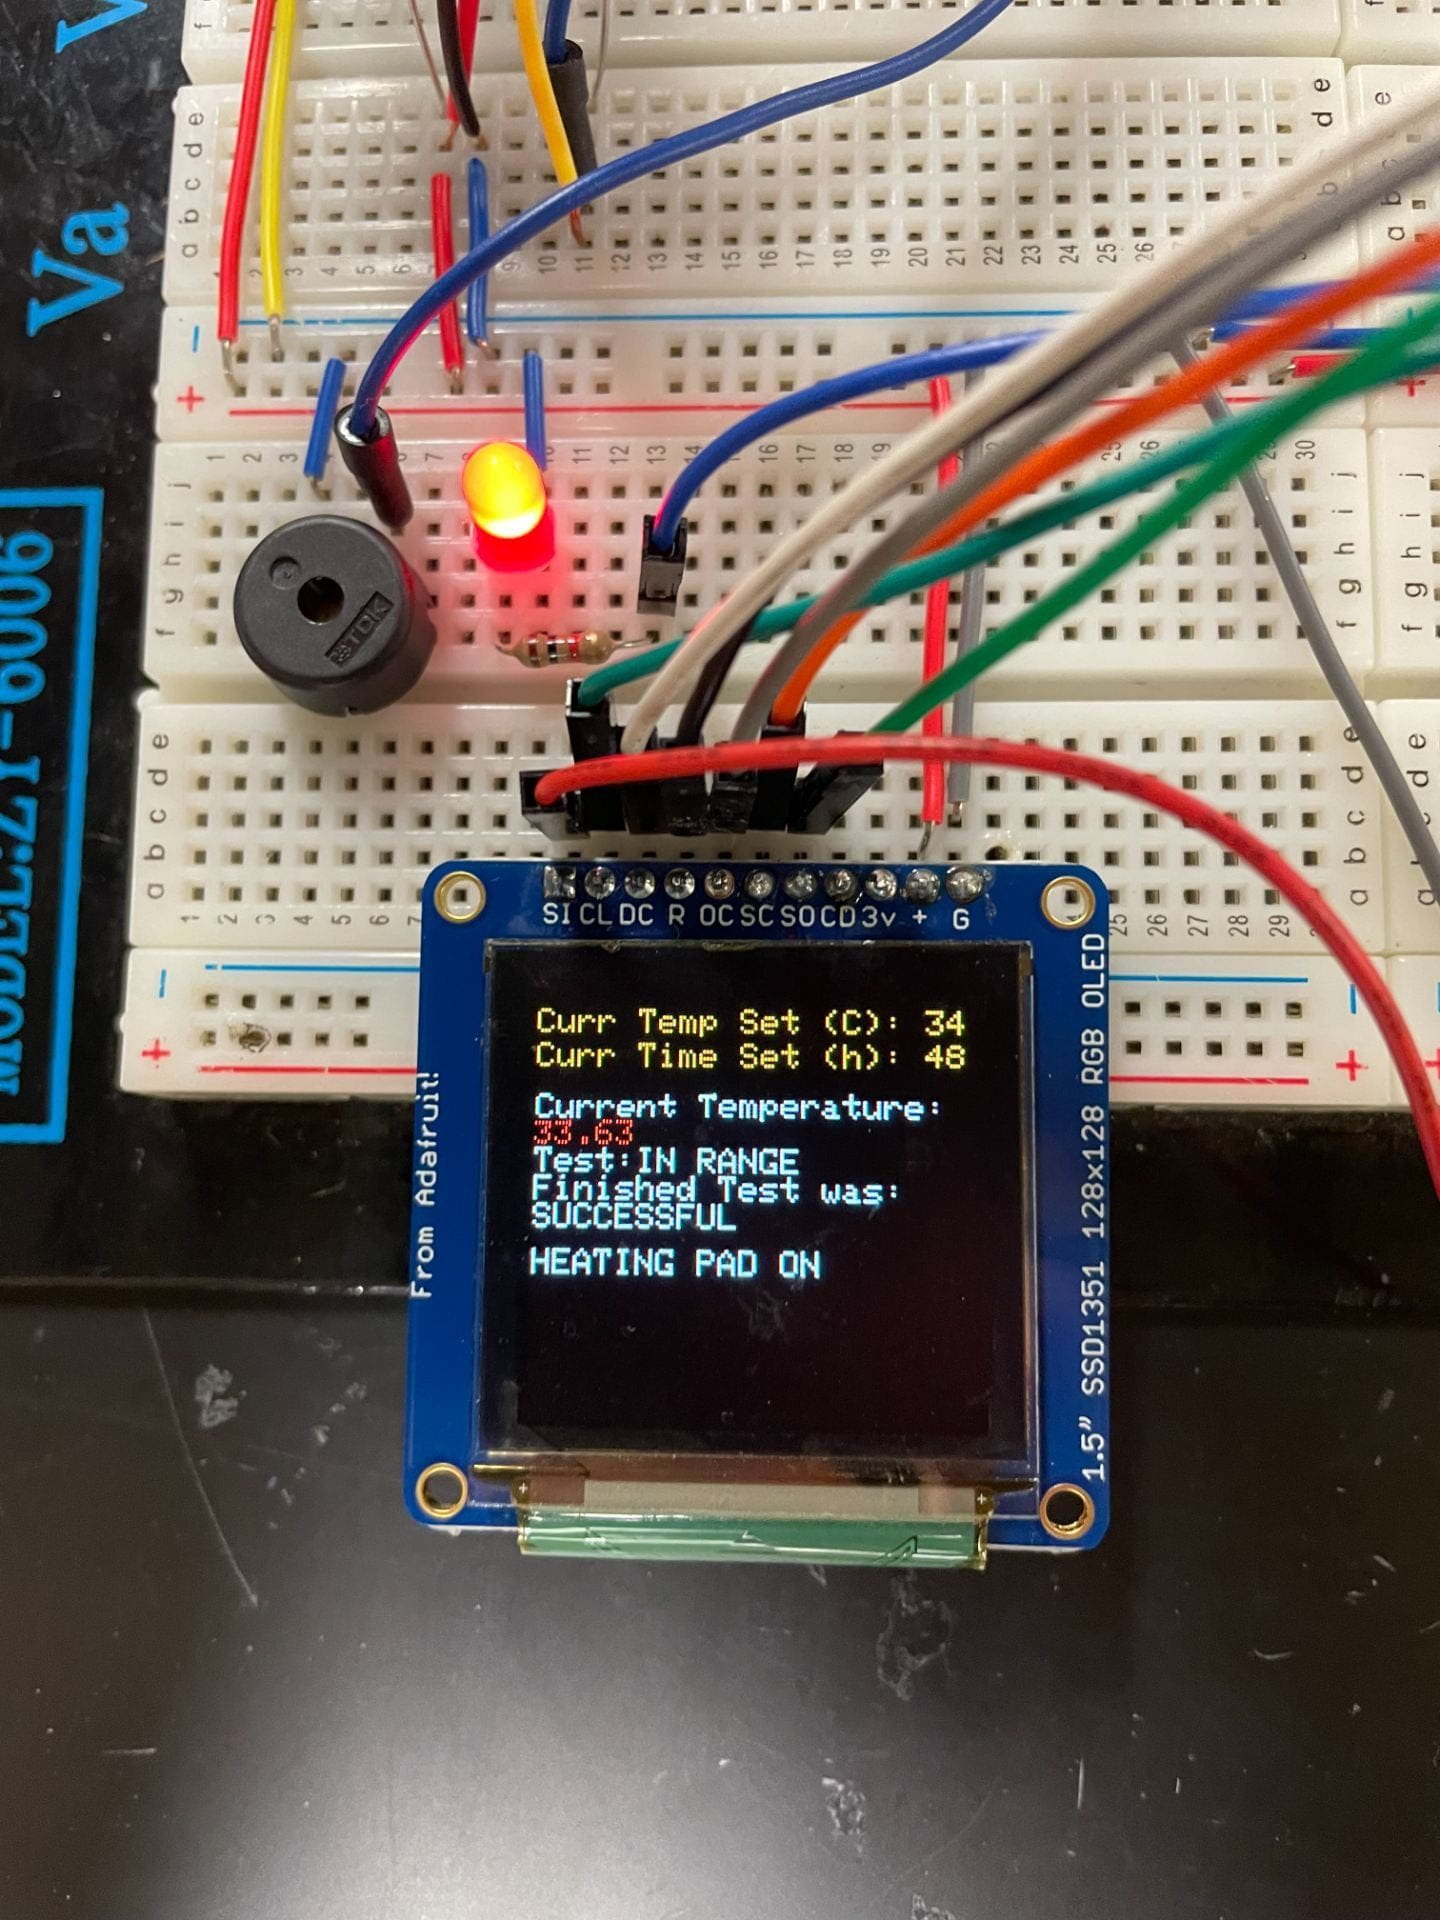
By the afternoon on Monday, we were confident enough in our circuit that we chose to make a new and improved breadboard. While our previous iterations were messy, I had a lot of fun cutting wires to the correct length and making neat patterns on the new breadboard. Piece by piece, we built up the subsystems that we had been working on, and soon, we just needed to upload code to the Arduino and turn it on. For the first time in weeks, we powered on the Arduino and saw the screen light up with a previous team’s (Minicubator’s) user interface. Additionally, the buttons, heating pad, and thermistor appeared to be functioning well, even if there were still a few issues to be resolved. We were immensely excited to reach this checkpoint, because it brought us ever closer to integrating it with our newly-designed incubation chamber.
A Journey on a Bike
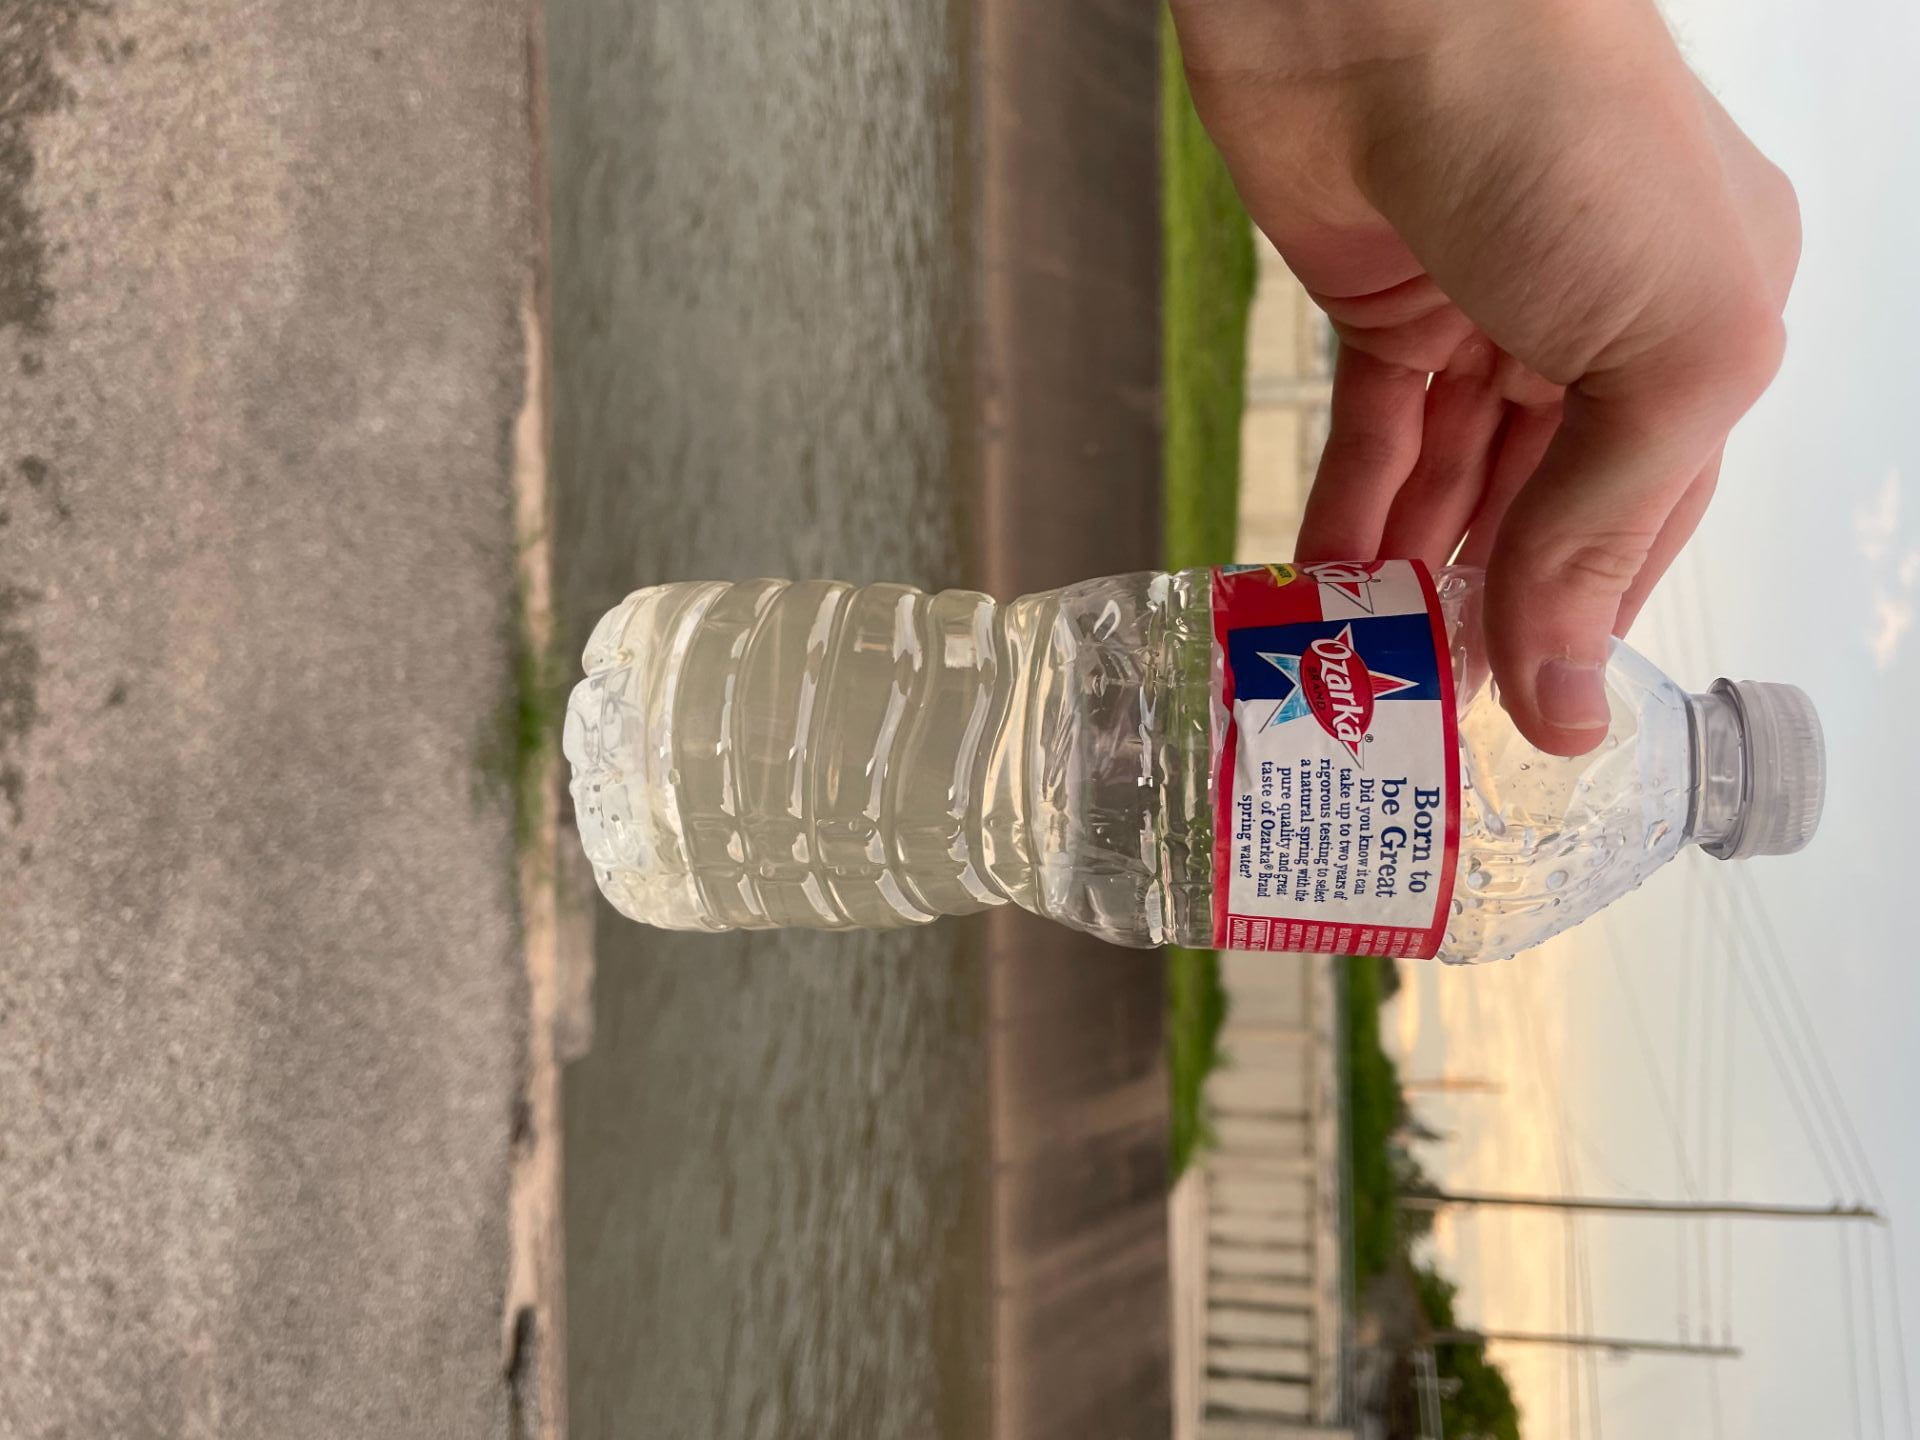
You probably wouldn’t want to drink this water, but it works great for a source of bacteria!
With our new progress on the circuit, we took a leap of faith in contacting a faculty member on campus to help us start performing incubation testing by the end of the week. Because of scheduling, and because we wanted to run a 48-hour incubation, we learned that we would need to start on Wednesday evening, in both a commercial incubator as well as our own. We did not have everything ready for a full incubation, and it would be a challenge to get a working setup within just two days, but we took the offer, knowing that it would be fantastic to showcase our results during next week’s presentations.
Once water samples are taken, it is best to start incubation within 24 hours. Therefore, on Tuesday evening, I packed an empty water bottle (and a full one—hydration is important!) and rode my bike out to the Brays Bayou near Rice University’s campus. We knew that this was likely going to be a good source of fecal contamination. I biked a short distance along the bayou, looking for a spot to safely step down to the water. I found a set of stairs, and walked down to collect the disgusting water in my (empty) water bottle. That was a fun little adventure, and certainly one that I did not expect to be having as part of my summer internship! As soon as I made it back to the OEDK with the sample and set it onto our team table, it was like a ticking clock. In twenty-four hours, we would either start our incubation, or we would disappoint ourselves and our faculty mentor.
The Big Day
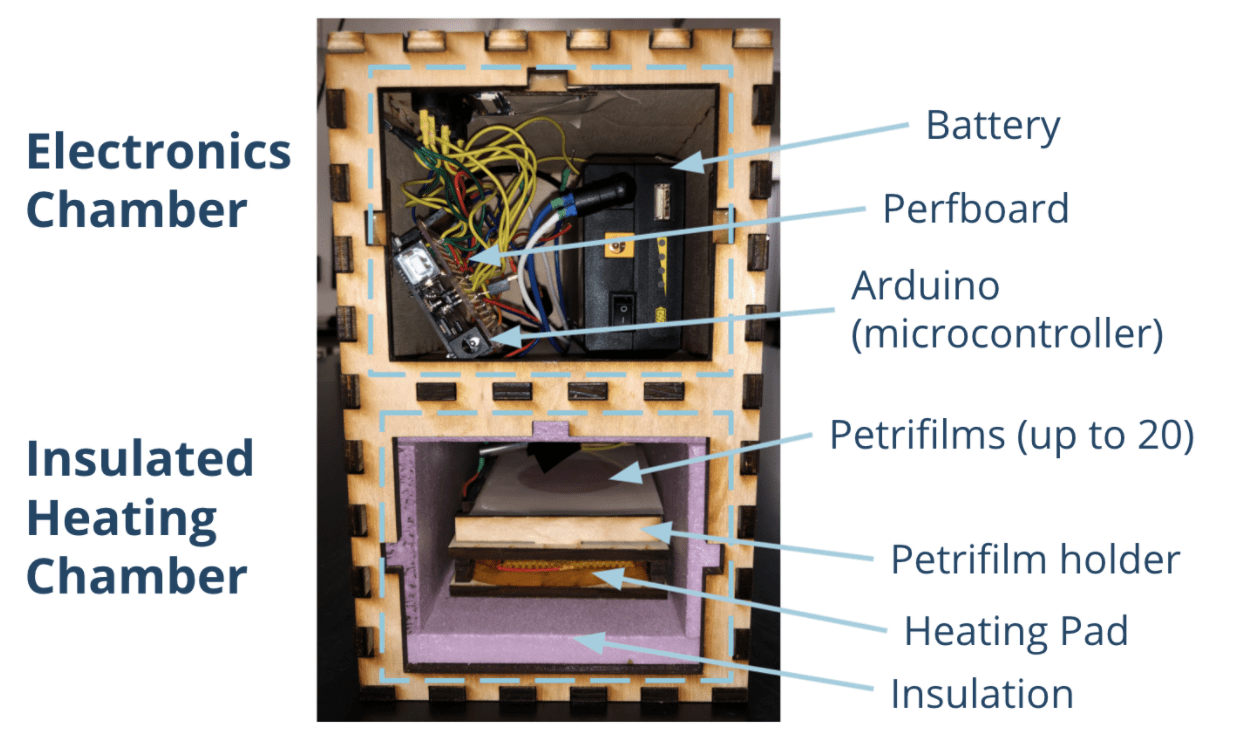
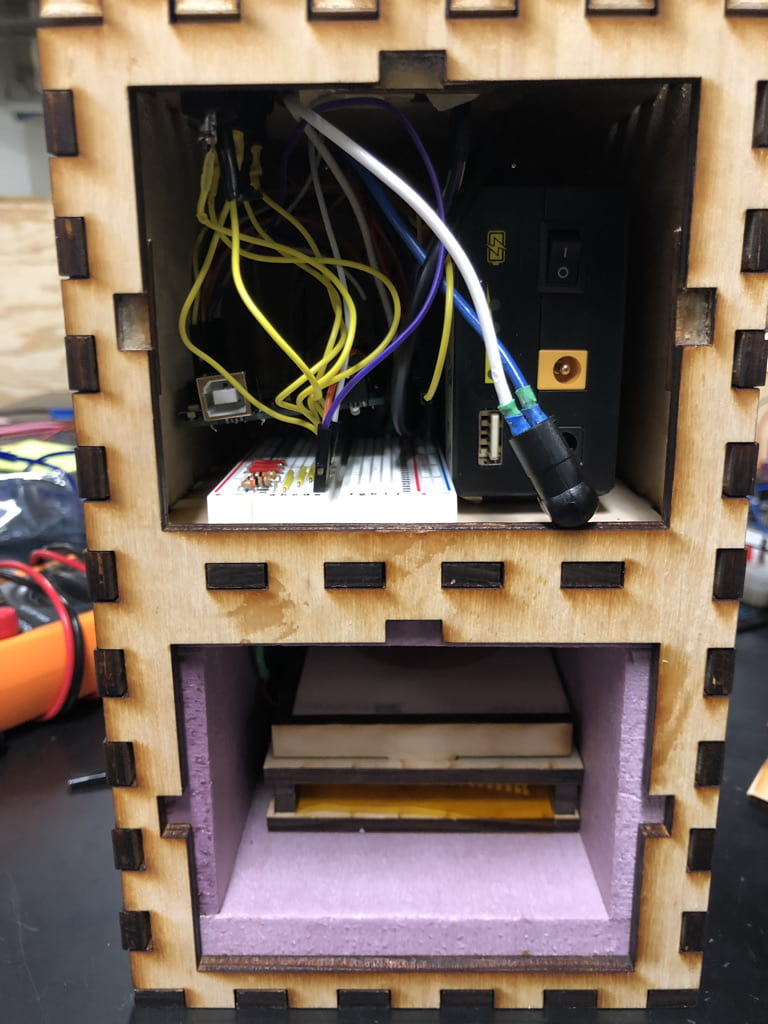
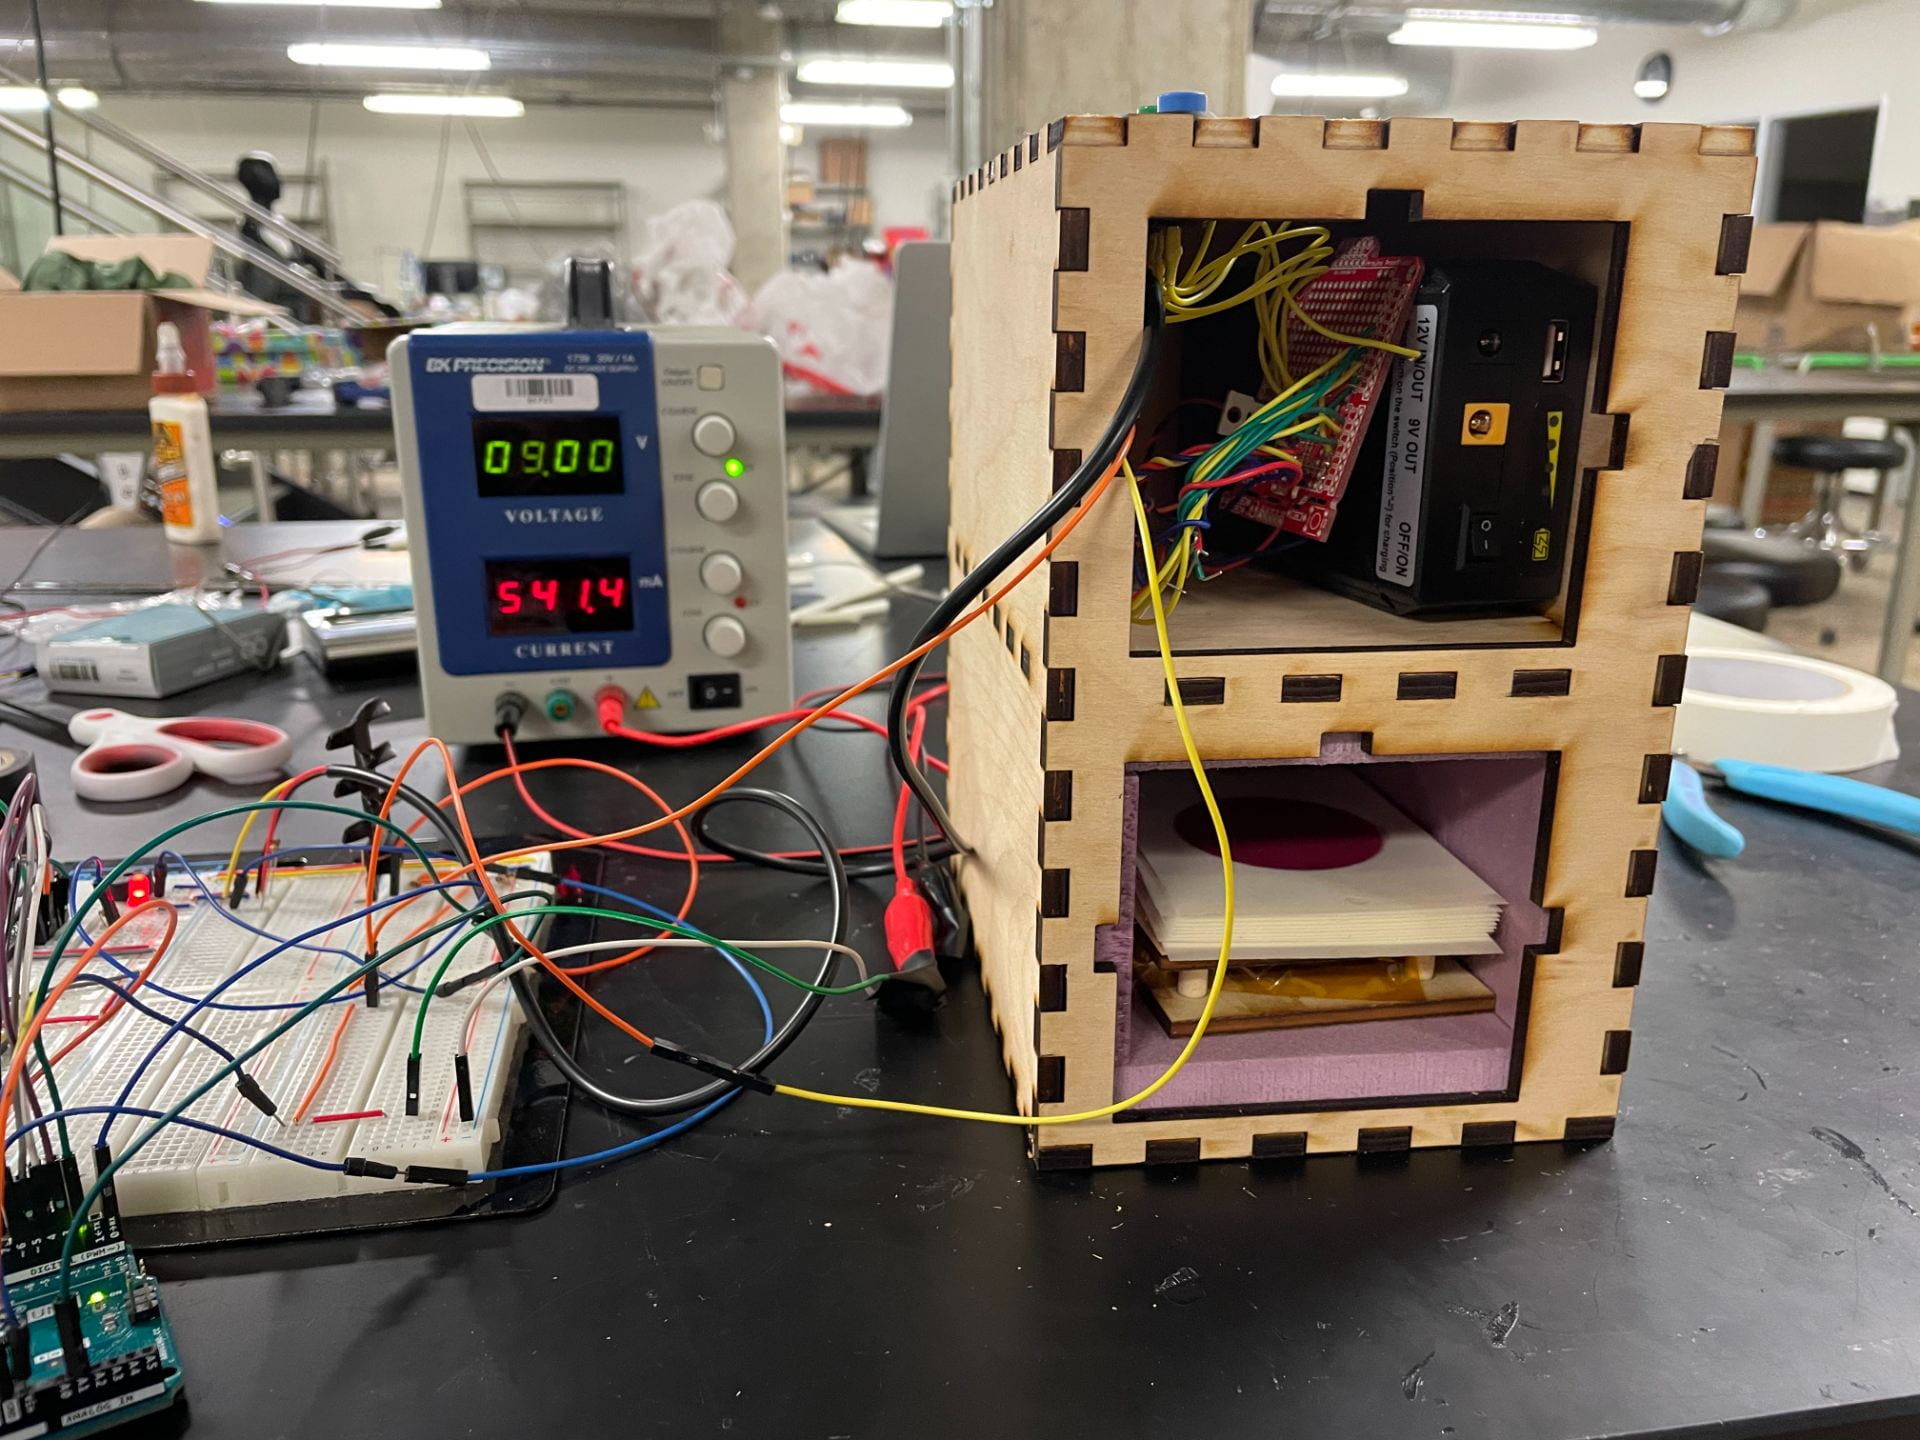
We worked tirelessly on Wednesday. While I tried to add capability for data logging to a microSD card during our incubation, we were also assembling our new vertical box incubator design. This box would have the heating chamber with foam board insulation below the electronics chamber. We successfully added the insulation to the chamber, and it was ready for incubation, which meant that we would not need to use our previous incubator for our 48-hour test. Throughout the afternoon, we continued to make more progress, but we were still straining to complete the system.
While I was not yet able to get the SD card working completely, we (mostly) trusted Minicubator’s heating algorithm to keep the chamber warm. We stayed late placing the heating pad and thermometer into the heating chamber, and we connected it to the breadboard alongside our new box. By around 7:00 PM, the chamber was ready to go, and we had placed 1 mL of water on each of the Petrifilms. We put the Petrifilms into both our chamber and that of the commercial incubator, and we watched.
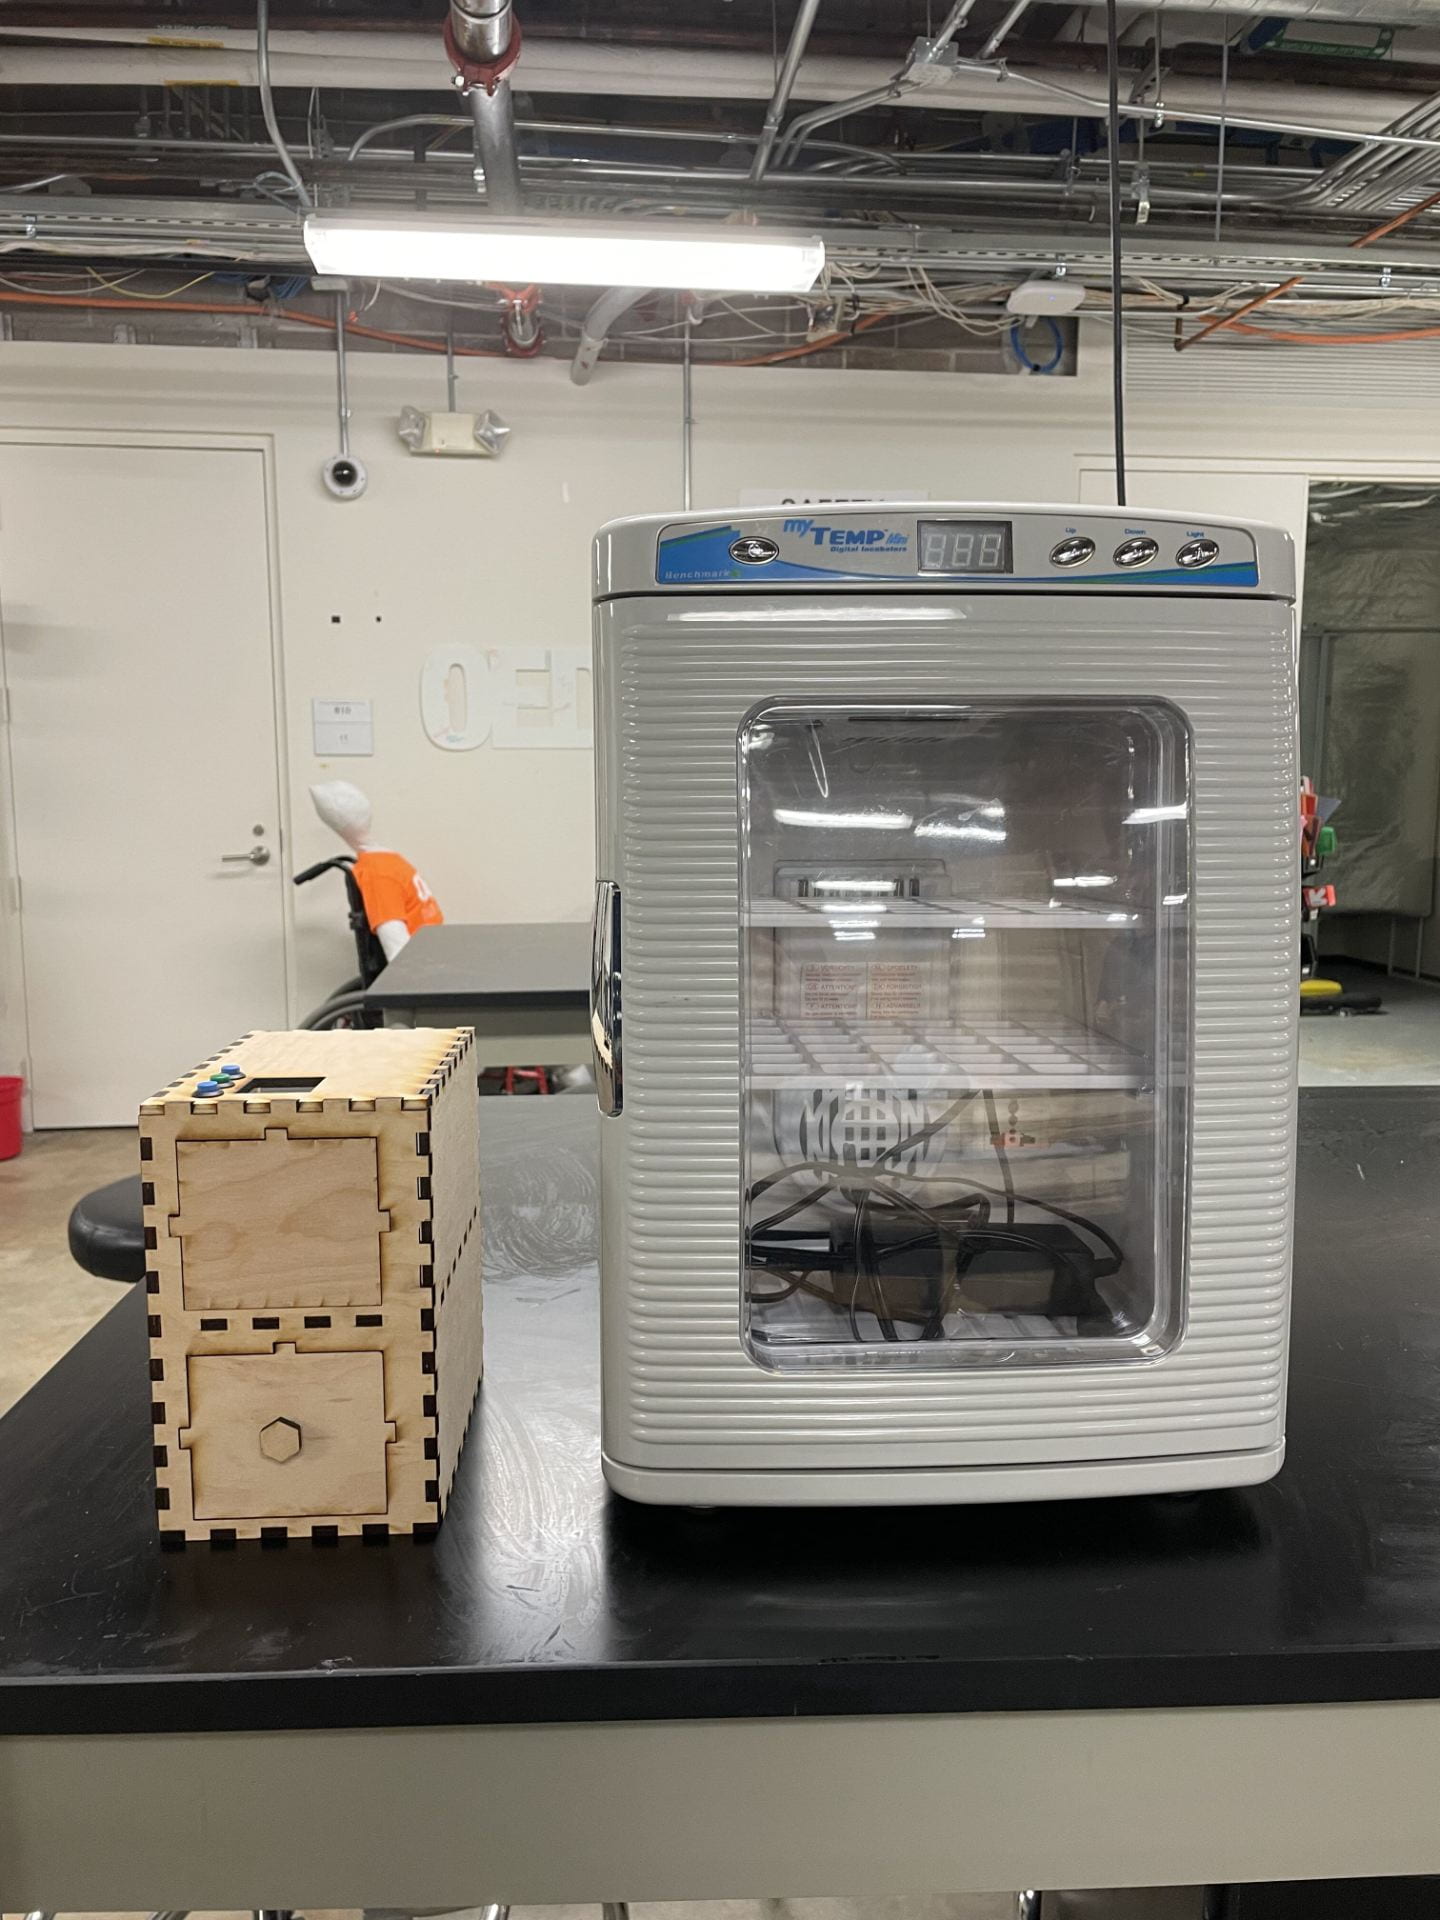
This photo shows our vertical two-chamber incubator connected to our breadboard and power supply. In the bottom chamber, you can see the Petrifilms ready to be incubated once the door is placed on the front.
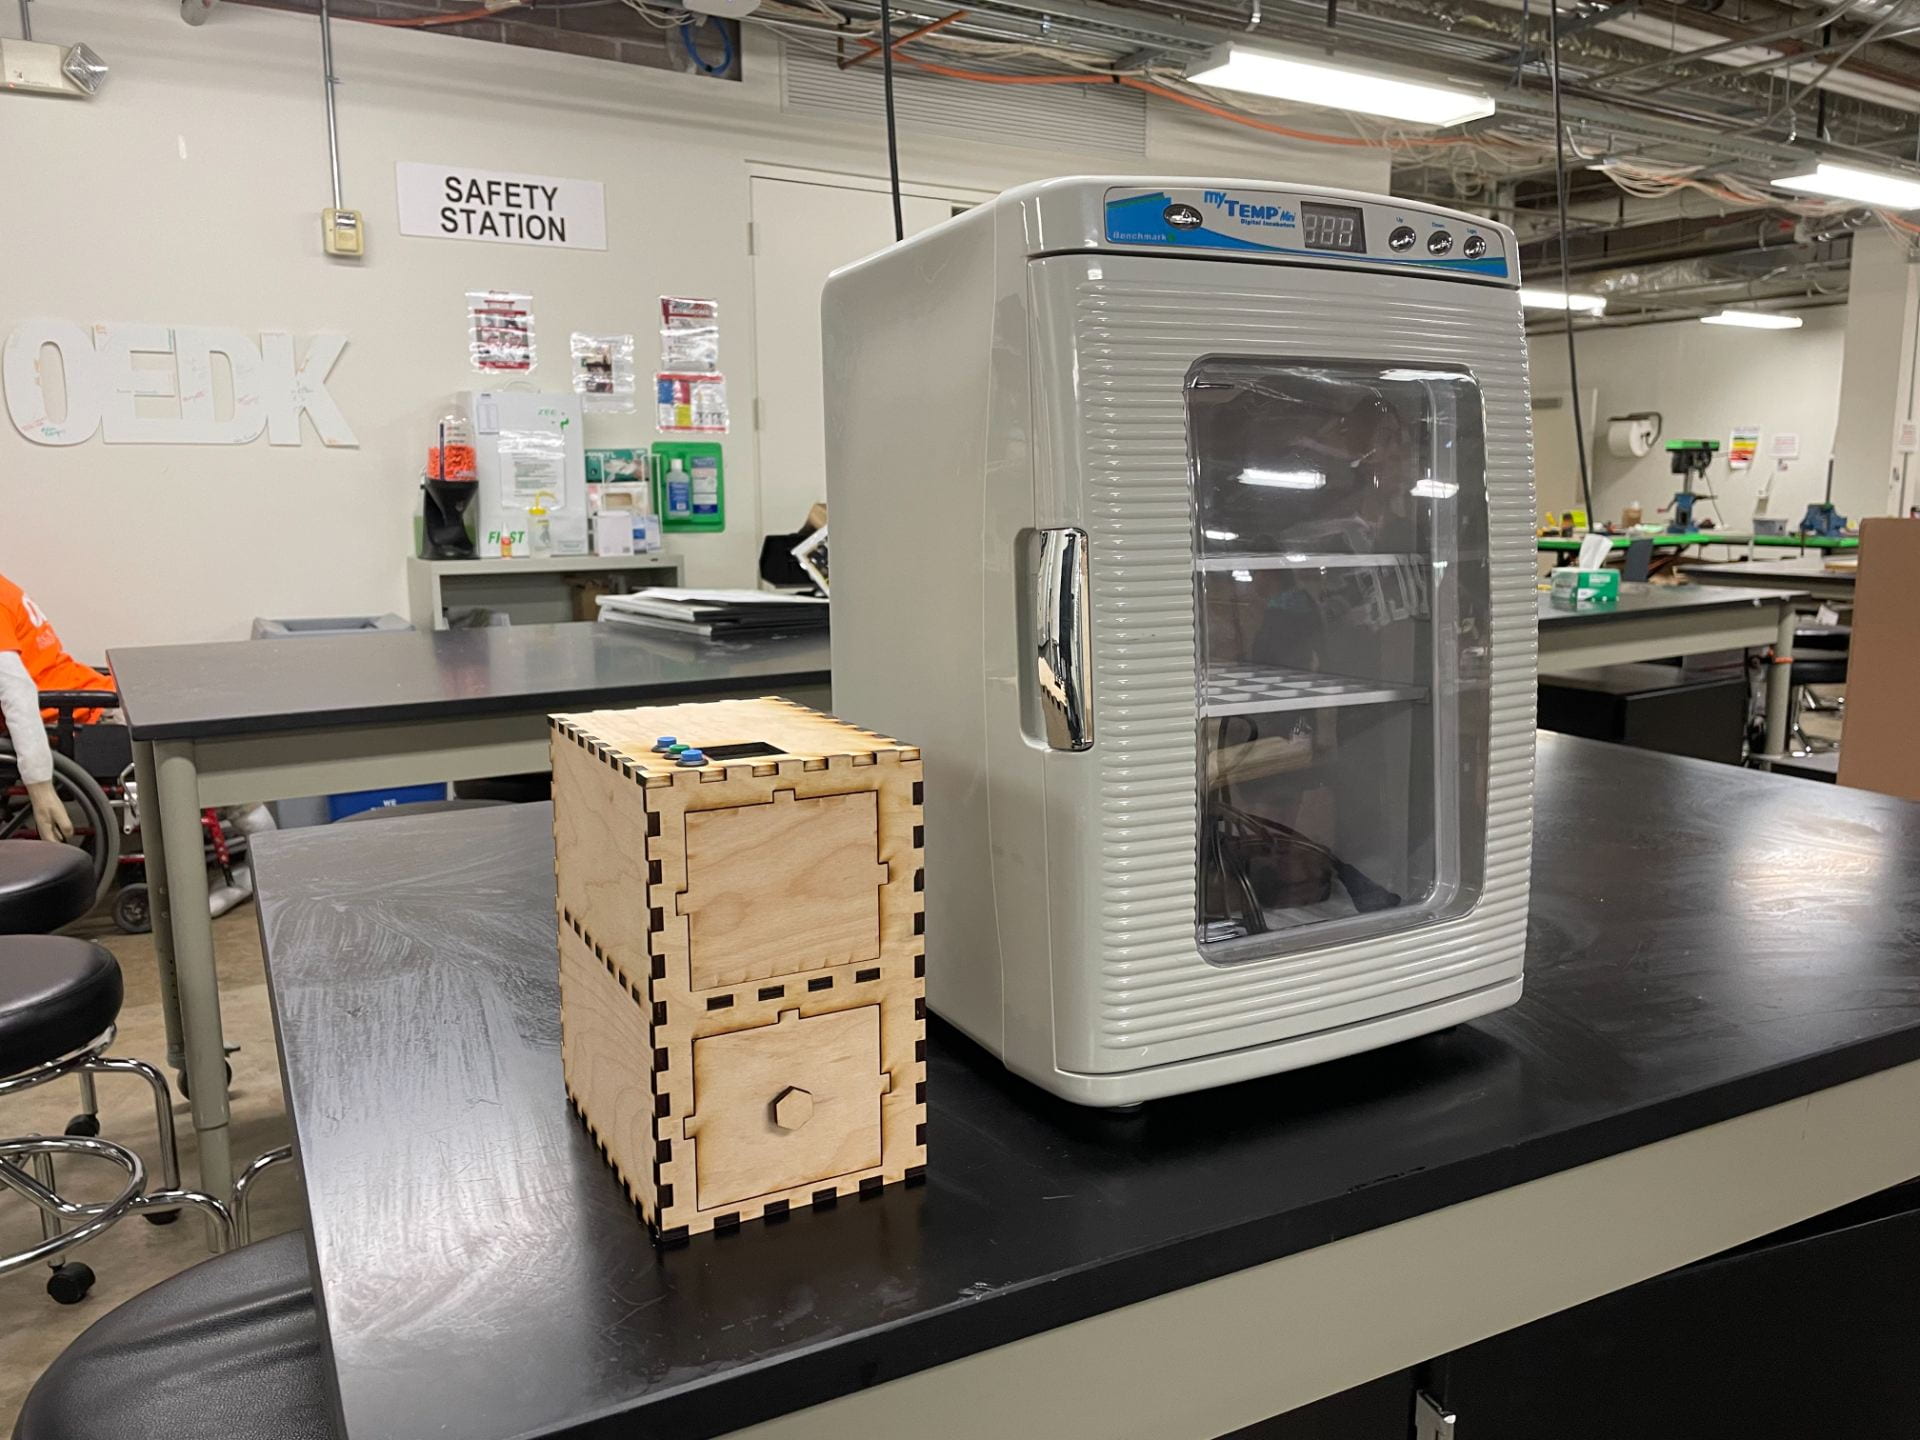
This photo shows our new vertical box design next to a “portable” commercial incubator. Both of these were used for our 48-hour comparative incubation test.
There were no major anomalies with the temperature of our incubator on Wednesday evening, and we checked it later that evening to ensure steady operation. Then, we left the OEDK for the night, just praying that our incubator would still be working by the morning. When I arrived in the morning, the temperature was still in range! Like clockwork! The rest of the 48-hour period went by without even a hiccup. By Friday, we were able to pull out the bacteria-filled Petrifilms and examine them with our faculty mentor. On the whole, our incubator performed very similarly to the commercial incubator! We were unable to quantify these results, because our water samples had far too many E. coli colonies, but we were very happy to see promising results after all of our efforts.
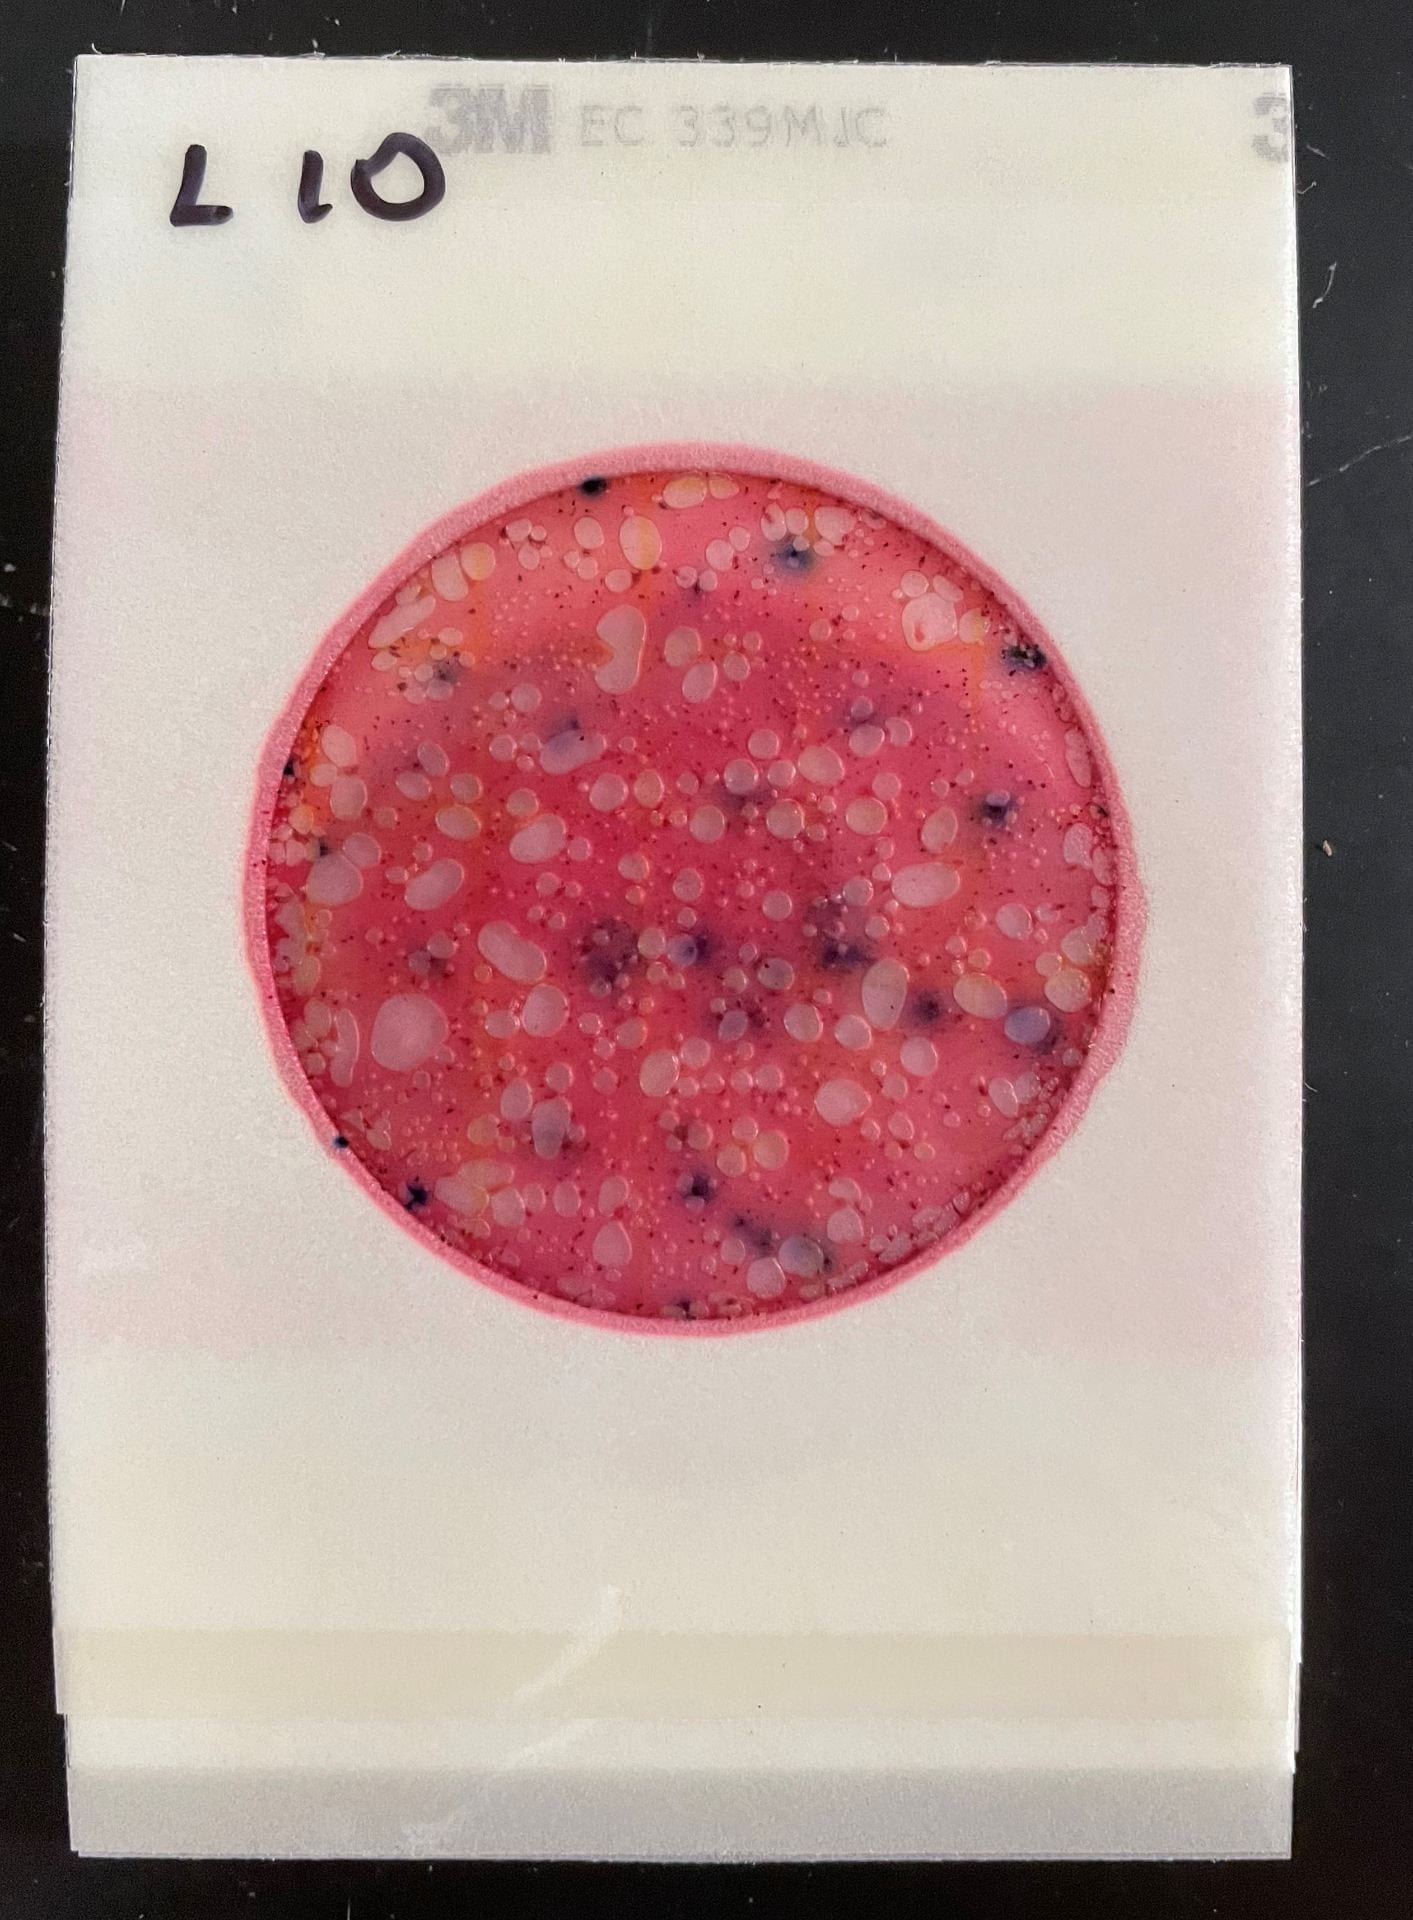
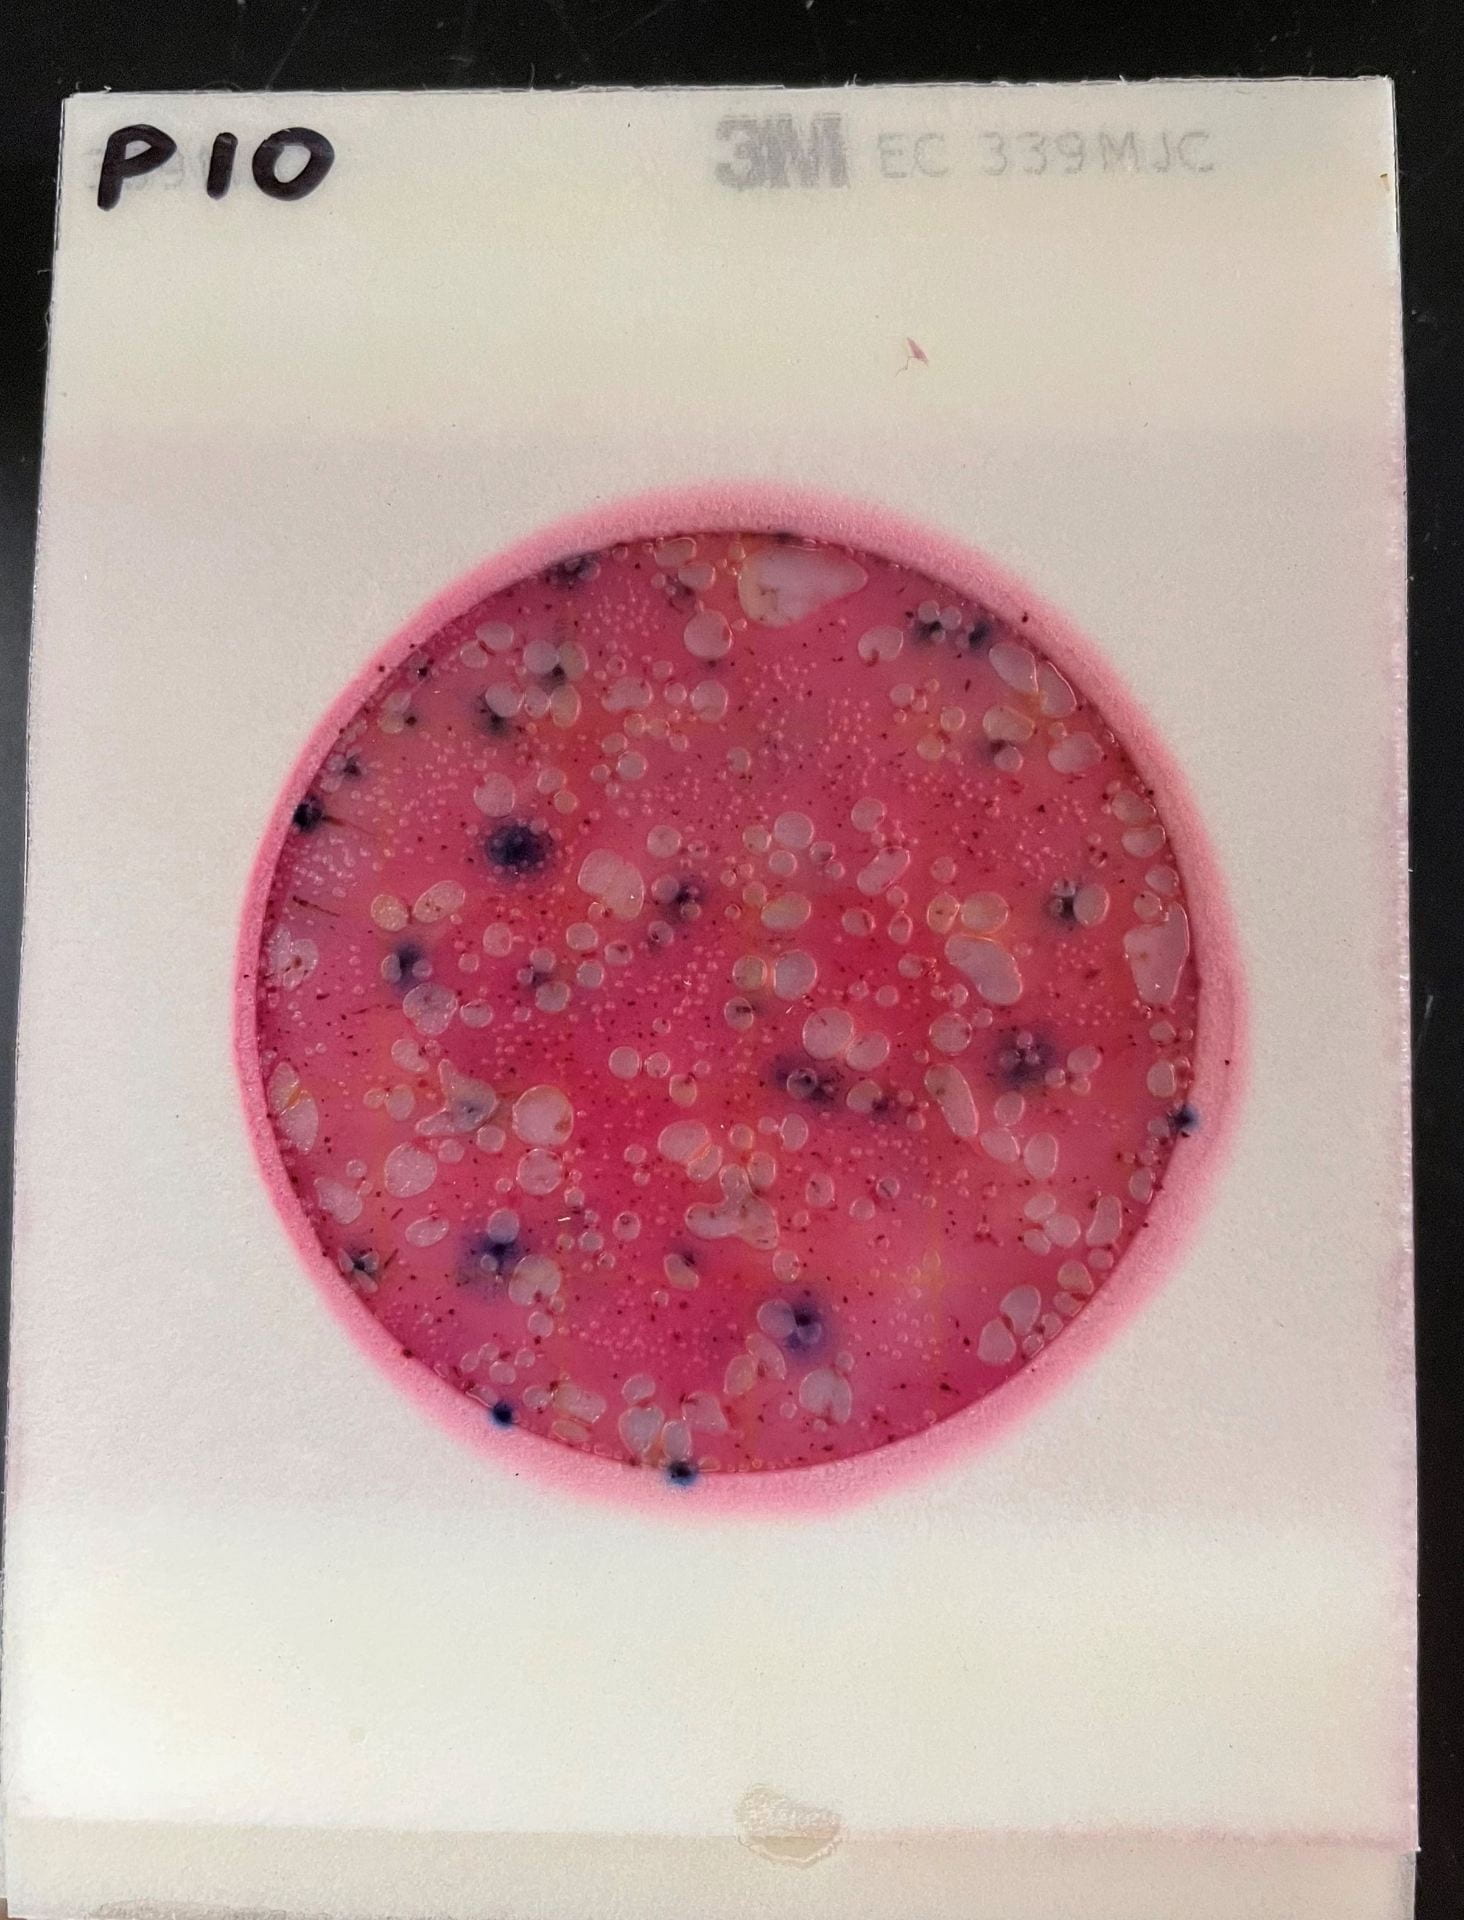
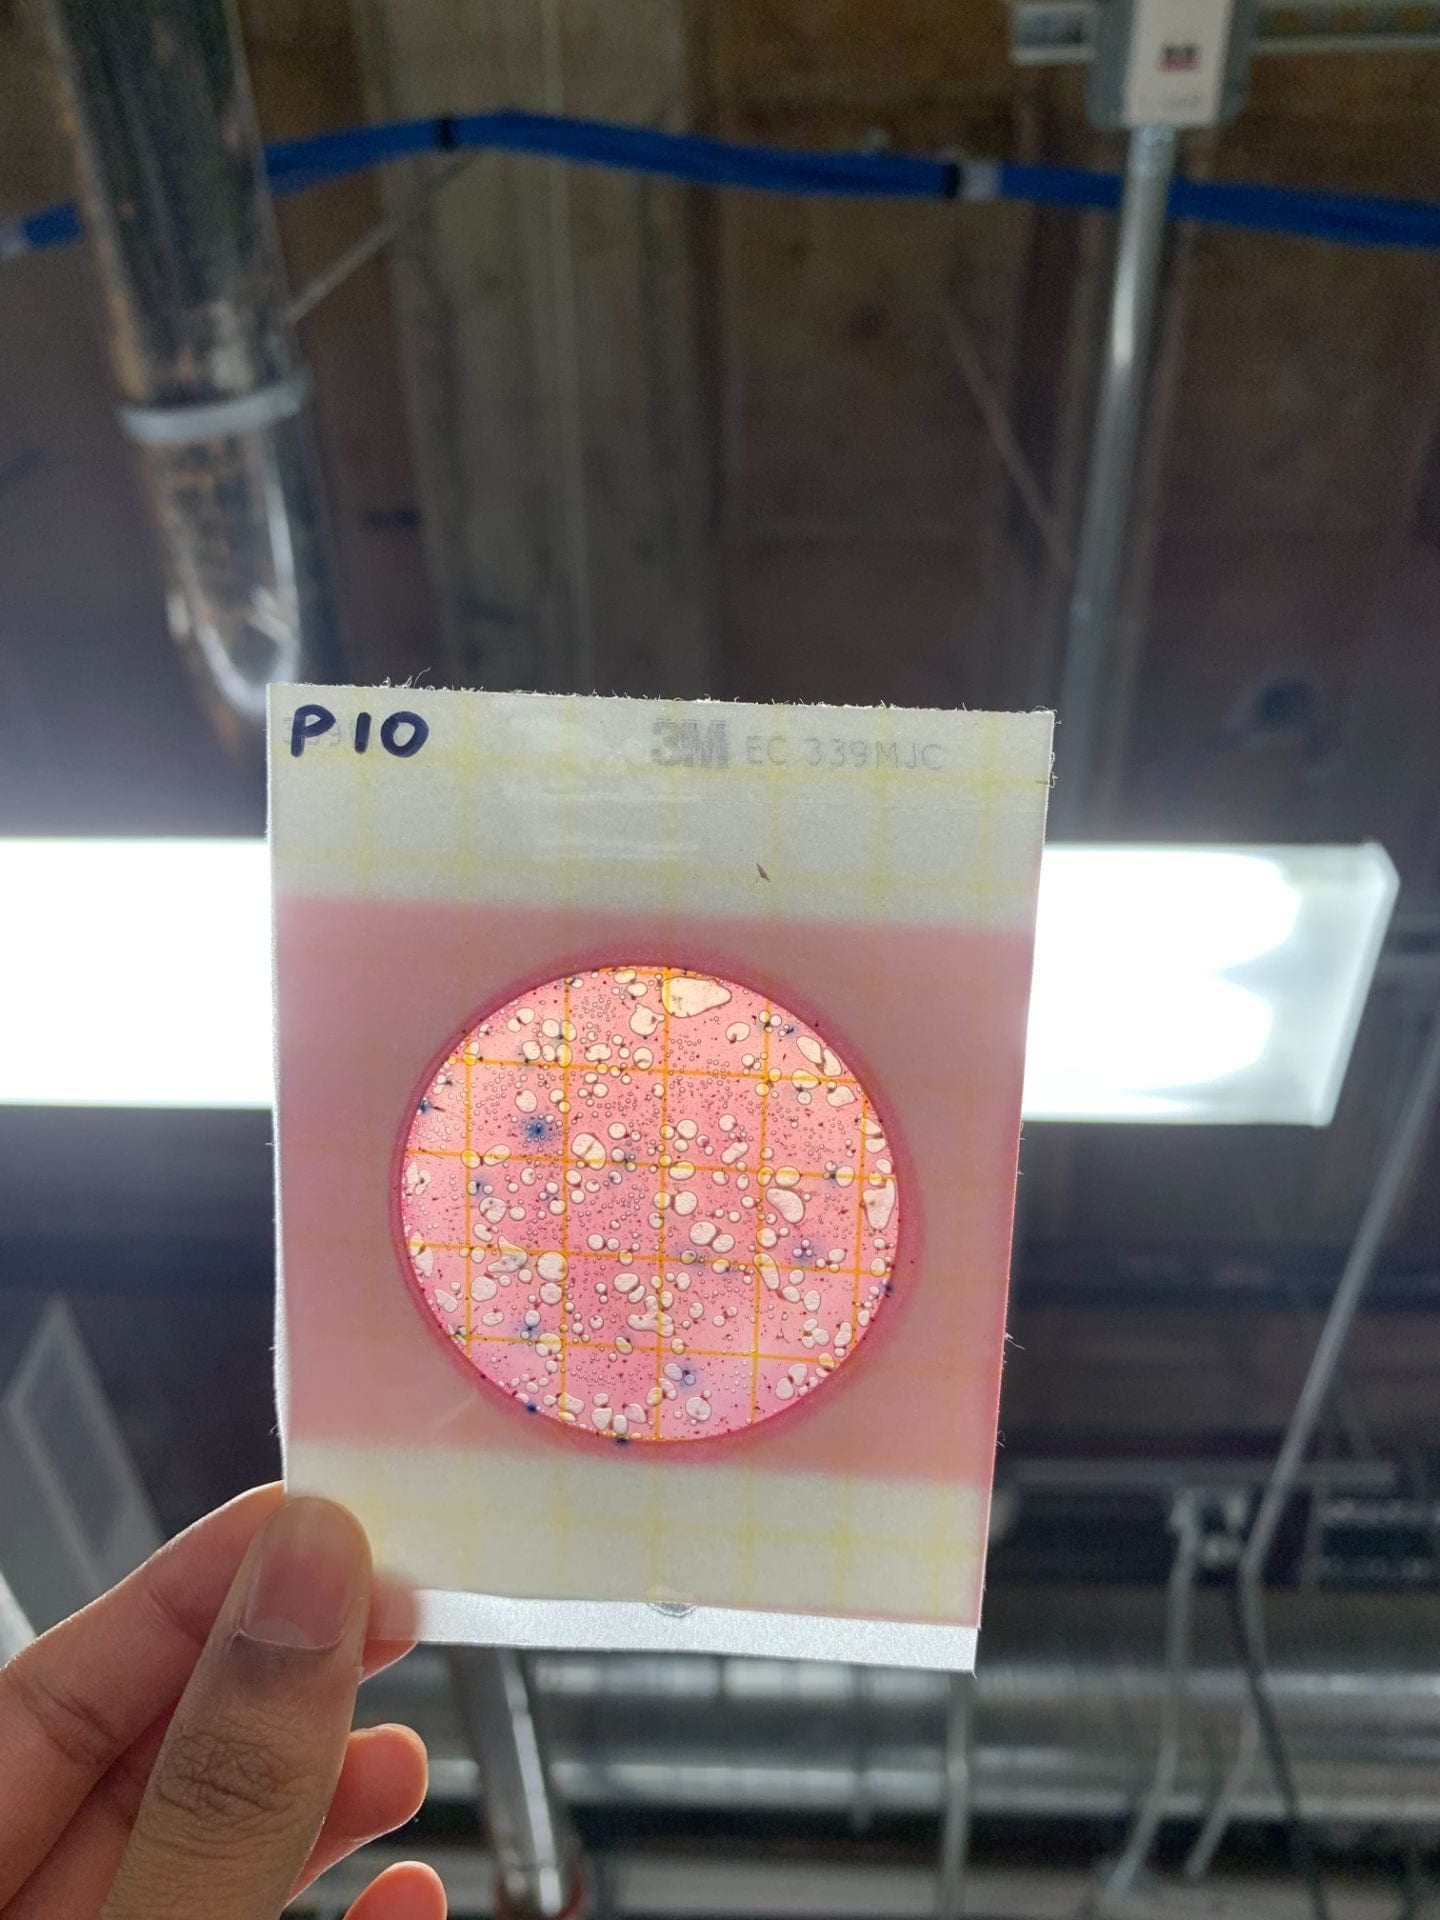
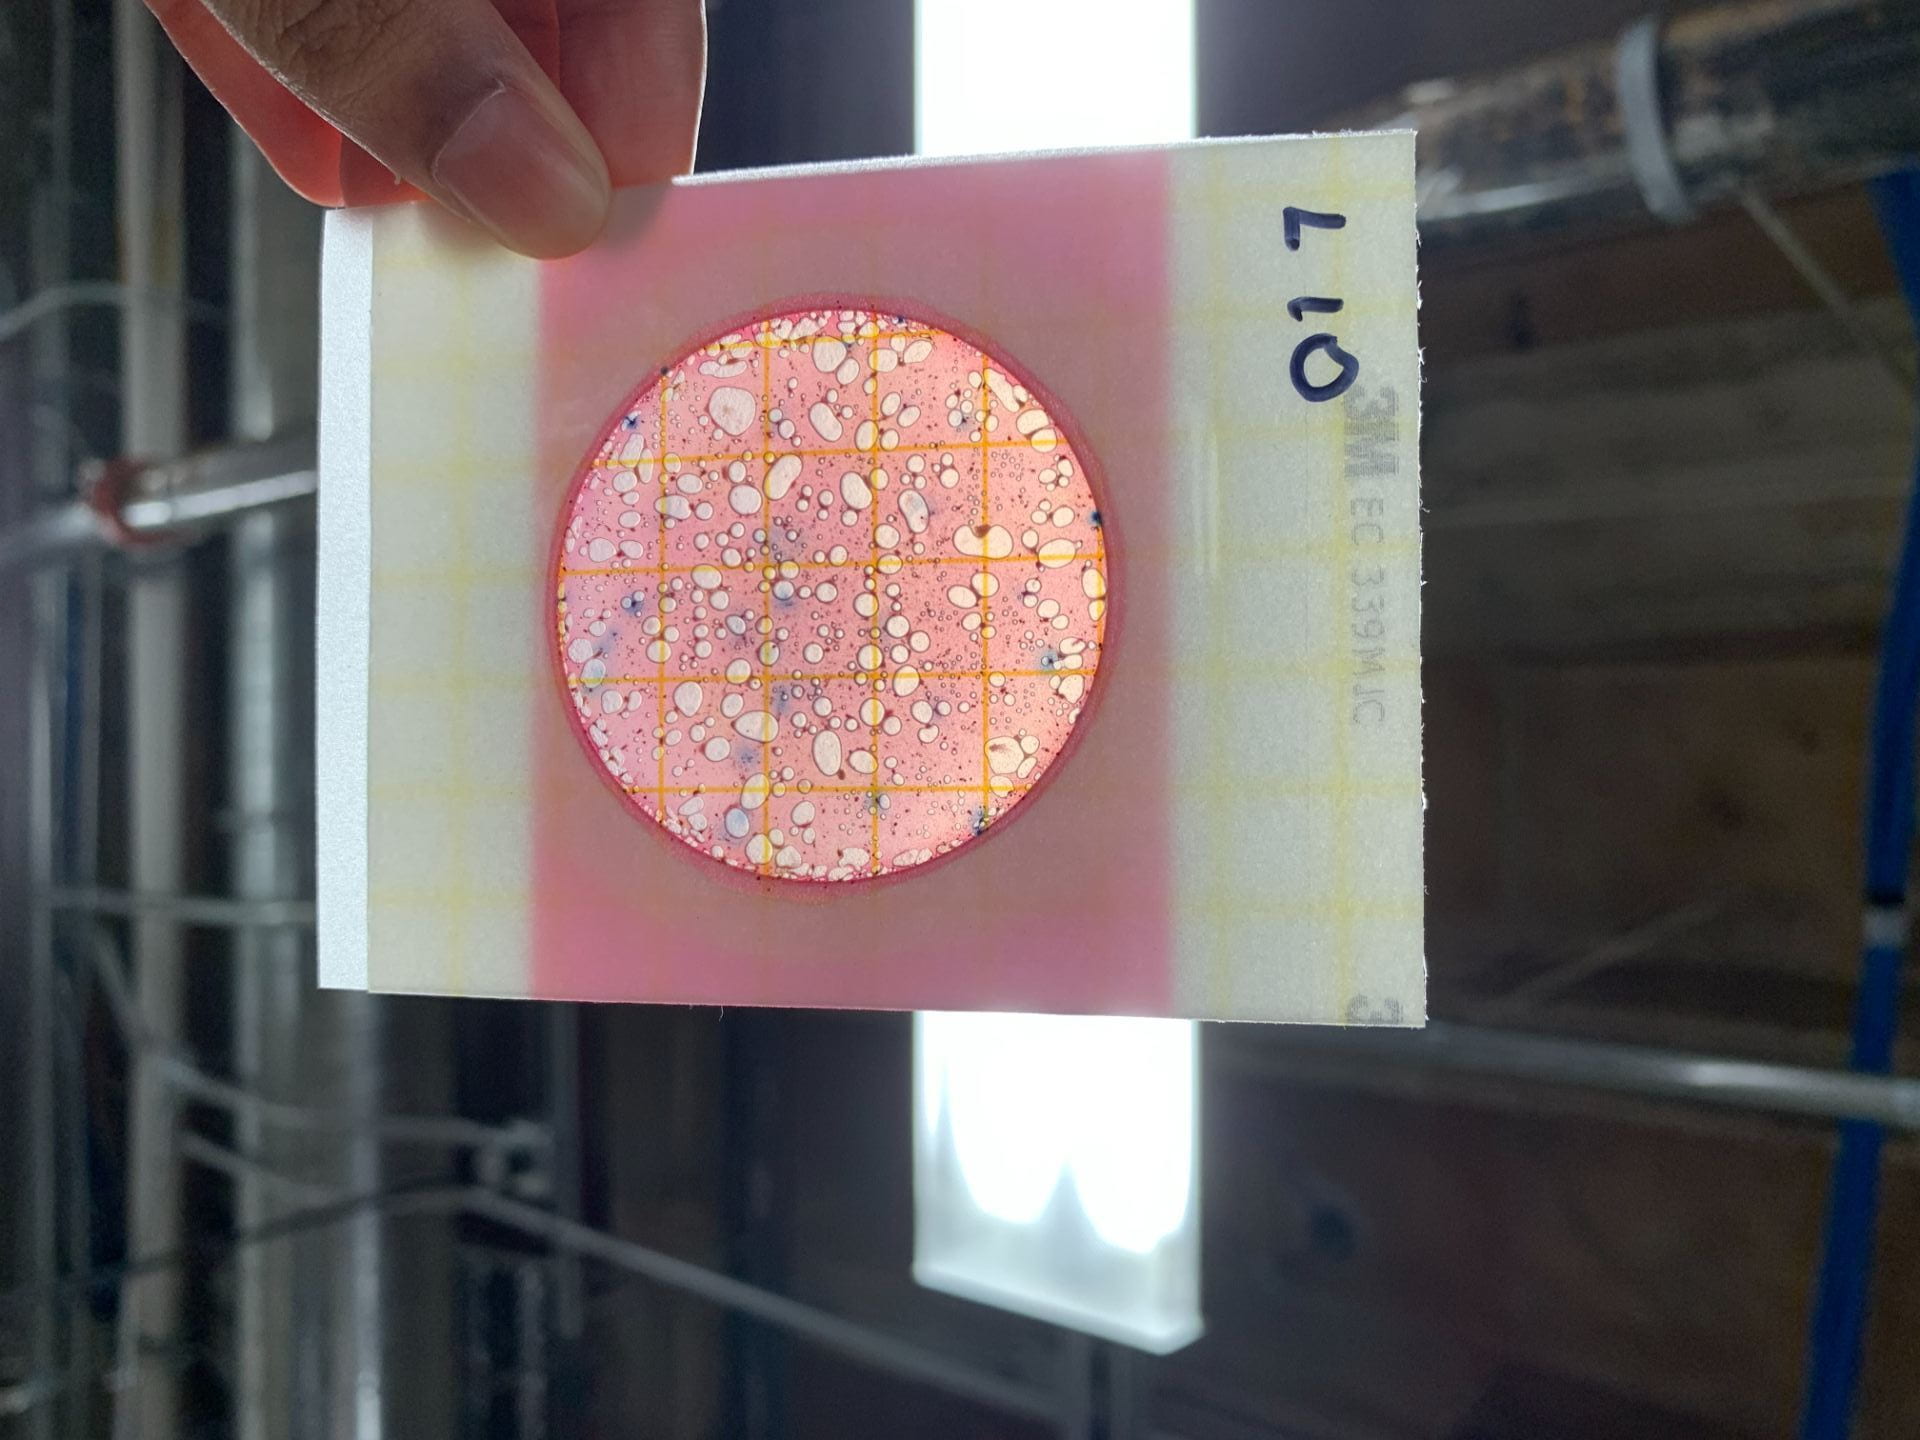
An example Petrifilm from the commercial incubator (top) alongside a Petrifilm from our own incubator (bottom), after 48 hours of incubation. The indigo dots indicate E. coli colonies, and the pale dots are air bubbles in the film that have resulted from respiration of the bacteria. Both incubators showed very similar results: a lot of E. coli.
Throughout this internship, we’ve generally been able to set our own deadlines. Of course, we knew that at the end of the six weeks, we wanted to have a new product that could successfully perform incubations. This week, however, we set ourselves a Wednesday deadline that pushed us to accomplish much more than we ever expected. In challenging ourselves and working hard at the beginning of the week, we rewarded ourselves with successful incubation results and the satisfaction of seeing the fruits of our weeks’ labor. Next week, we must prepare for showcase presentations, but I’m very excited for the refinements we will be able to make to our incubator in our final week together.
As the internship comes to a close, we have been spending most of our time putting final touches on our device, analyzing the results of our comparative incubation test, and sharing our work. My teammates and I are so excited about the work we have been able to achieve, so it’s bittersweet to be so close to the end already.
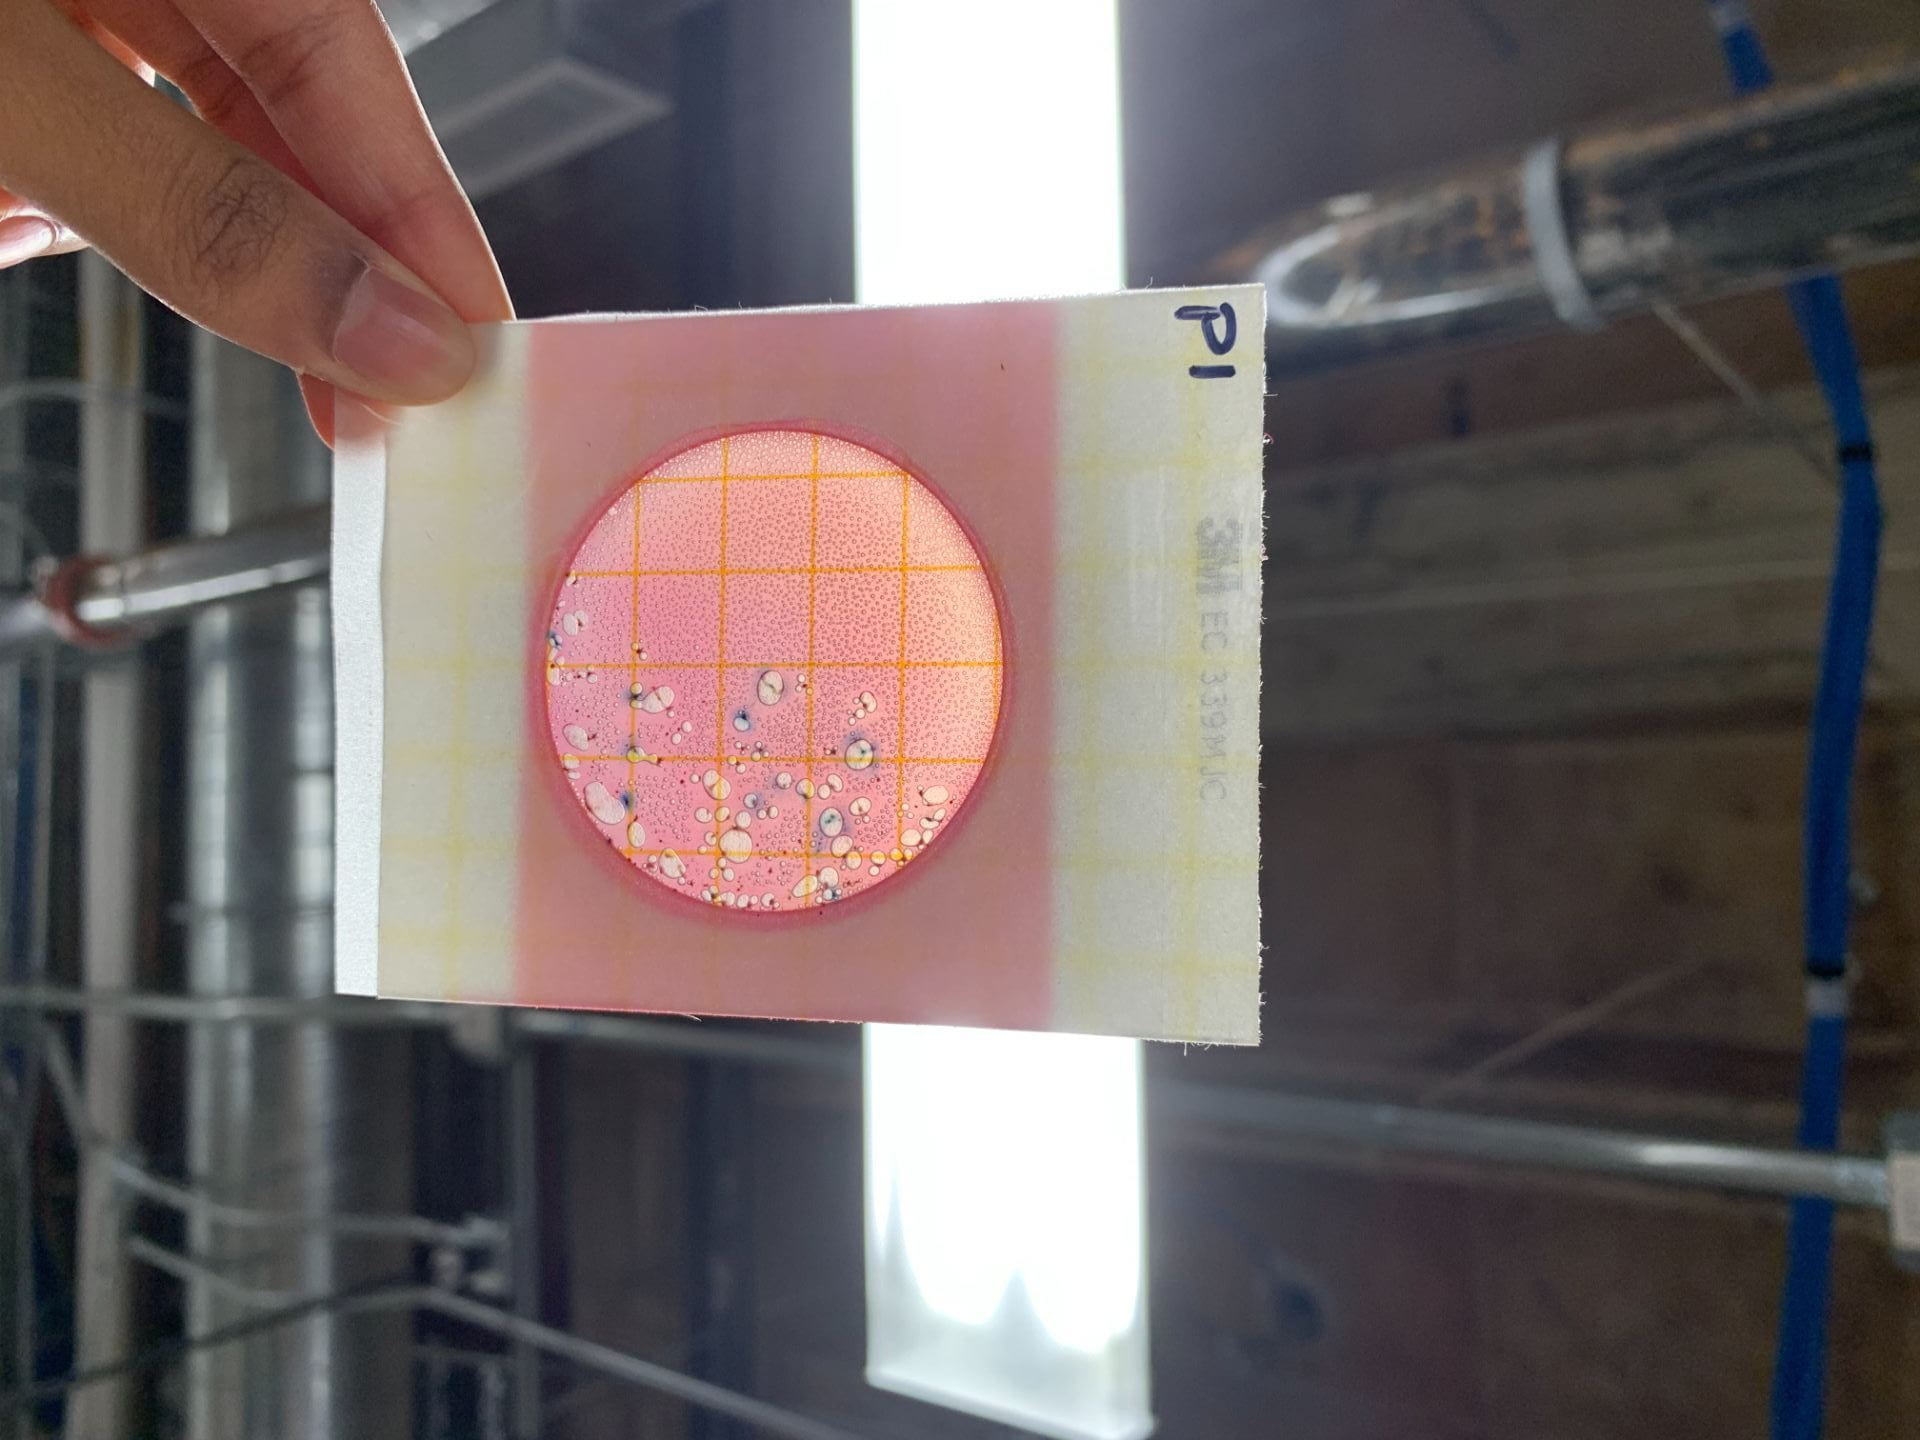
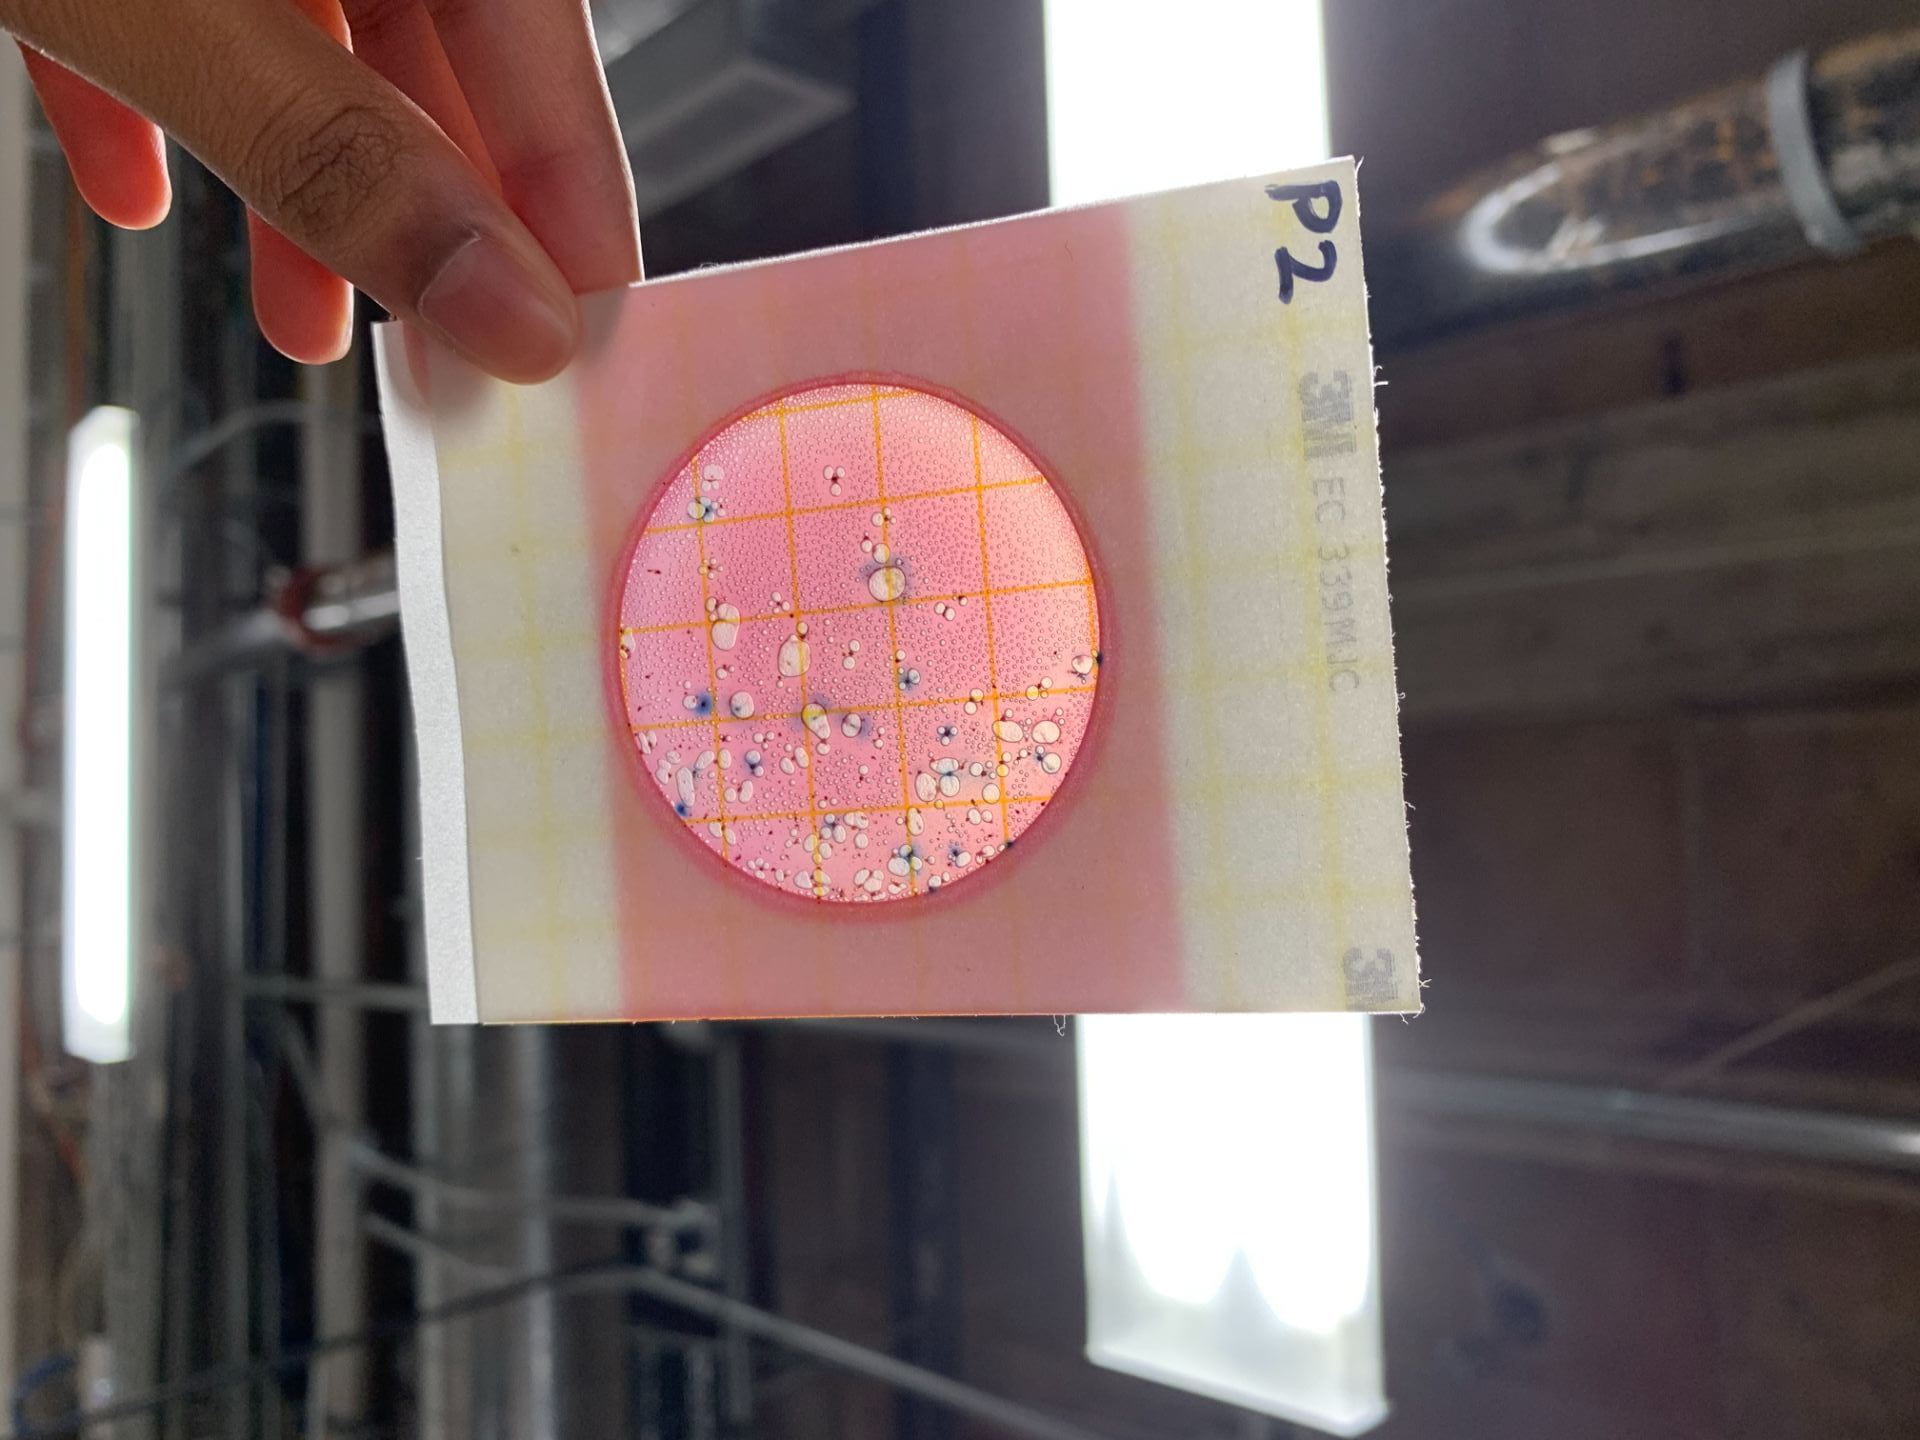
One of the most inspiring developments of the week that reinvigorated me for this final week was seeing our testing results: there was visually no difference between the 10 petrifilms we put in the commercial lab incubator and our own prototype. Ideally, we would have been able to numerically confirm this lack of difference, but according to Dr. Loyo (our mentor for this test), the bacteria were too far overgrown to accurately quantify.
Our incubator (left) and a commercial “portable” incubator (right)
Petrifilm incubated in our prototype
Petrifilm incubated in the commercial lab incubator
The petrifilm resting directly on the scaffolding
Slightly less sterilization seen in the petrifilm directly above the petrifilm which was in contact with the wood scaffolding
Something interesting we noticed, however, was that the bottom 3-4 petrifilms in our prototype had a region where no bacteria grew. We hypothesized that this was likely because the heating pad did not lie perfectly flat in the wooden scaffolding– part of it was slightly crumpled and was touching the upper part of the scaffolding on top of which the petrifilms rest. Because of this contact, the wood there must have gotten too hot for viable bacterial growth and caused that area of the petrifilm to be partially or fully sterilized. The top 6-7 petrifilms were well shielded from this heat by the bottom 3-4 petrifilms, so they looked very similar to the commercial incubator petrifilms.
While we couldn’t quite get the perfboard ready for the Rice360 showcase on Tuesday, we had a really good presentation and demo with our breadboard circuit. We even got the circuit onto a smaller breadboard to fit completely into our device the day after the showcase! Not only did we get a lot of good input from attendees, but we also were reminded just how much we were able to accomplish in such a short timeframe. After the showcase, we spent time working on our journal article which will serve as a technical memo for Dr. Read (our client at Public Invention) and future teams working on our device.
The full final device!
Overall, I am so proud of my team and I for being able to achieve so much this summer. Personally, I can say I’ve learned a lot of new skills I hope to be able to use again 🙂
Week 3 was a busy week with the preparation and presentation of the mid-presentations. We presented our designs as well as discussed the engineering process. We created up to over 100 possible mechanisms, designs, and ideas which was hard to narrow our ideas down to only two ideas by week 5. Week four we scheduled a meeting with Texas Heart Institute (THI) at the downtown medical center. This meeting was very helpful because we were able to eliminate many ideas and we narrowed down our ideas to 3.
I was not allowed to watch TV until I was in first grade. Yes, yes, how did I survive, that’s so sad, I didn’t have a childhood, etc. I’ve heard it all. But looking back, I’m grateful–I don’t find myself addicted to my screen the way that some of my friends are, and TV doesn’t have the same appeal for me as it does for everyone else.
However, when COVID-19 struck, I had to adapt to centering my life around screens. All social interactions suddenly became virtual–in order to talk to my friends, I had to pull out my phone. And although I’m still not a big fan of Facetime or Zoom, I’ve learned to value their unparalleled ability to bring people together in difficult times.
When I first found out that I would be in the only hybrid team in the internship, I was nervous. How would prototyping work? How would we productively brainstorm together? How could we ensure that everyone was included? The first week took some adjusting: finding a conference room with a working webcam, only having full team discussions in the morning, and Zooming in Fadeel for standup meetings. After spending so much time interacting only virtually, it was tough to be stuck in limbo between the COVID-19 world and normalcy.
I am constantly inspired by Fadeel’s ability to handle this dual environment. Right away, he suggested ways that he could contribute, including filling in research, keeping detailed documentation, and even remote prototyping if needed. I’ve attached a series of texts he sent after one of our daily text briefings (in which we’d catch him up on what was accomplished during the day and our suggestions for things he could work on while we slept), which pretty much sums up his eagerness to help us in the best way possible.
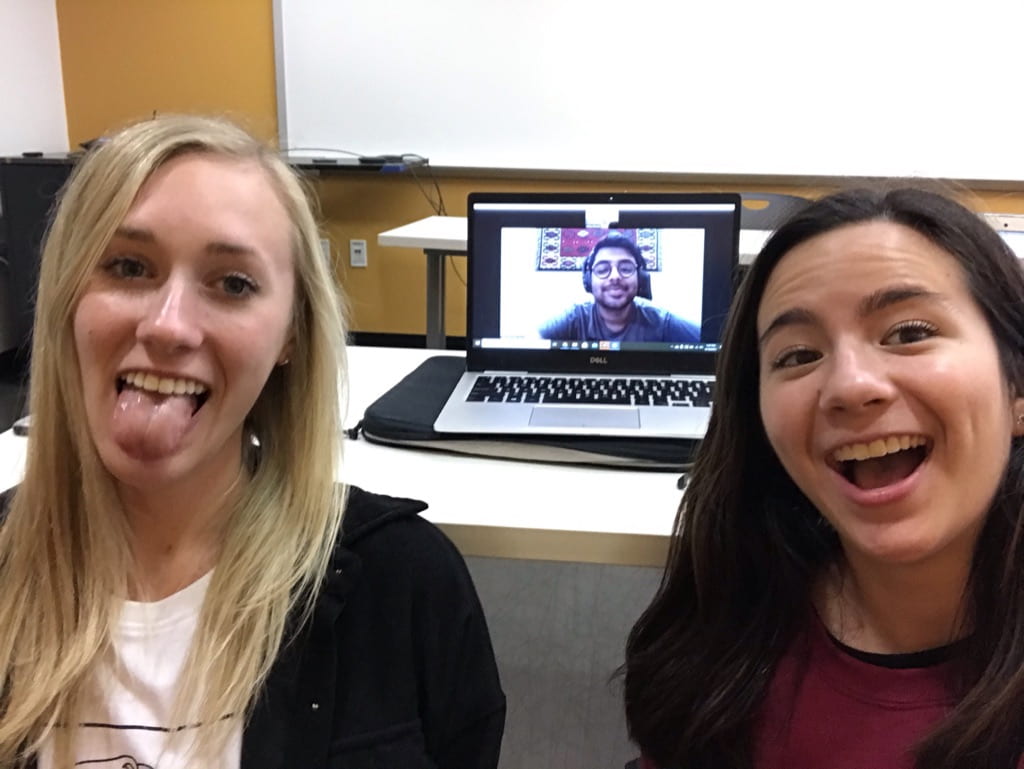
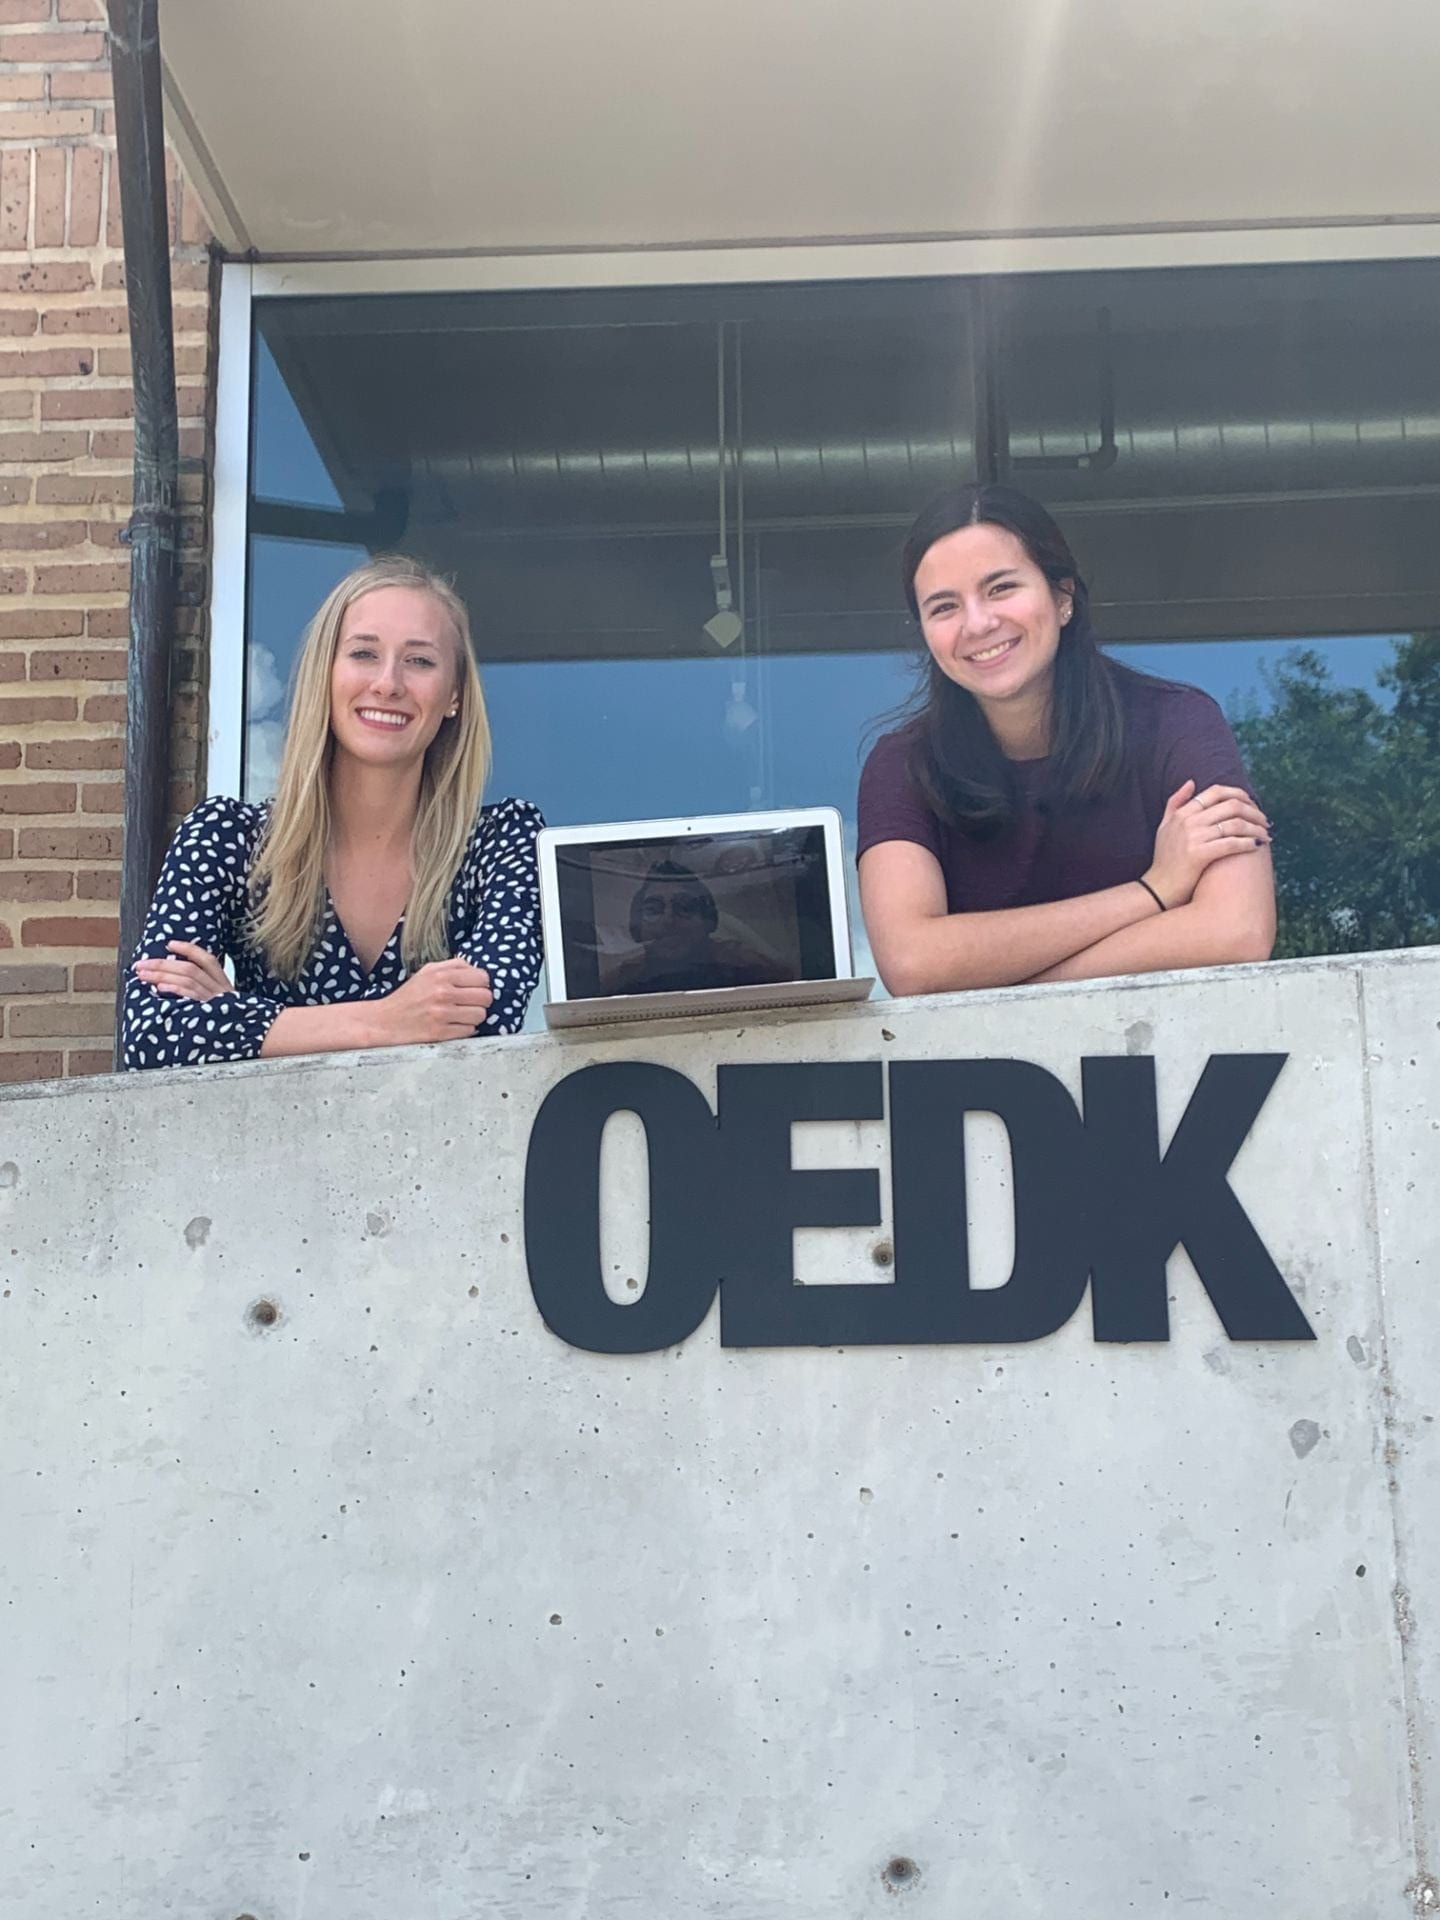
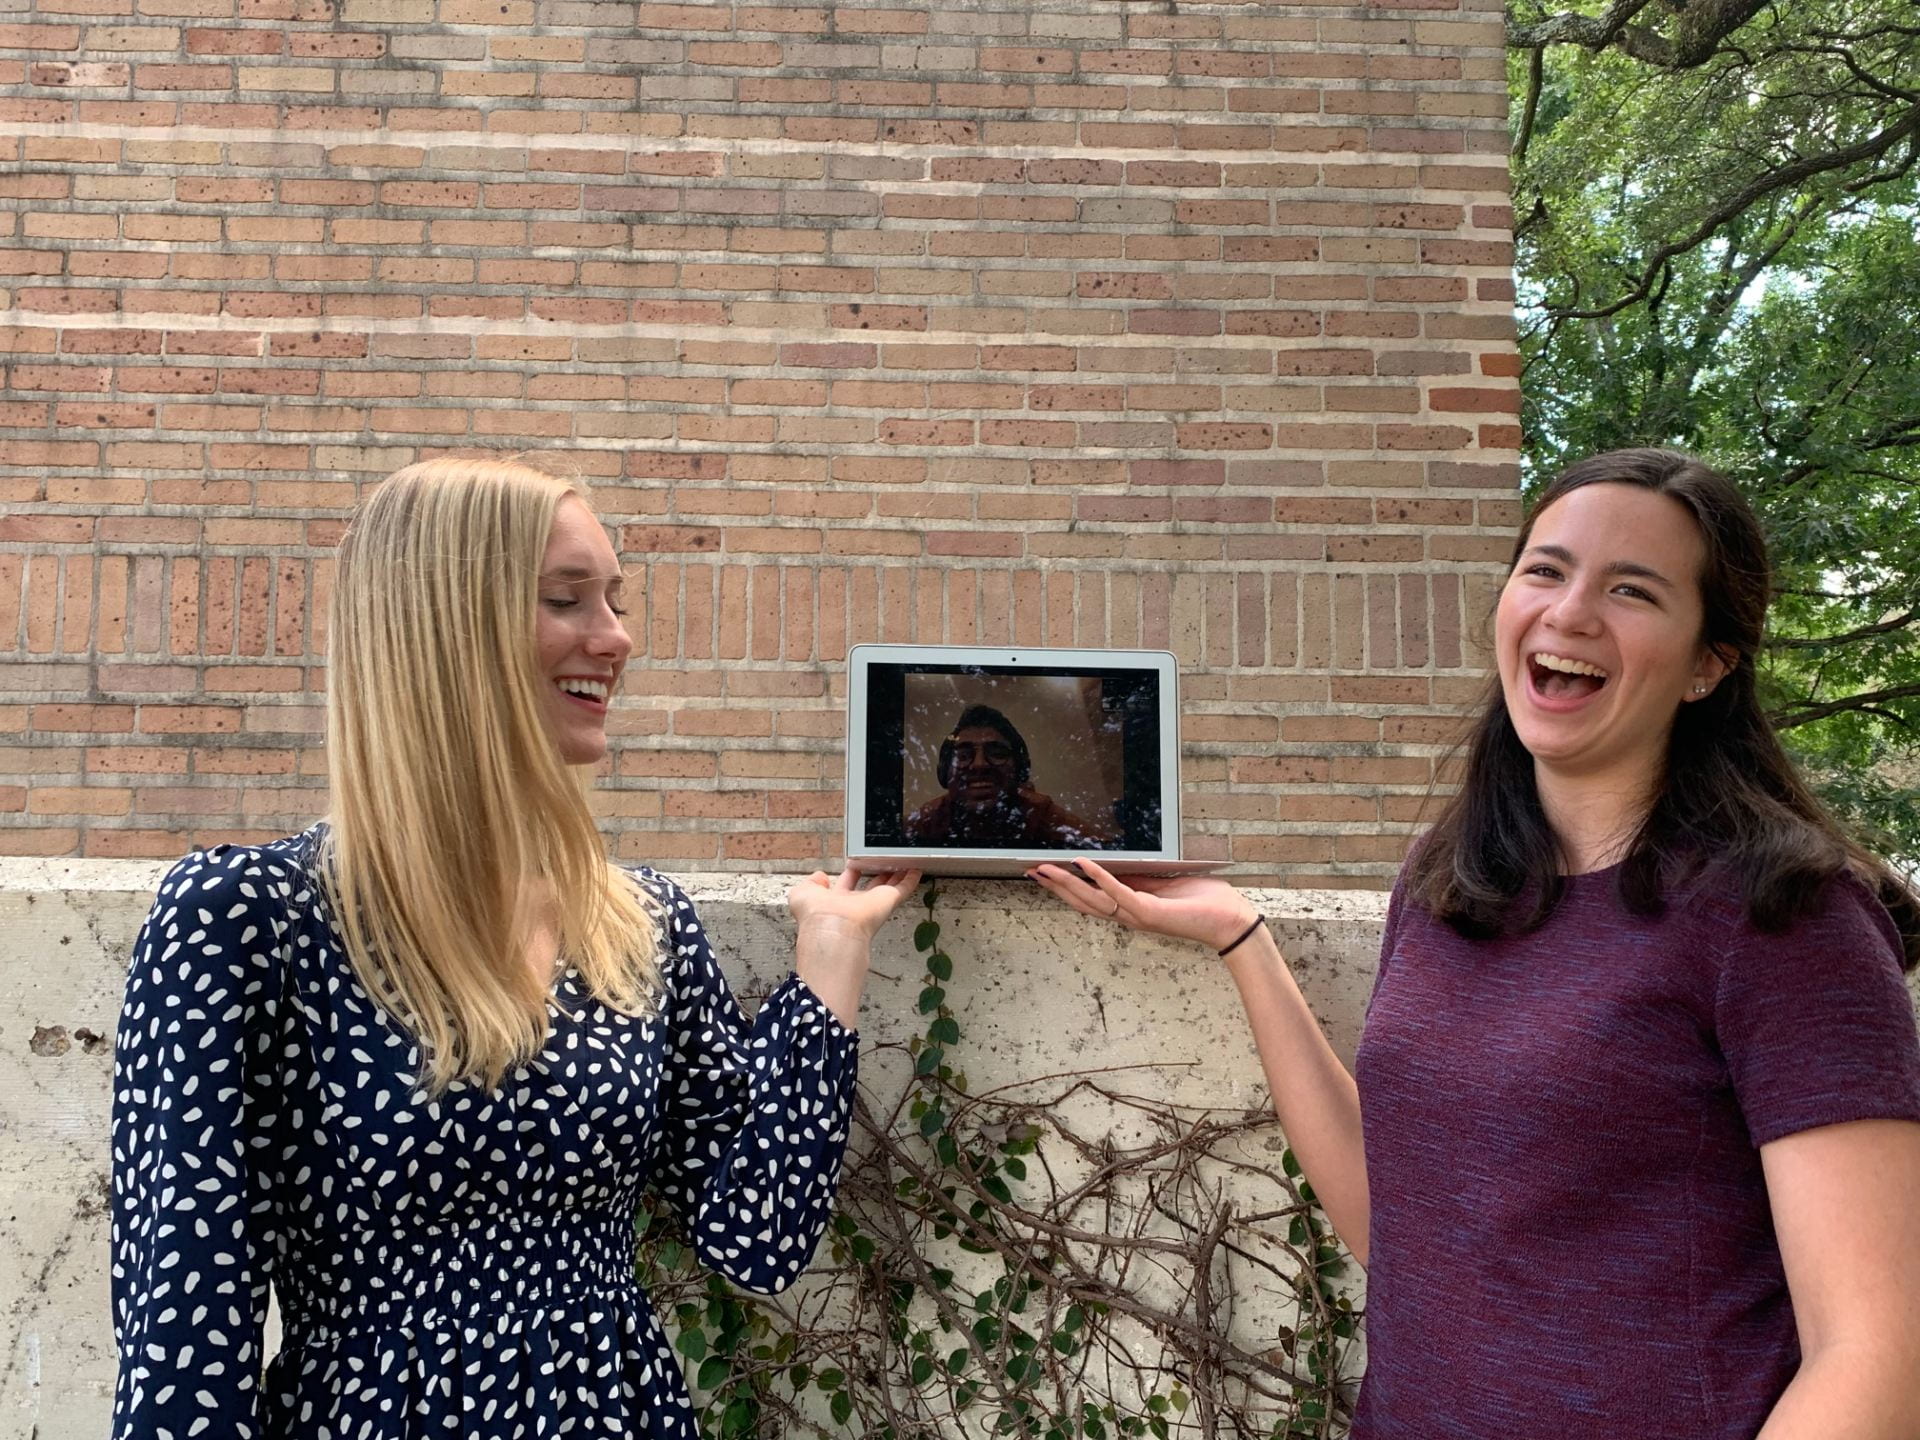
In the end, I think our team adapted marvelously to the hybrid situation. We took several hybrid team pictures, some of which I’ve attached in earlier blogs, and some of which I’ll attach below.
We also had hybrid team meetings every morning, staking a permanent claim to one of the OEDK conference rooms. All of the other interns loved hearing Fadeel’s voice boom down the hallways on the conference room speaker, or waving to him in the background of our Zoom camera.
My favorite part was hybrid team standups. I put myself in charge of virtual integration, which meant holding up my computer and walking around the room to show Fadeel the progress that each team had made and passing around my speaker so that he could hear us clearly. I can’t explain the joy I felt whenever people would wave at my computer or carefully say hi into the speaker (except Alois, who decided to yell into the speaker in his excitement).
One of my happiest moments occurred during Dr. Taylor’s end-of-internship speech, in which she was sharing a funny story about assumptions. When she finished the story, Fadeel posted a gasping emoji on his Zoom screen, and immediately the room erupted into laughter. It felt like he was sitting right here alongside us.
Seeing the way that the interns worked together to adapt to the hybrid environment made me realize two things: one, the power of technology to bridge enormous gaps in tough times, and two, I am passionate about bridging these gaps. It all made sense: my desire to pursue global health roots in my desire to bridge gaps in global healthcare access, so of course I would get super excited about little things like serving as Fadeel’s eyes and ears here in Houston. I’ve learned so much patience and creative thinking solely from the hybrid aspect of this internship, and I’m so happy that I was placed in this hybrid team.
So in the end, although I pride myself in my ability to resist downloading Tik Tok and binge-watching Netflix, I am grateful to technology for the way it can bring people together all over the world.
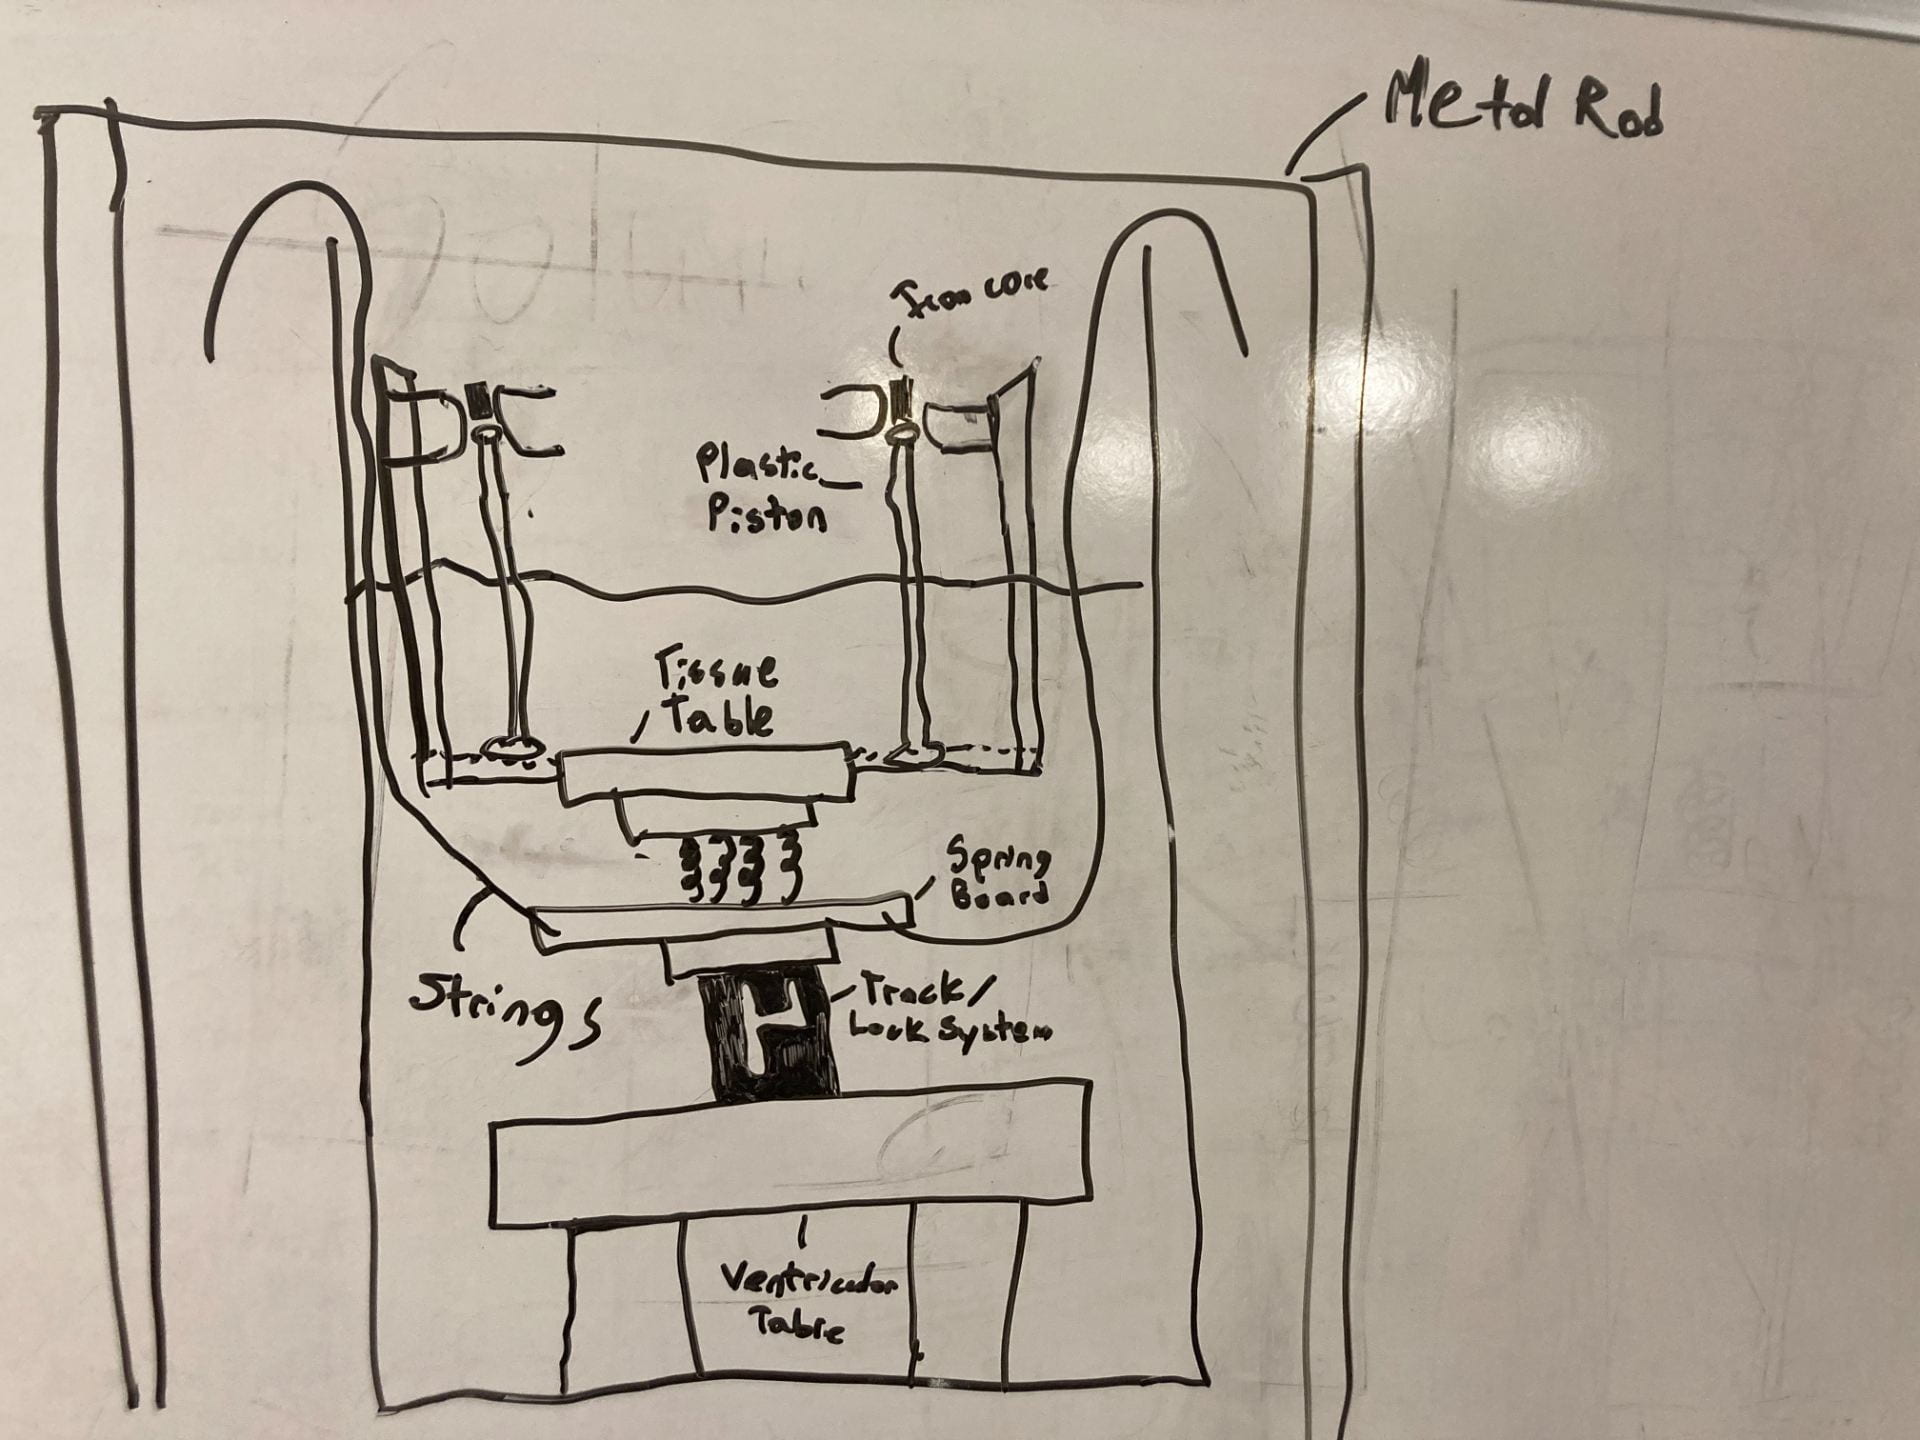
What a busy week for team Heartache. Our team was head on into the prototyping season of our internship with Kaitlyn and Rachel working on solution the cumulative motion of heart/lung displacement on the tissue table using strings. Chris and I worked on designing on the variation of the solution using a solenoid and springs to mimic the heart contraction and the same pulley system to mimic lung motion. Both sides of the team spent much of the July 4th weekend at the OEDK cading and 3D printing parts.
Chris and I developed an illustration of the iron solenoid solution that we designed with the iron solenoid being elevated above the water using extensions on the tissue table and plastic extensions on the iron solenoid to push down on the tissue table, which will be build on the spring board. The illustration is shown in the following picture
As far as the cumulative motion solution, team Heartache is currently in the works of improving the lung motion of the device by replacing the string & pulley system that was subject to issues with string slack with a gear and track that will give the device a less subtle and more accurate lung (and/or heart) motion.