Week 3: Foil. Lots and lots of foil.

My favorite part of being a small child was not recess, not naptime, but crafts. My mom and I would sit together every afternoon for “pony drawing time,” and once I was introduced to pipe cleaners, it was decided: I was a hardcore crafter. From Lincoln Log cabins to knitted monsters to intricate Hexbug race tracks, I loved to create things. 

It’s sad that so many people lose touch with their crafty side once they hit third or fourth grade. Although I continued to draw as a hobby (especially dragons and flames), the pom poms, popsicle sticks, and even pipe cleaners disappeared into the storage closet. Who knew that it would be the Rice 360˚ internship that brought me to craft once again?

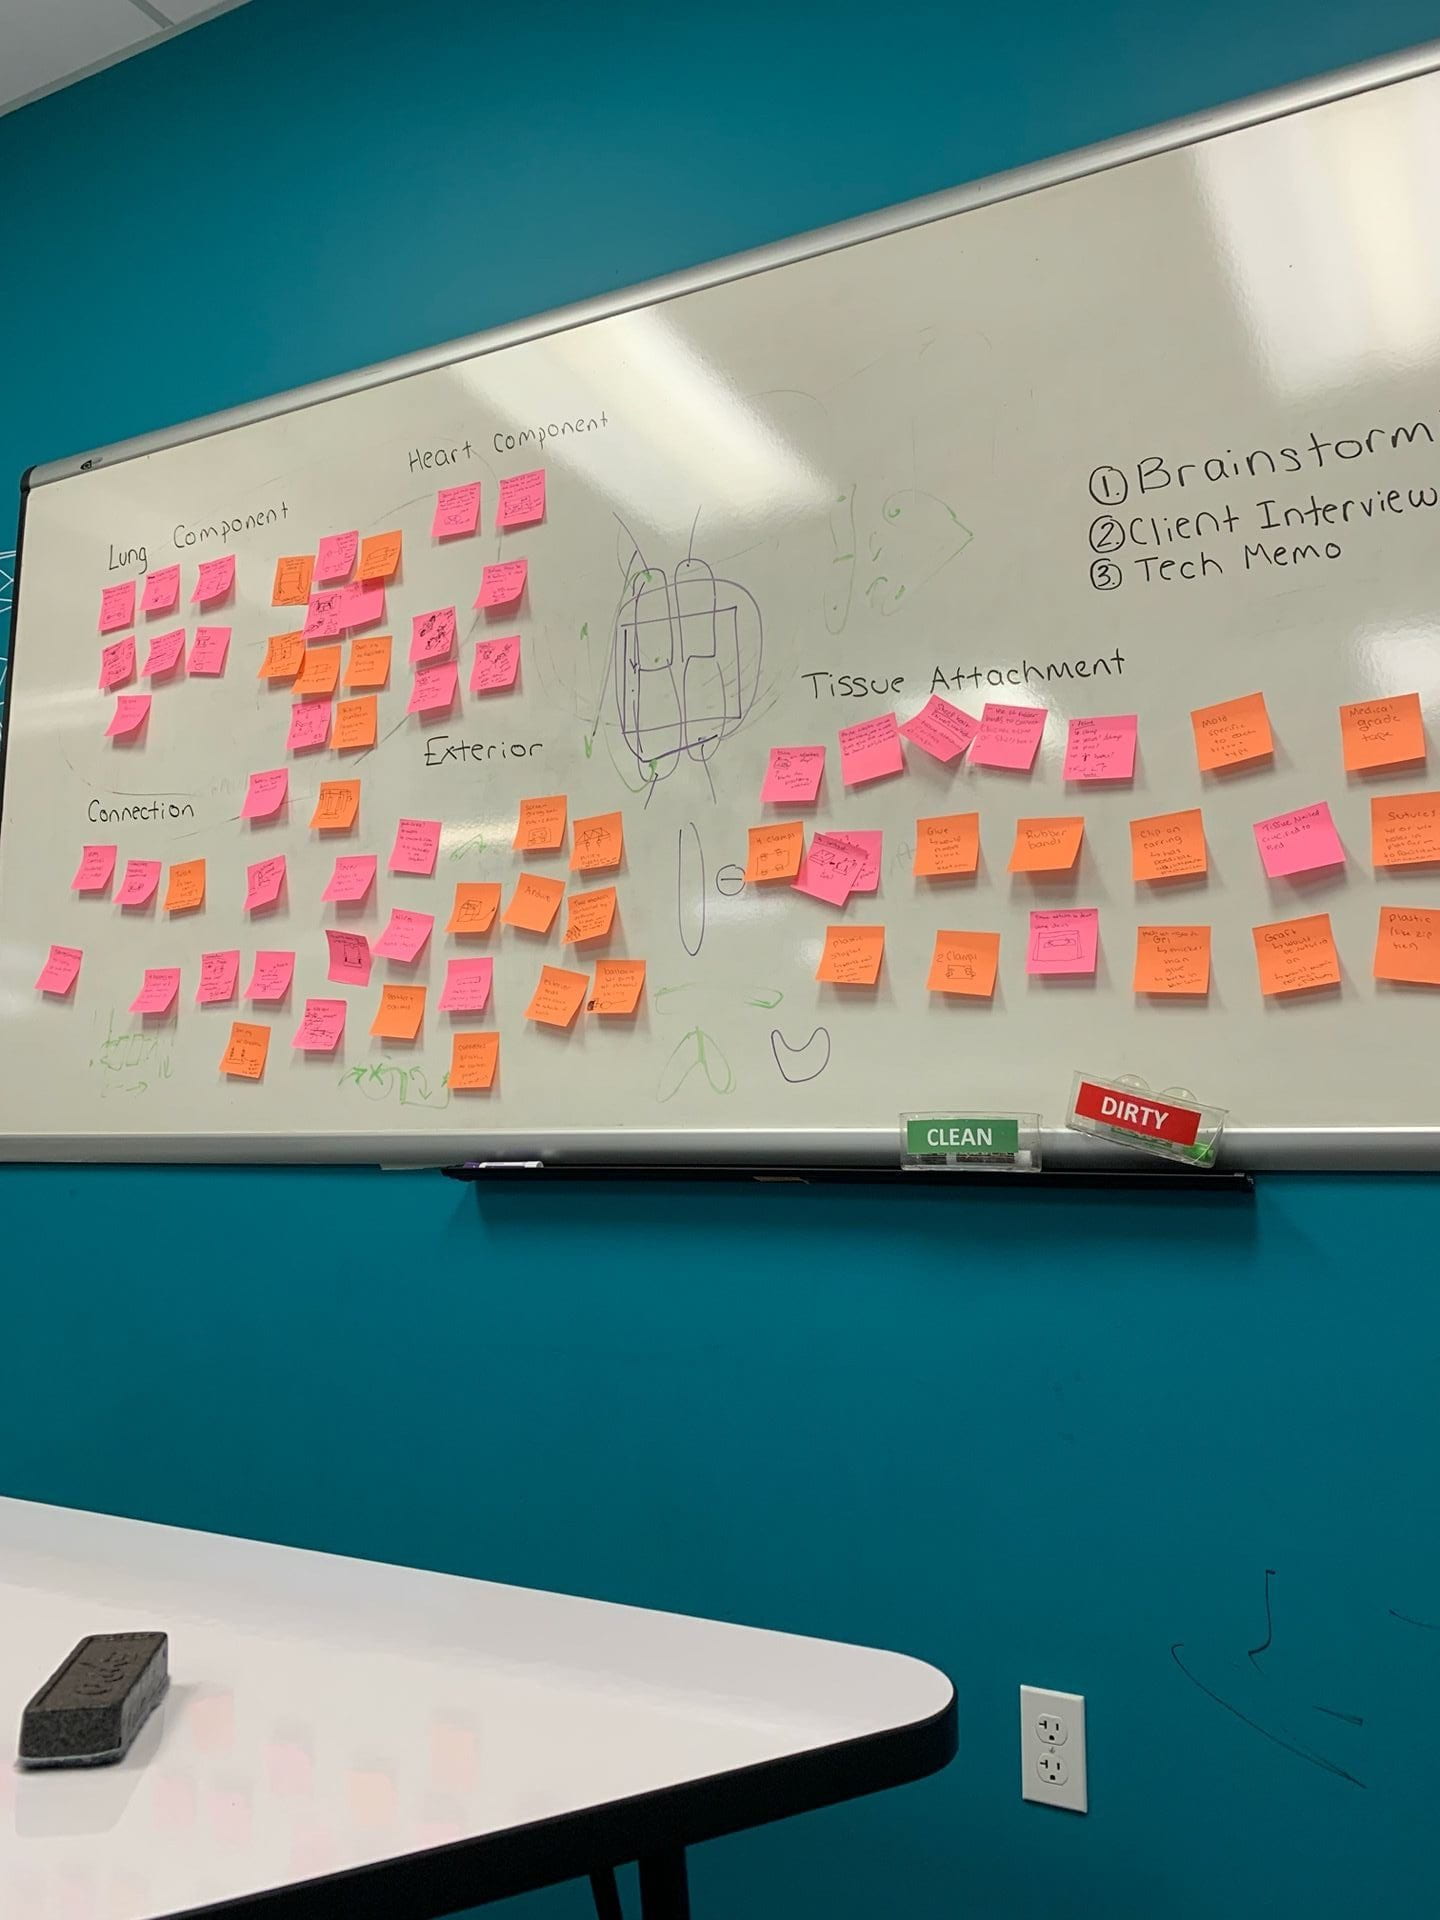
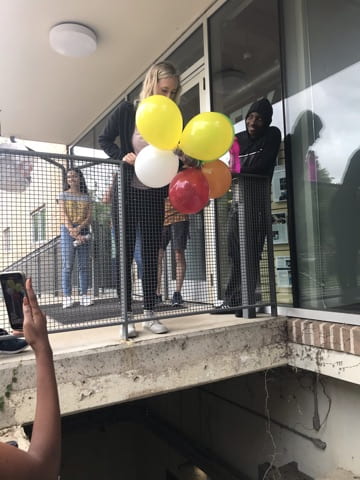
Early this week, we began the exciting process of low-fidelity prototyping. Dubbed “lo-fi” prototyping, this process involves creating very simple physical representations of the ideas that we brainstormed last week. When I discovered that the tray overflowing with straws, balloons, foam, and even treasure–yes, treasure!–was the toolkit for our prototypes, I was thrilled. After beginning with a time-constrained egg drop challenge early on Monday morning (I’ve attached the picture of our balloon-cushioned, cotton ball-insulated, cup-enclosed design below), we got right to work on creating our lo-fi prototypes. 

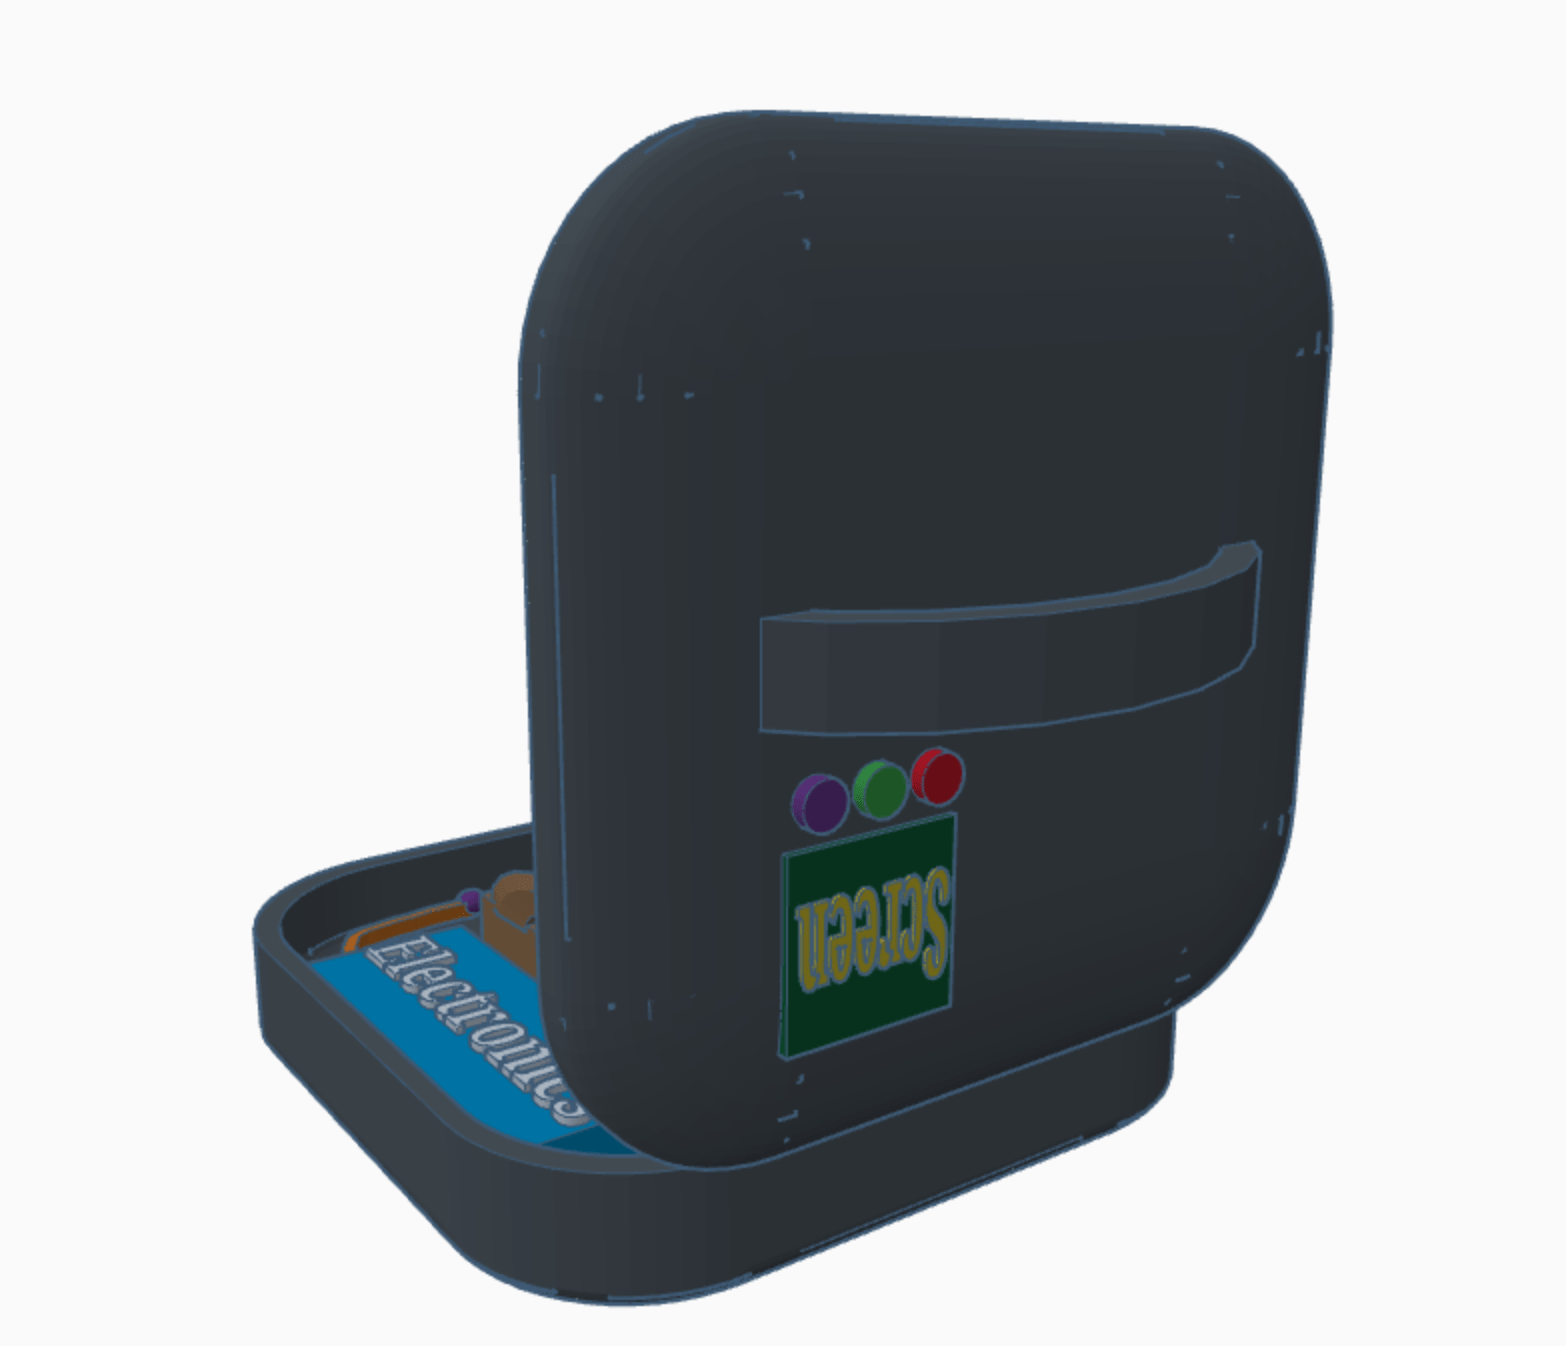
After evaluating our brainstormed ideas, we had settled on two possible geometries for our device: a cylindrical shape with a removable frame that slides out vertically, and a rectangular box with removable trays that slides out horizontally. To determine which shape was more user-friendly and efficient (in terms of maximizing masks sterilized per unit time), we decided to create lo-fi models of both. 

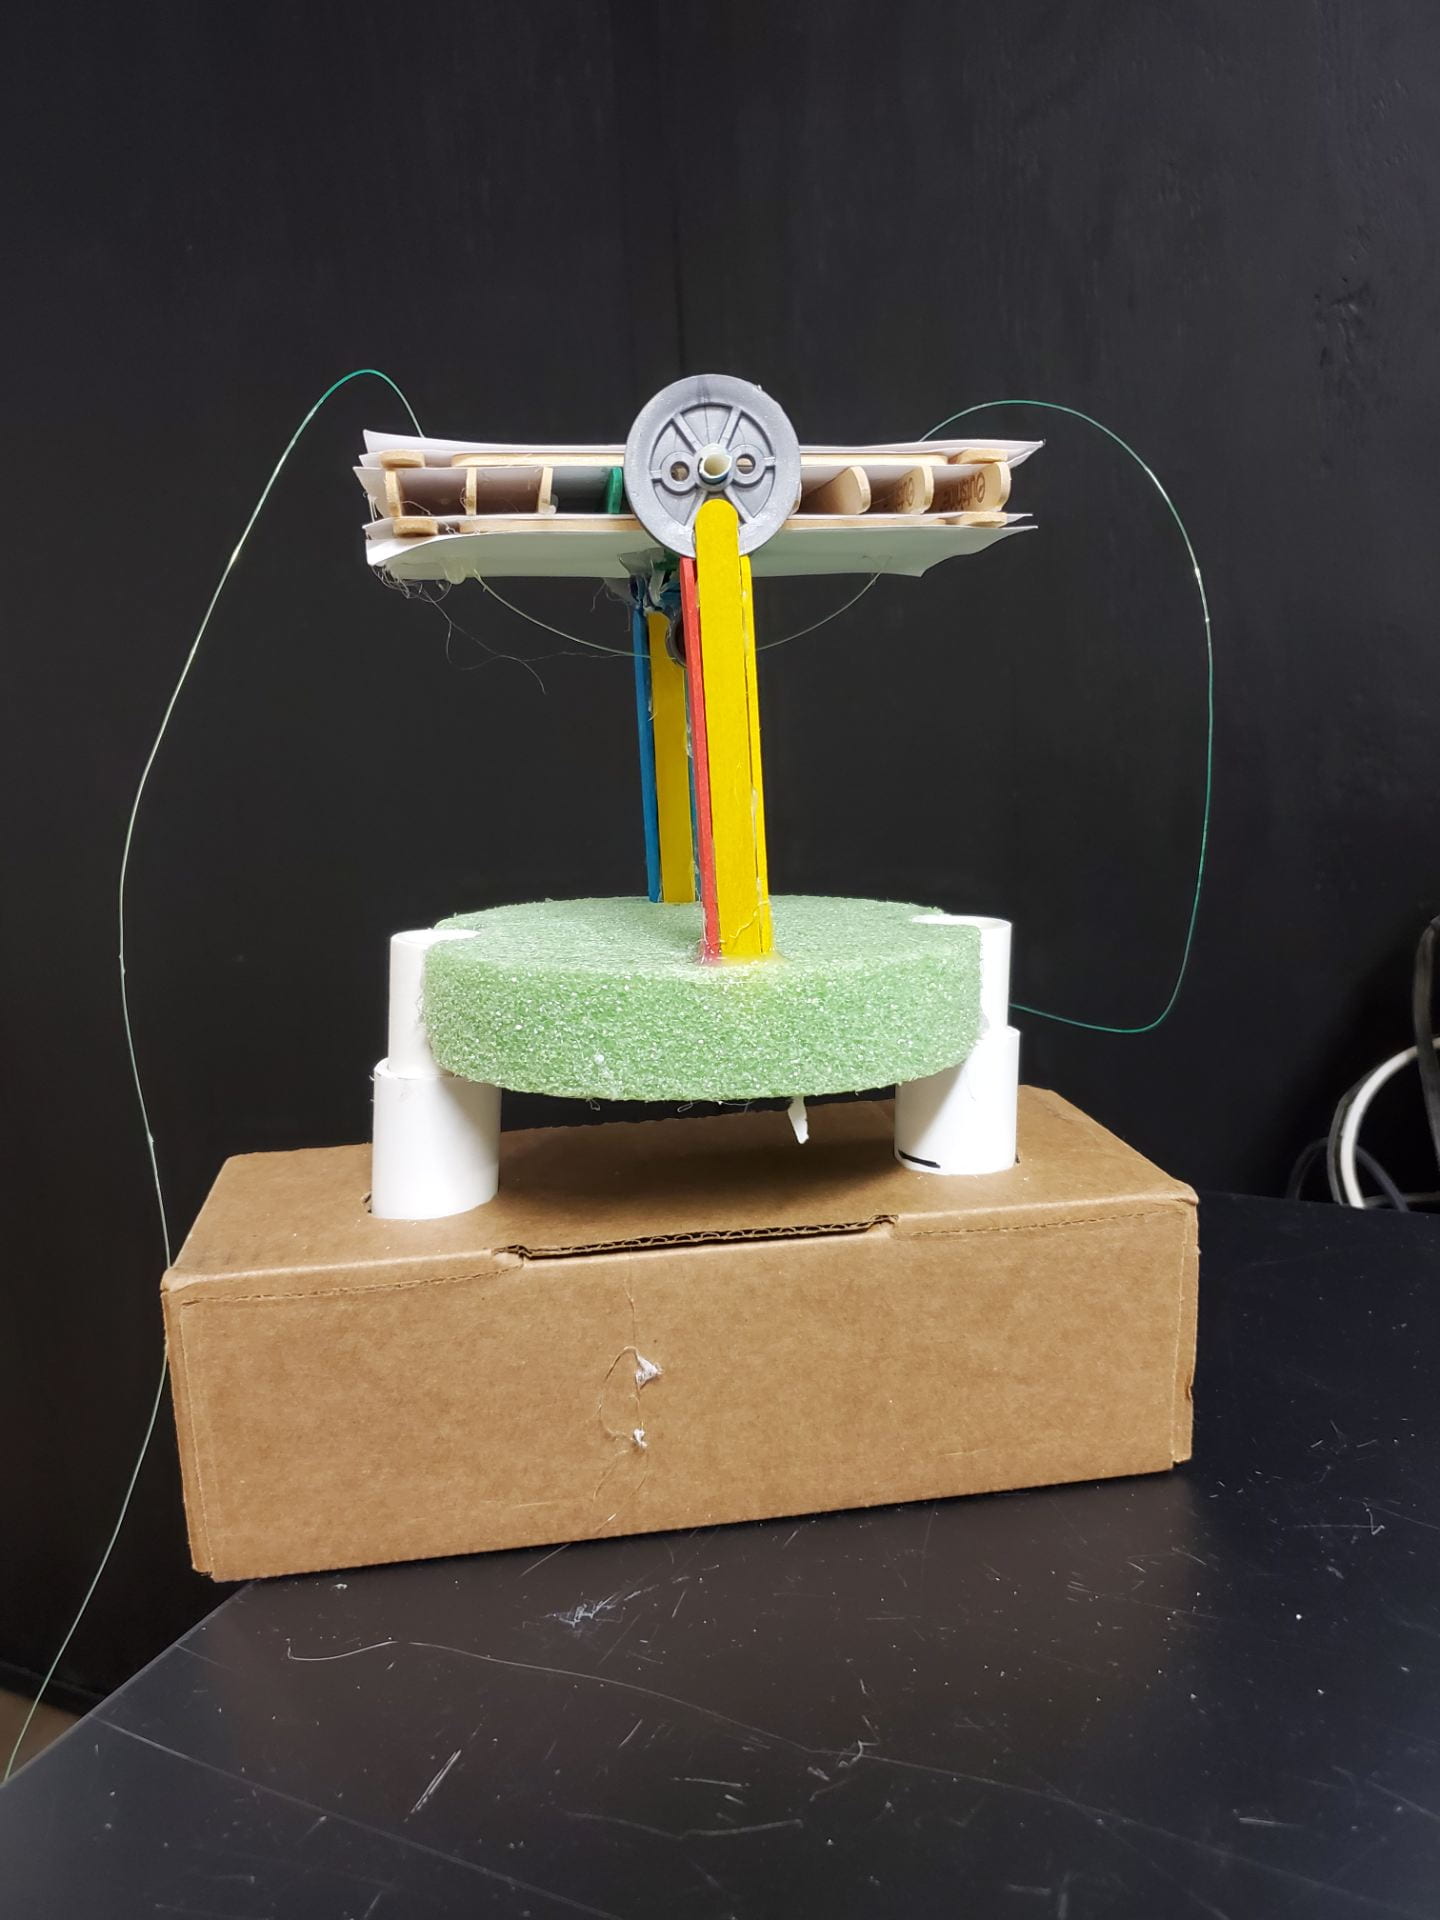
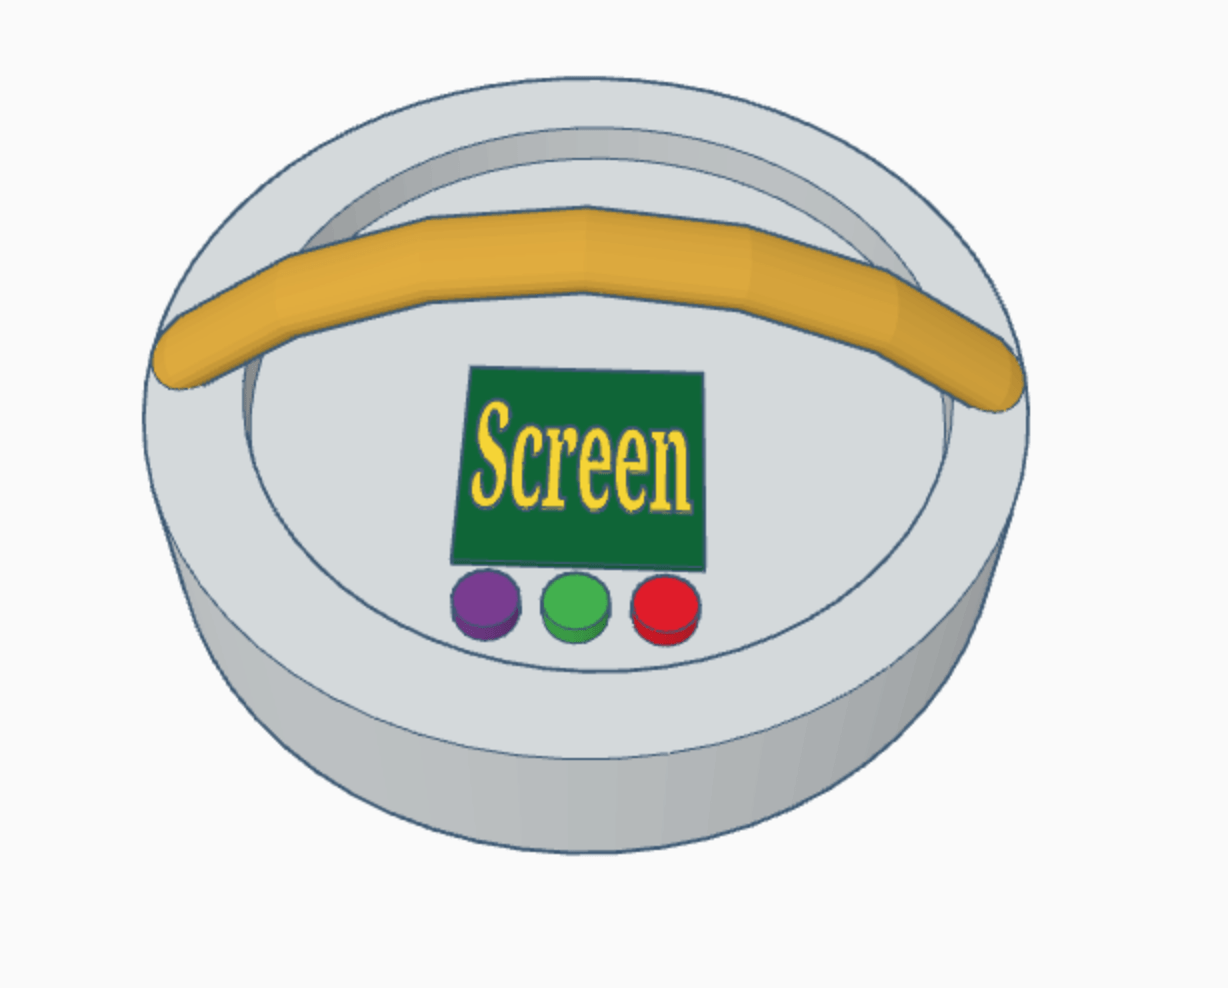
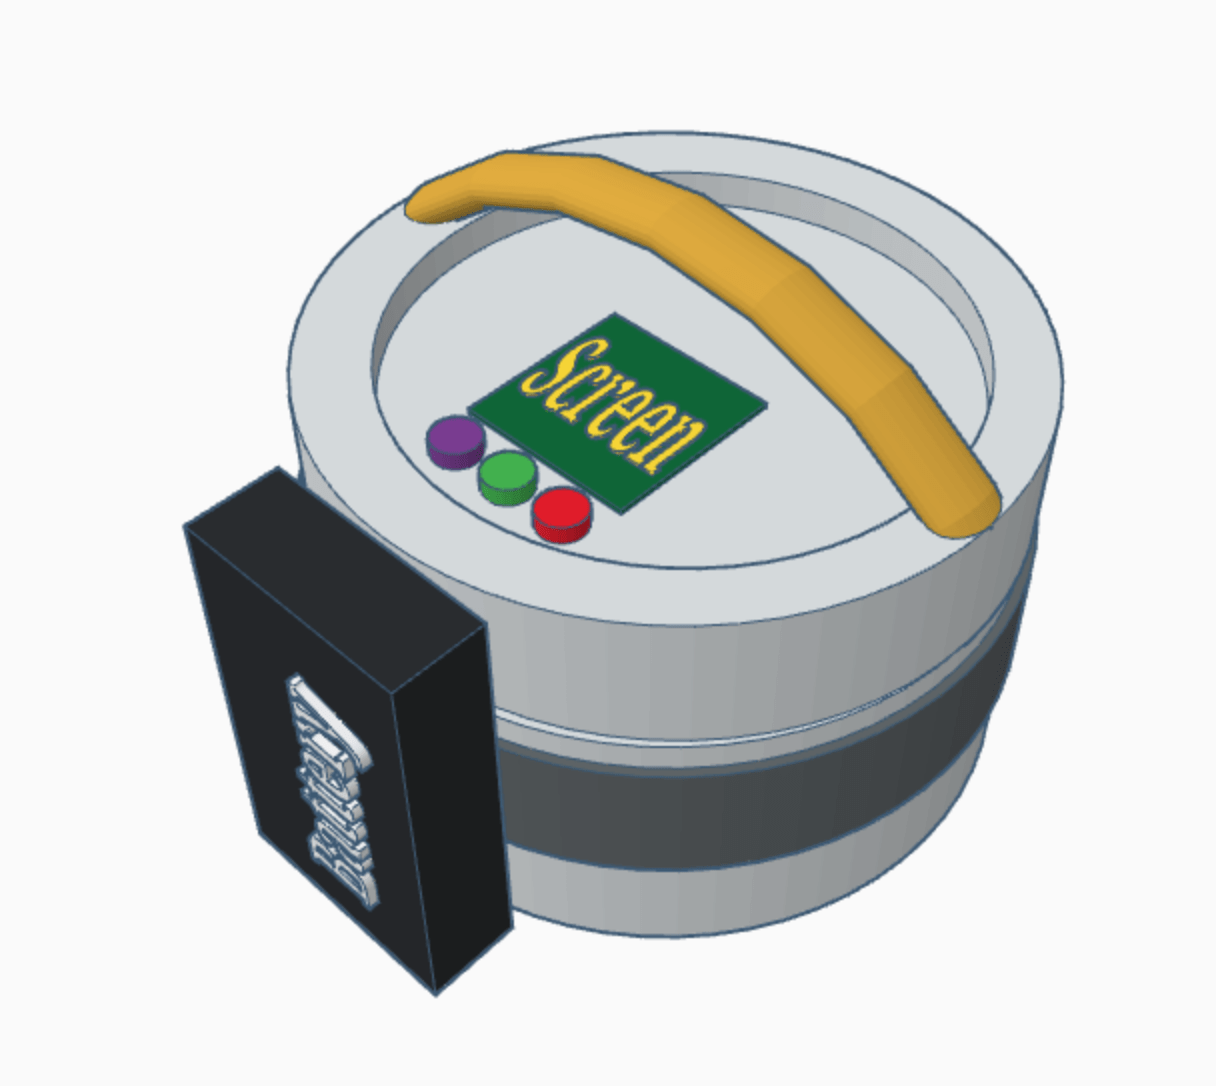
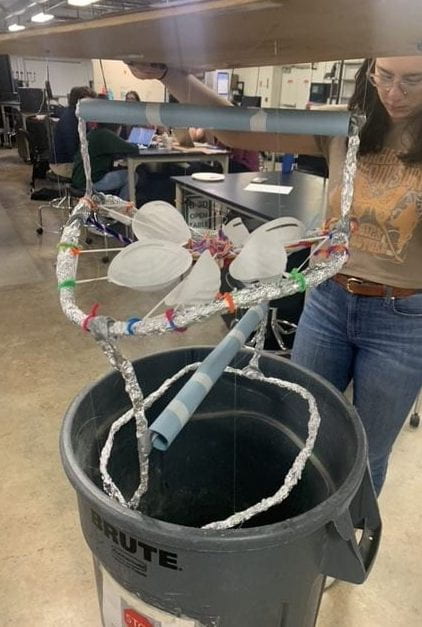
Carl (seen below) was our first prototype. As you can see, we used about ⅔ of a roll of aluminum foil to create the circular mask frames and supports for the overall framework. The masks would be stretched between hooks attached to the sides of the ring, as well as a suspended hook-imbedded piece in the center (made of many criss-crossing pipe cleaners). UV light bulbs (represented by the blue paper rolls) would be attached above and below the diameter of the mask ring in alternating orientations. The whole frame would come in and out through its suspension from the lid of the cylinder by fishing wire.

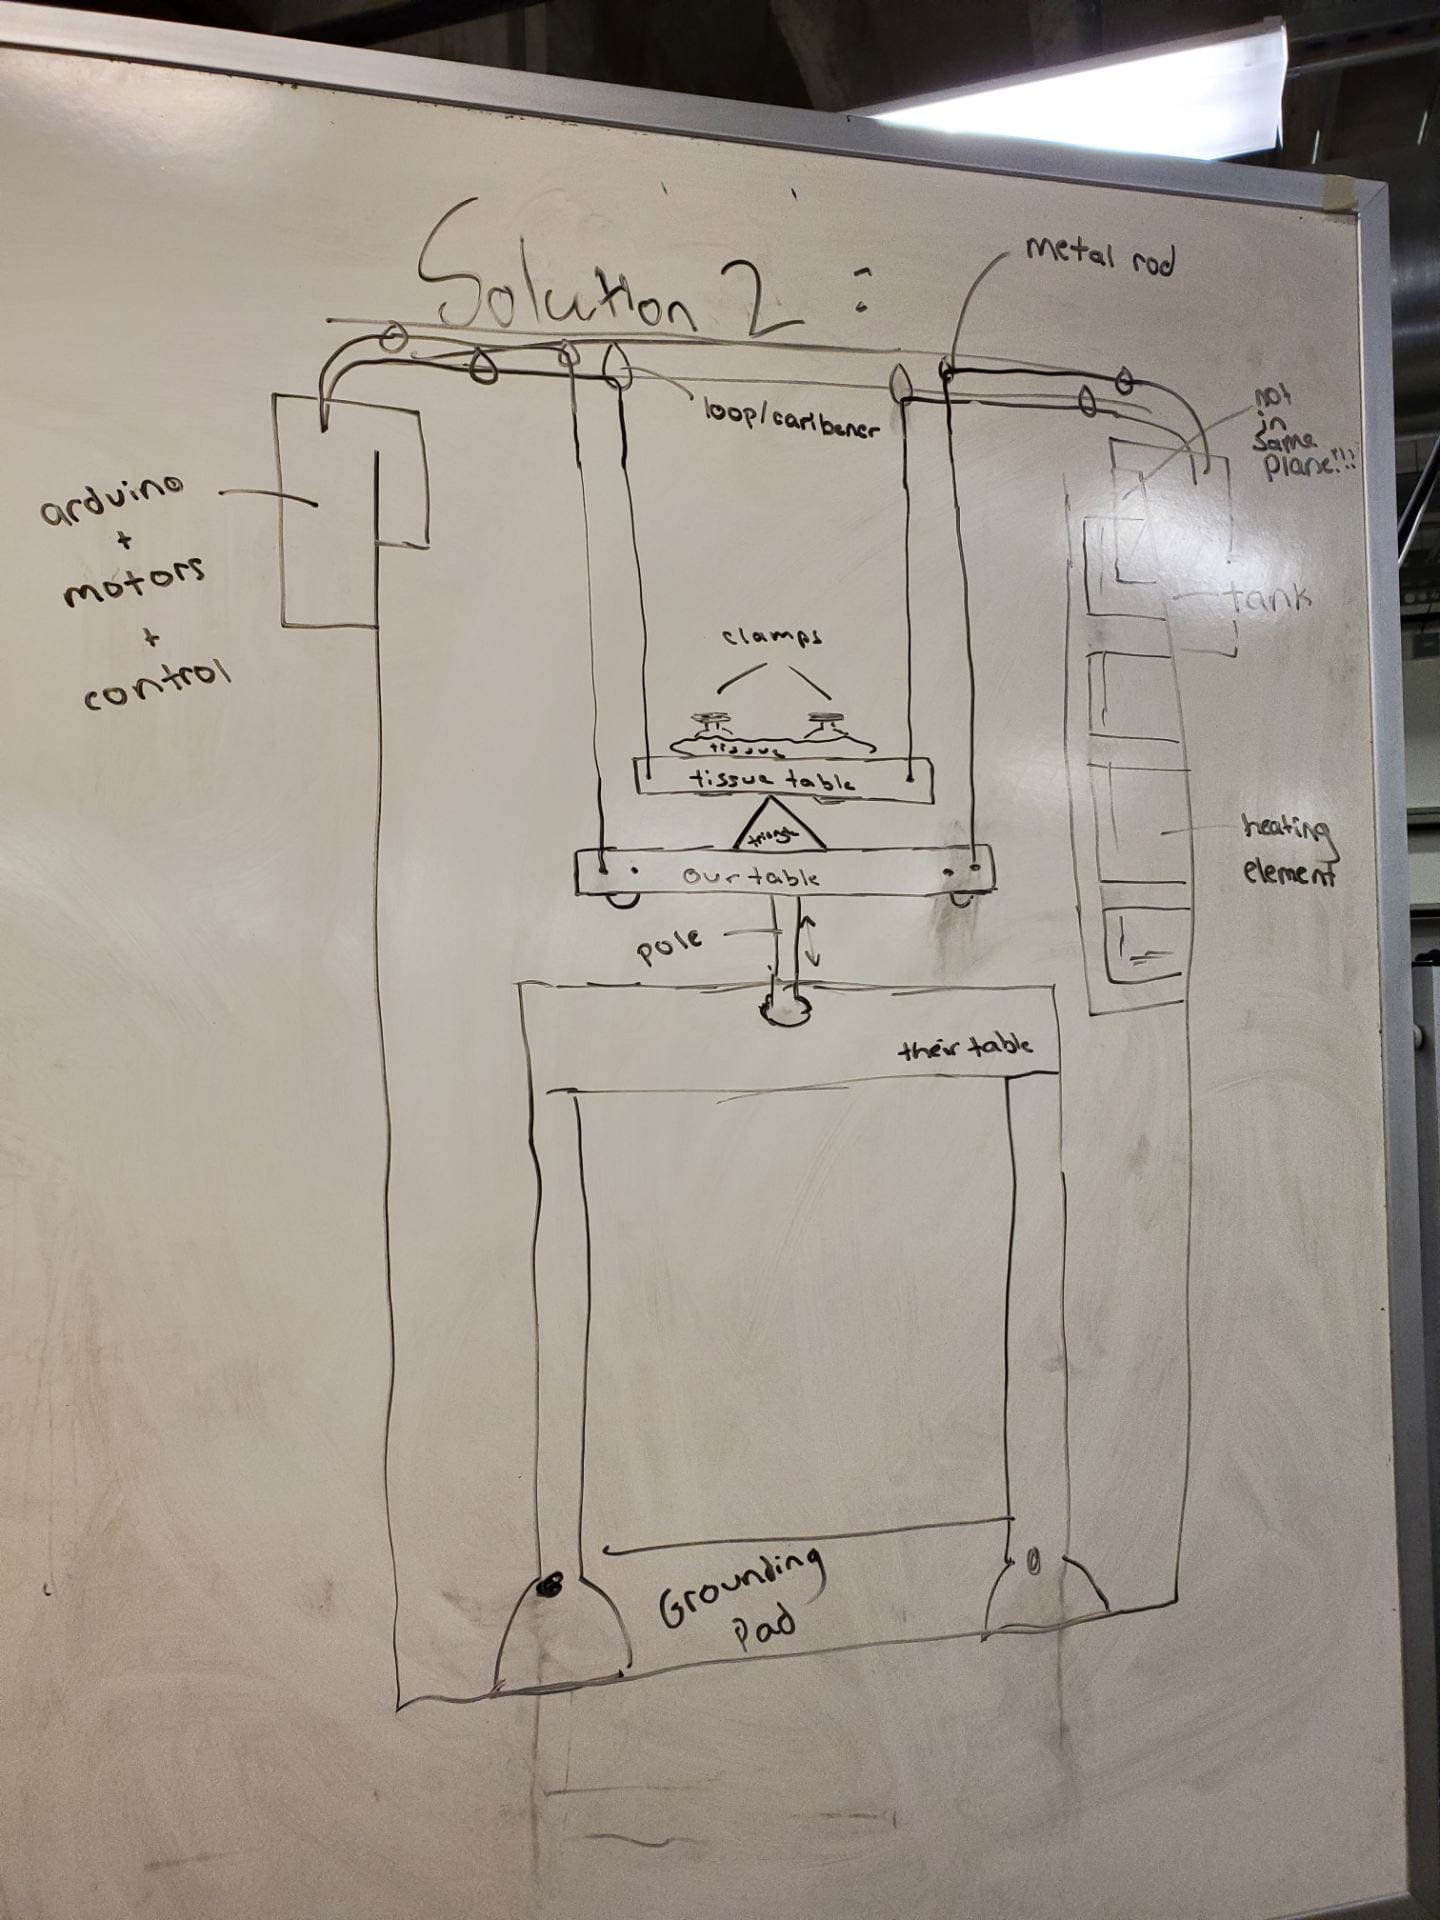
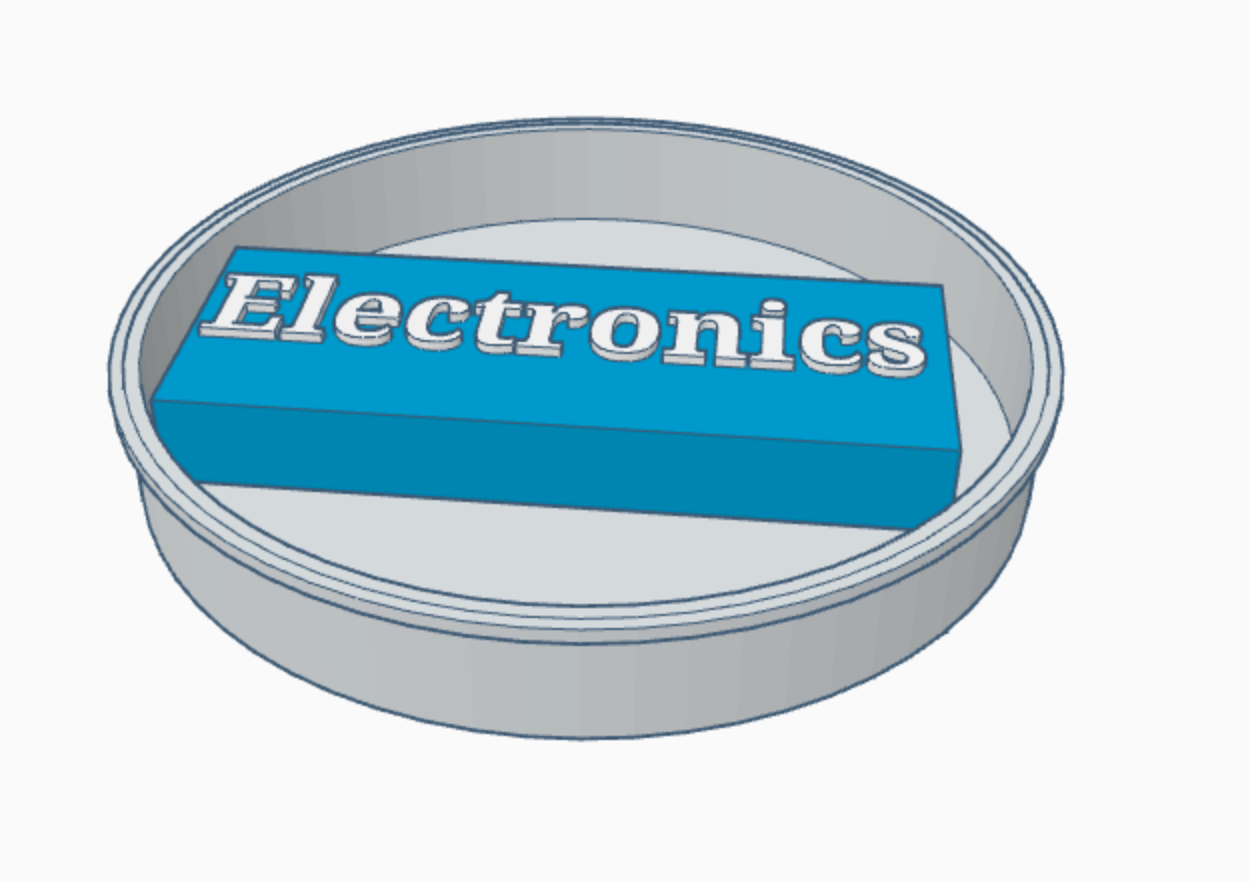
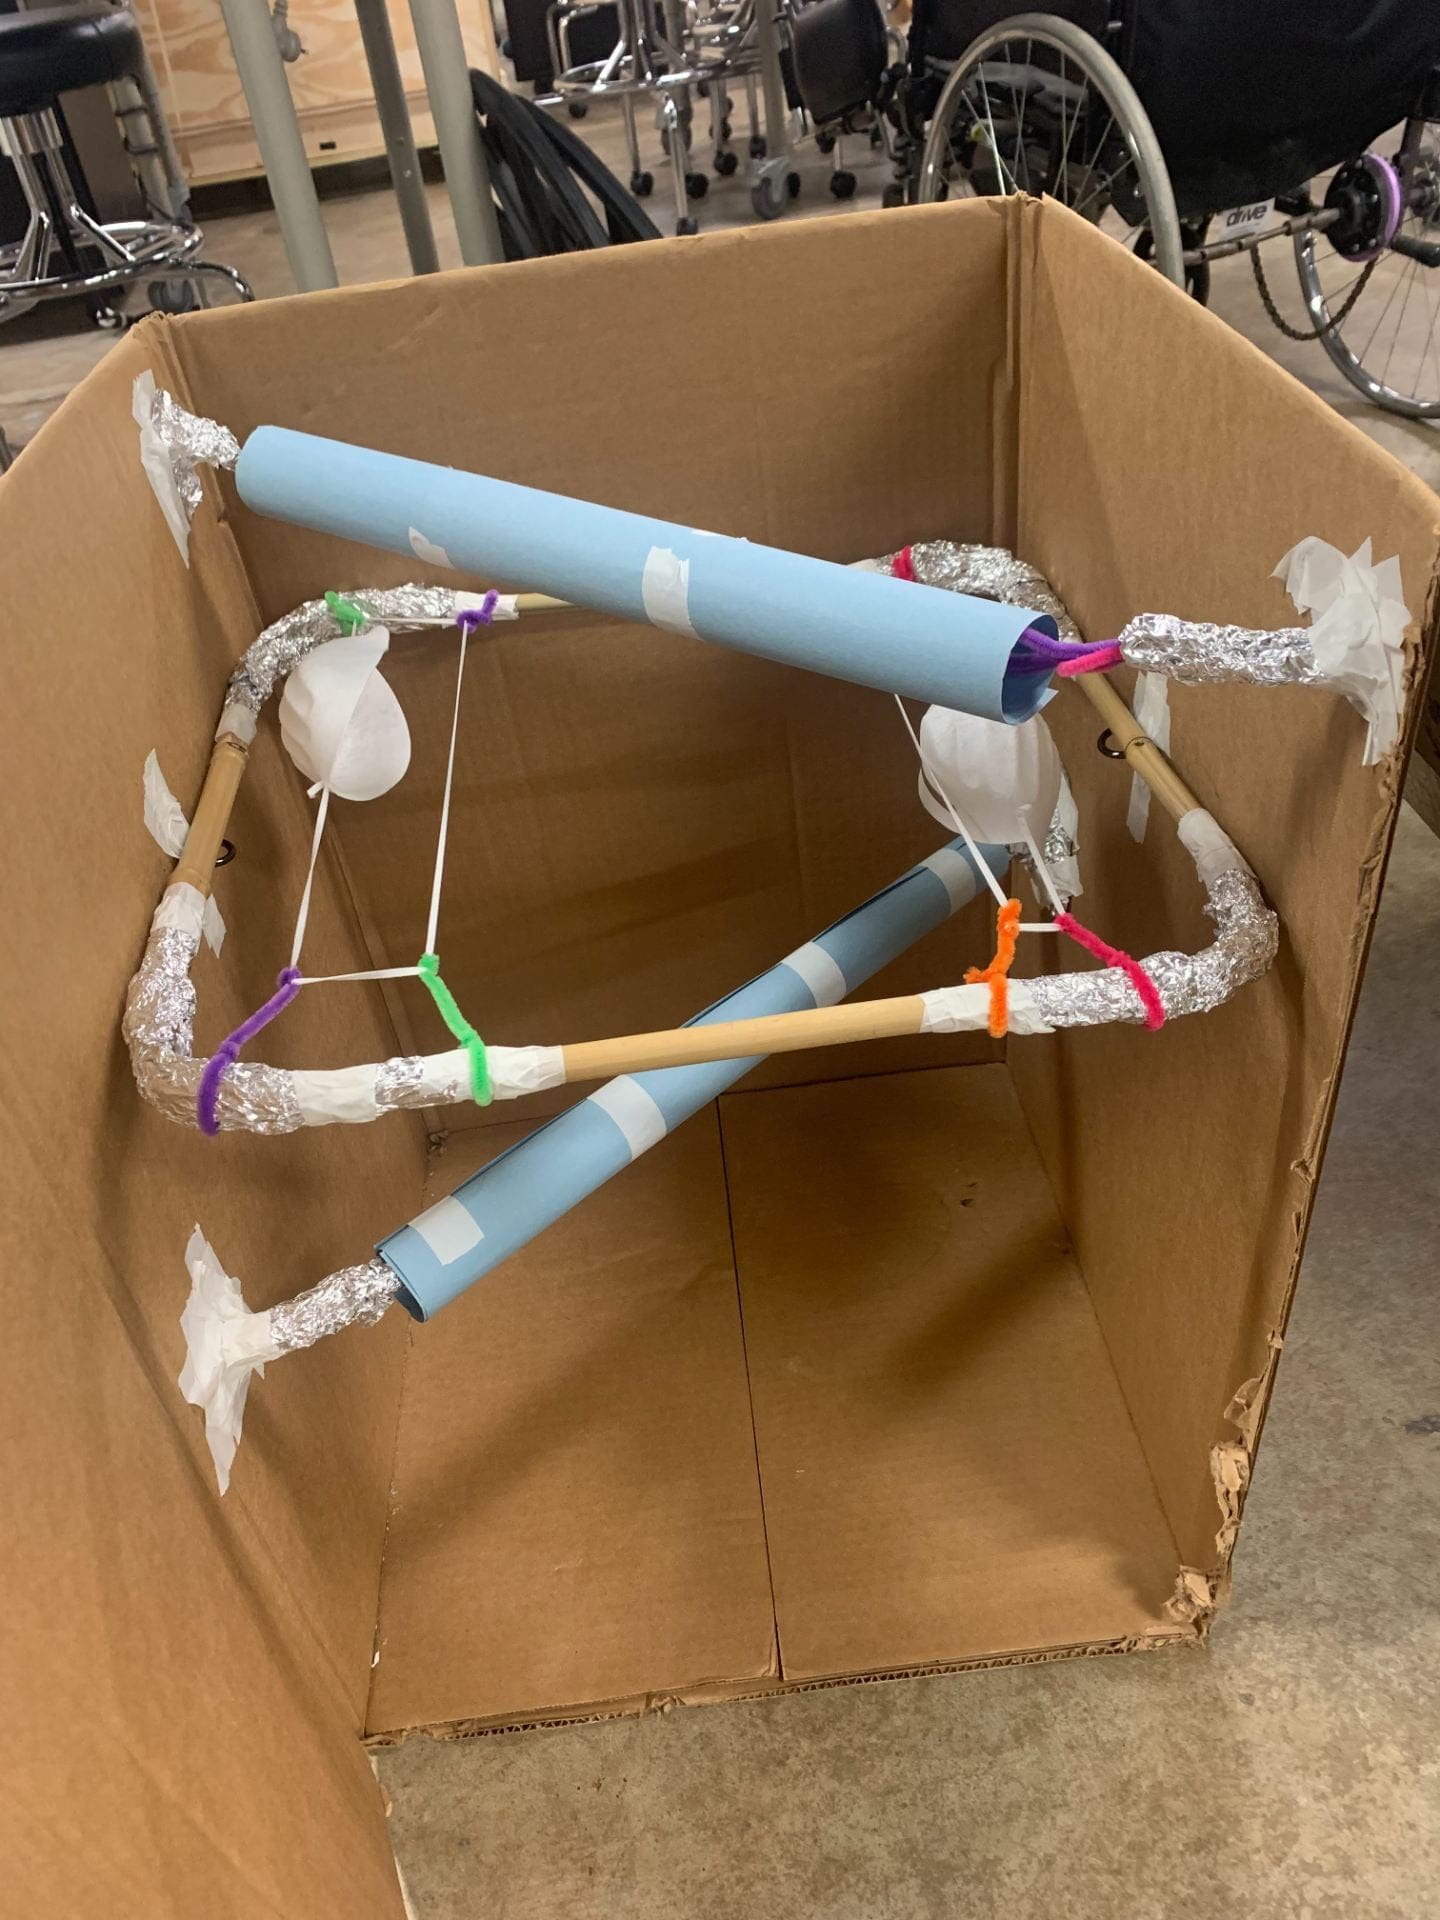
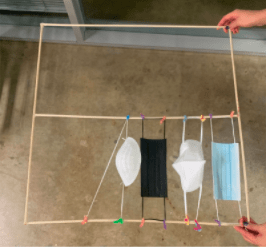
Our second iteration was affectionately named Geraldine (below). This was the rectangular idea, featuring sliding trays (made of bamboo rods connected by corners made of pipe cleaners with ~many~ layers of foil and tape for stabilization) over which the masks would be hooked. We used a random cardboard box we found lying around the OEDK to represent the box size; however, we discovered that the dimensions were a bit awkward since it was too wide to comfortably hang masks the entire length across but too short to make two layers. 

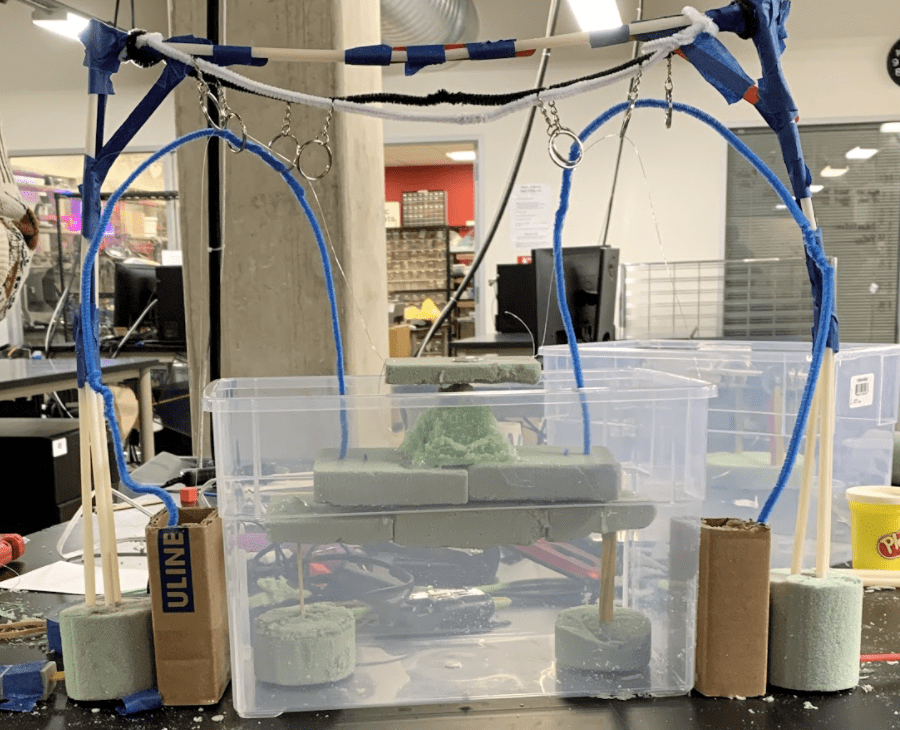
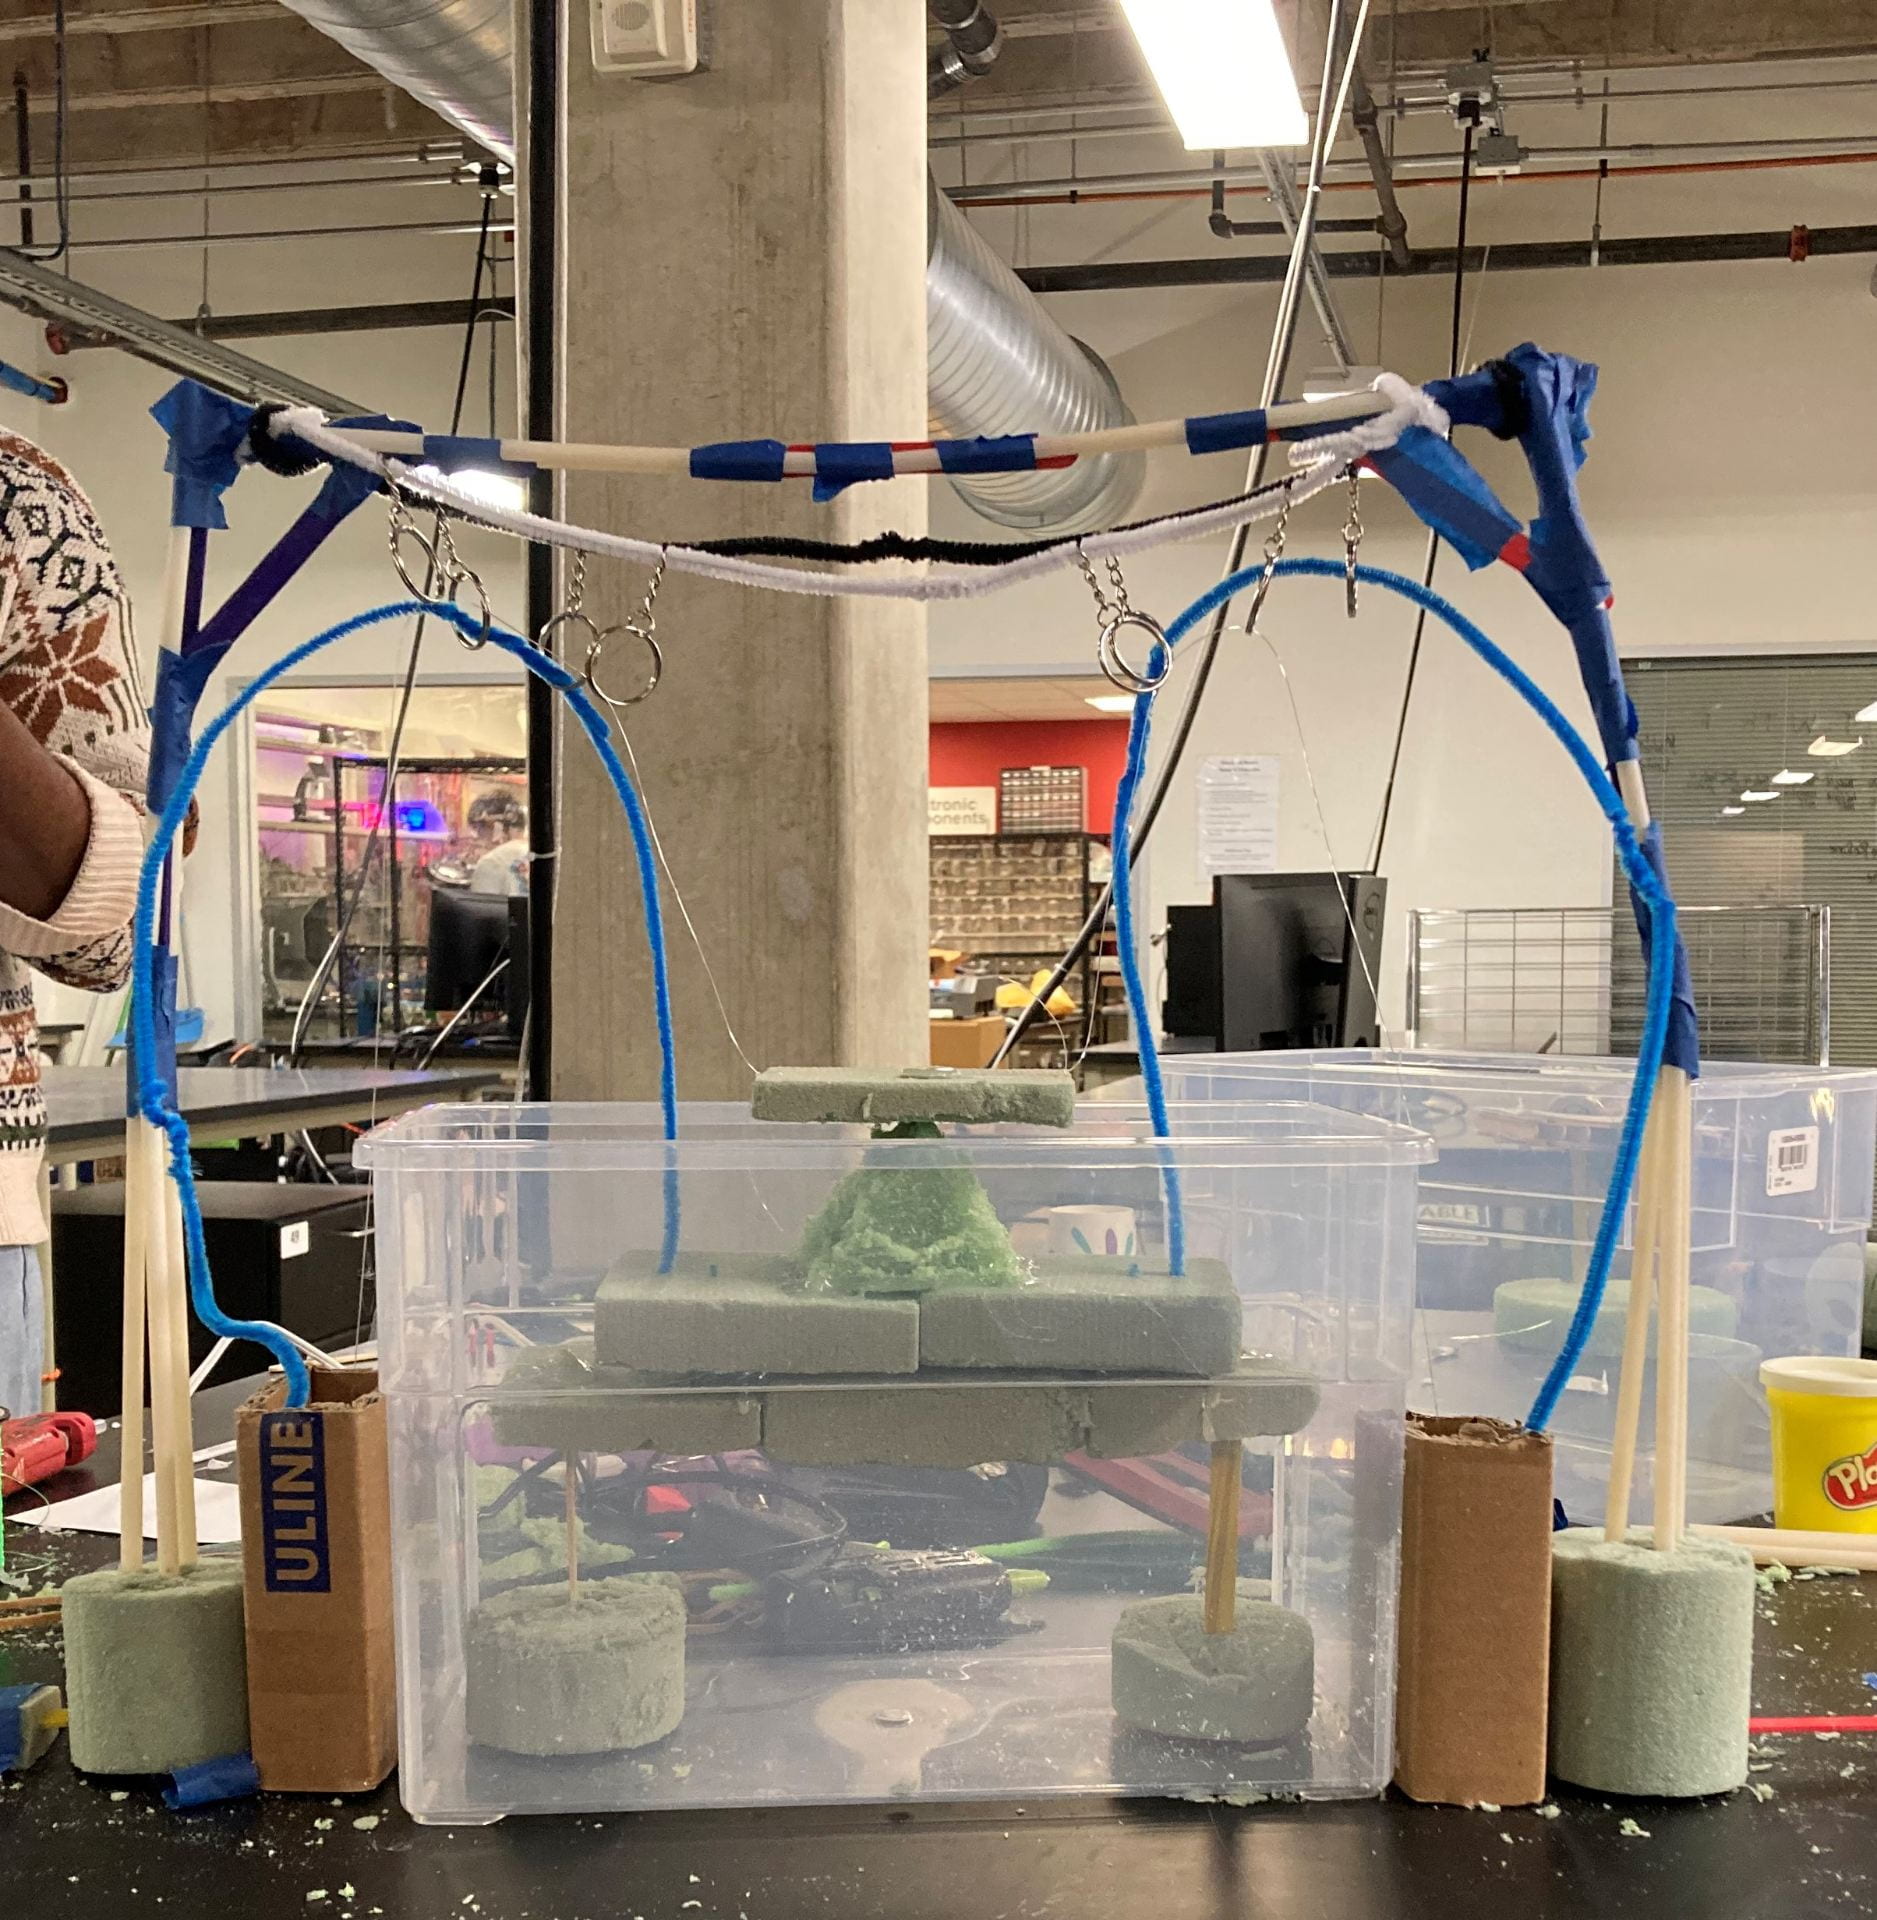
Thus Gertrude (pictured below) was born (created?) as a way for us to determine the optimal dimensions for the mask frames. We extended both sides and attached a rod down the middle so that two rows of masks could be hooked up. With 64 cm by 64 cm dimensions, we were able to fit 12+ masks per tray, which suggested a very high sterilization efficiency, especially if more than one tray was used per device.

Throughout this process, I learned why we always start with low-fidelity prototypes instead of jumping straight into realistic designs. We had to do a lot of crumpling, squishing, bending, and taping of our foil-based framework, and because of this material flexibility, we could adjust our dimensions and even shape quite easily. The craft supplies that allowed me to create fun creatures as a child allowed us to visualize and interact with our abstract brainstormed ideas, and through this process, we rapidly learned the pros and cons of each device shape. (Don’t worry–you’ll hear all about Carl, Geraldine, and Gertrude’s skills and struggles in a later post!)

As a whole, I vastly enjoyed lo-fi prototyping. Not only did the prototypes give us a concrete idea of the device designs we were considering and allow us to convey these ideas to others in a simple (and aesthetically entertaining) manner, but we got to use craft supplies to do so! This week was instrumental to developing and choosing our design…and stay tuned, because ***spoiler alert***: Carl may be getting a younger sibling sometime soon 🙂

Week 2 Reflections

Week 2 brought a lot more clarity to our project, as this was the week we were able to connect with potential users here at Rice EMS. We were able to set up a meeting with them and talk to a few EMTs on campus to gain more information about our problem, as we were having difficulty understanding it in context. After connecting with REMS we had a clearer picture of what problem we were trying to solve, and they were able to handle our device and give us a lot of useful advice and features that they would have liked to see. This gave us some direction for our brainstorming which we started doing towards the end of the week. We found that breaking down our problem into a few components was a lot more productive to brainstorm then full solutions, at least at that point in the process.

We also began to split up the tasks of the project into 4 main groups: Electrical, Coding, CADing, and Human Factors. I was the lead on the electrical aspect of the project, and for me that meant that I would be taking the current circuit and moving it from a bread board to a perfboard to increase the stability of the previous teams prototype. I am looking forward to next week because I have always been fascinated by Electrical work, and so this was a good time for me to learn some new skills related to that field. It sounds like it may be difficult, but I also find that difficulty is part of the charm of learning new skills, so I am ready for what week 3 throws at me!

Week 2: Thinking About the Global Water Crisis

It’s hard to believe that we are almost to the halfway point of this summer program! While we have made great progress in our project as you can read about in my teammate Kenton Roberts’ blog post for week 2, I spent a lot of time over these past few weeks reflecting on my project’s problem space: the global water crisis. 

Globally, 844 million people don’t have access to usable water. Access to clean water is a crucial stepping stone for development. Without it, people are not able to practice proper hygiene and sanitation. Children get sick and are less likely to go to school. Parents worry about and tend to water-borne illness and struggle to make a living. This past fall semester, I had the opportunity to take the course BIOE365: Sustainable Water Purification for the Developing World. One of the first things we learned in the class was how the term “developing world” is misleading and often reductive to the countries which are included. It groups countries as a whole into a category of low social and economic metrics. However, oftentimes crises we relate to “developing countries” are crises which are occurring in the daily lives of the vulnerable people in the US: communities of color, low-income people residing in rural areas, tribal communities and others. 

For example, the water crisis is often a problem we don’t consider to be one in our own state or even in our country. However, in Cochran, Texas for example, families must haul water by car or foot or purchase trucked water at high costs. Families in this city use only 50 to 100 gallons of water per month for whole households of up to 8 people while the average American uses 88 gallons of water per day. It is estimated that 2 million Americans still don’t have access to clean drinking water and more than 44,000,000 million Americans are served by water systems which violate the Environmental Protection Agency’s Safe Drinking Water Act. Overall, I just wanted to bring attention to the fact that sometimes in the global health space we neglect the vulnerable populations in our own communities and distance ourselves from global issues by getting stuck in the mindset that these issues only happen thousands of miles away across country borders and oceans. 

Throughout my experience being involved with Rice 360 these past 3 years, I learned about how to effectively design for communities with limited resources.  Reading about how we need to be careful of the verbiage we use and the mindset we sometimes take on in the global health field has played a key role in my own approach to the engineering design process and inspired a shift in the role I want to play as a physician working in the global health space. 

Rice 360 blog

Blog number one through three-week review 

My reflection for the past few weeks was learning more about the rice 360 program. I also was able to learn about the interesting projects and was assigned to work with the Texas Heart Institute to develop a heart-lung model for a new wireless pacemaker. I was assigned a team and we went to the medical center to meet clients and learned more about our project. We also meet many interesting guest speakers and learned a lot about the engineering design process. Our team also conducted low fidelity prototypes and plan on creating high fidelity prototypes in the coming weeks.

Week 2 Reflections

Hello again everyone! 

This past week has definitely been a week of twists and turns for our team that really showed the value of getting consistent feedback from your clients. Ending out the week, we had determined and defined our design criteria (cost, ease of set-up, ease of maintenance, durability, and accuracy of motion), as well as completed our first round of brainstorming for each of our four device components:

  • The heart motion
  • The lung motion
  • The tissue attachment mechanism
  • The motor and Arduino housing component
  • The exterior-interior connection

However, during our client meeting on Friday with the Texas Heart Institute (THI) team, we found that many of the solutions and mechanisms that we had brainstormed were not fully aligned with some of the design constraints. Namely, the fact that the tissue could not be impaired in any manner following our device’s use. We had previously made the assumption that the tissue could be punctured in order to attach it to the ’tissue’ table. This assumption proved problematic due to the fact that following the tissue interfacing with our device, it will need to undergo further analysis that would be negatively impacted if there were any holes or tears in the tissue. As a result of this newfound constraint, we headed back to the drawing board. It was fortunate that this concern was found before any significant prototyping had been done, and we still had a lot of time.

In this round of brainstorming, we made some alterations to the component designations for which we were brainstorming. For example, due to the highly integrated nature of the heart and lung motion, we decided to define and brainstorm these mechanisms as one component. We also got rid of the connection between the exterior and interior components in brainstorming, as the feasibility of each was heavily dependent on the heart and lung motion chosen. 

Following our second round of brainstorming, we performed a morphology chart of the brainstormed components to create several holistic solutions. We subsequently narrowed down these holistic solutions to two final solutions using a Pugh Scoring Matrix. We then sketched out and built a low fidelity model of each of these solutions to get a better idea of what each would entail and possible future challenges. 


Solution 1: Our tissue table (table on which the tissue will be clamped) is built on an axle that has a string running through both ends of the platform that will facilitate a rocking (heart) motion. This axle is constructed then onto a second platform that is attached to a set of tracks. When pulled by a string, these tracks will assist in mimicking vertical (lung) motion. 


Solution 2: The tissue table (table on which the tissue will be clamped) is a small platform that is located on top of a triangle. This table has strings attached at each end that would facilitate a rocking (heart) motion when pulled. The mechanism here is similar to that seen in a seesaw. Meanwhile, the middle platform is attached to the stationary table by a pole that is running through the center with strings being used again to this time create a vertical (lung) motion.


*Note: The vertical motion seeks to mimic the heart’s motion that is caused by the lung. 


Moving forward into next week, we plan to develop a higher fidelity version of each prototype and perform some additional iterations. Based on the findings of our low fidelity prototype, it seems that it might end up being best to combine the best aspects of each solution into one final one. Additionally, we plan to use SolidWorks to 3D print some of our components, write Arduino code in a manner that allows for independent control of the heart and lung motion, and hopefully bring our device to life!

Signing off,

Kaitlyn

Week 2.5: Smoke and CAD

Intro

Over the past week and a half, the program really got going. We are now almost halfway through the internship, and it has gone by so fast. After the initial process of finding our footing with the previous prototypes, we sort of split into two parallel segments, one of which involved continuing with the Minicubator prototype’s code and circuit, while the other focused on starting our own design process and figuring out what we want our final device to accomplish.

Continuation of Minicubator’s Path:

For a while, I was mostly focused on the circuit. Initially, I got the PCB that Minicubator left us to operate, so the OLED lit up and we were able to program incubation periods. The heating pad never heated up, however, and when I tried to re-wire the battery towards the heating pad, the PCB started smoking in three different places. So I tried to unsolder several of the components, including the OLED and the transistor, and rebuild the circuit on a breadboard where I could manipulate it more.

PCB before shorting out:                                PCB after shorting out:


Breadboard version:

I also made a digital version so that if anything got unplugged by accident (which happens frequently with breadboards) we would have a model to use to fix it:

This follows the schematic of the PCB that we were given, but because of an issue with the circuit design (essentially there are currently two separate circuits that need to be run in parallel on the same battery, but it sort of seems like it was set up to run with two batteries, which is not really an option), it doesn’t quite work. On the bright side, though, we finally fixed all the issues with compiling the code, so the software is now uploaded to the new microcontroller (which was a different version than what Minicubator used)!

Our Own Design Path:

The other main thing we did this week was go through our own design process, starting from scratch instead of using other teams’ prototypes. We broke our problem into six design blocks and brainstormed enough ideas to take up two whiteboards. Then, we scored these partial ideas to narrow them down and morphed them into a few complete designs. The two main options are a thermos system and a lunchbox system. The thermos system would more effectively retain heat, thereby requiring less power, but it is messier in terms of wiring and user interface. The lunchbox would require more power, but would be much neater. Below are some rough CAD models of each design.

Lunchbox:

This is the basic setup of the inside, including the tray with the petrifilms on top of a heating pad in the middle, with the battery and electronics housing on either side. The wires from the electronic housing go through the hinge to the back of the display screen and the buttons. The SD card is easily accessible on the underside of the lid.

This shows what the lid will look like. When it is closed, there will be a handle on top to carry it easily, and the screen and buttons will be conveniently located in the upper righthand corner.

Thermos:

Here you can see the inside of the main heating chamber of the thermos. On the bottom, there is a heating pad underneath the tray with the petrifilms. There is also a small thermistor, shown in purple below. Then, all the wires (orange) connect to a plug (black) which has to be plugged in when the lid is put on. The battery (black) is attached to the outside via a cam strap (darker gray).

This is the tray that houses the electronics. If we continue with this idea, we will most likely attach the tray to the top of the thermos, so that the user does not have to interact with all the wires, aside from the ones that plug into the heating chamber below and into the battery on the outside. The only problem with this is that the user would need to detach the tray to access the SD card, which is on the underside of the OLED (see next image).

The top of the thermos has a handle to use to carry it, and the same screen and button setup as the lunchbox. We would need to use a drill press to create holes in the metal for the buttons and screen, and for the cable coming from the battery (not shown).

This is what the thermos would look like fully assembled.

Future

Later this week, we have our mid-summer presentation, where we will show the rest of the program what we have done so far. Tomorrow we plan to use Pugh scoring to decide on a final design to pursue. We are also going to perform a heat loss experiment on a thermos and a lunchbox to help us make an informed decision. We have made so much progress in the past week and a half, and I am so excited to keep working on this design!

Week 2: Skipping a Heartbeat

Entering week 2, Team Heartache was bright-eyed and ready to take on the world. We eagerly jumped into brainstorming, producing a vast amount of different ideas and components. By the time we had our meeting with the team at THI, we had screened our ideas for each component and had compiled a few clarifying questions to ask. Upon asking our first question, we realized that we had encountered a bit of a problem, and I will have to admit that my heart skipped a beat. Our clients informed us that the tissue we need to move should not be damaged in any way, and our team had made an assumption that the tissue could be punctured in order to attach it to the table. 

In the moment I was alarmed as I absorbed the implications of our mistake: having to scrap the majority of our ideas for the “tissue attachment” component of our design. After a few moments, however, I felt relieved. We had caught a potentially grave mistake. This mistake would have had greater consequences if we discovered it a week from now. Luckily, our team was able to recover quickly, holding another brainstorming session and revamping our design criteria within a day. 

Moving forward with our reassessed ideas, we ran Pugh screening and scoring matrices and determined two prototype ideas to pursue. 

Both designs involve a three platform/table system, with a “red table” as the base, an “intermediate” platform that will move vertically to simulate the lung’s effects on heart motion, and finally a tilting/rocking “tissue table” that will have the tissue sample clamped onto it. 

The major differences between the two designs involve how the tissue table will be designed to rock back and forth and how the intermediate platform will move up and down. 

We have been able to produce low fidelity prototypes for both design ideas and have ordered the necessary materials to continue iterating and increasing the fidelity. 

Our next steps include using SolidWorks to 3D print some of the components, coding the Arduino, and hopefully bringing the device to life.

Until next time,

Rachel Lee

Week 2: Change of Heart

This past week has definitely been a week full of twists and turns for team Heartache. Our team completed its first round of brainstorming based on the lung/heart motion component and the Saline box exterior component. We also met with our clients at the Texas Heart Institute (THI) Friday afternoon and from the Q/A we had with them pertaining to our device, we found that many of the solutions and mechanisms we had originally brainstormed were not aligned with some of the needs/expectations of our clients. As a result, our team initiated a second round of brainstorming the next week. We also spent some time prototyping these possible solutions

Our team also was able to finalize the design criteria, as shown in the list below:

  1. Cost
  2. Set-up (Measured by the amount of connection points between device and the Saline box apparatus)
  3. Maintenance
  4. Durability
  5. Accuracy of Motion

After our client meeting on Friday, we realized that tissue attachment was going to be reached using clamps, resulting in our team eliminating adjustability as a design objective. Using the ideas our team brainstormed for the different components, several holistic solutions were formed and put through the Pugh scoring matrix. As a result, our team came out with two solutions that we plan to go forward prototyping with. Descriptions of these solutions with pictures of their low-fidelity prototype are shown below:

Solution 1: The tissue table where the tissue is clamped is built on a seesaw with strings being used to mimic the heart contraction using a rocking motion. The seesaw is built on a middle platform with one pole running through the center with strings being used again to this time create the vertical motion of the heart caused by the lung.

Solution 2: The tissue table is built on an axle with a string running through both ends of the platform to create the same rocking motion. The axle is built on a second platform that is also attached to a set of tracks where the vertical motion will be mimicked by strings once again.

This week was also marked by some interesting workshops pertaining to coding, 3D printing, and CAD. Luckily, our team was able to gain a clearer understanding of the design criteria before any major prototyping was completed, but this week has taught much about the importance of a design team constantly being on the same page with its clients.

Week 2 Reflections

Yay week 2! We had some fantastic and thought-provoking lectures this week. My personal favorites included the Designing for Usability lecture by Jake Johnston, Magdah Omer’s Biosocial Approach to Design, and Dr. Gobin’s Brainstorming Workshop.

Magdah, a bioengineering student here at Rice and a TA for the program, gave this, honestly, surprisingly fantastic presentation. I say surprisingly because I wasn’t sure what to expect based off of the title “Biosocial Approach to Design”. She provided examples of well-intentioned, and well-funded global health ventures that went south. The main program for discussion was the infamous play-pump.  Honestly, with the introduction to the non-profit, I was impressed with the level of intricacy. Here it seemed as though play-pump had not only repaired unnoticed leaky and contained hand pumps, but created an innovative mechanism to effortlessly pump water and allotted the community more time. Not only that it was financially sustainable and created jobs. It’s one thing to create something like a merry-go-round water pump, but it’s another thing to make that cool new invention in a successful venture. However, that was not the case for play pump. It turns out that the technical design of the pumps was faulty, the massive adoption of the pumps replaced the functional hand pumps, and school children were not a sustainable solution to pump enough water for the community. It all fell through tragically and the mention of play pump in some southern African countries is synonymous with a curse. This is a disheartening story because the people involved were designing for essentially, their neighbors in-country. I previously worked on a year-long capstone project on a project pitched by an American NGO wanting to solve a problem in rural LMIC. Basically inaccessible users to us student designers in America. We made several efforts to see if we had connections that could lead to connections of people who might have a connection to who we were designing for to no avail. From there we tried to brainstorm adjacent users to interview. Of course, still, those users were “worlds apart” from our core users. Finally, we were able to find a marketeer who created products in the same industry as us to share how their conduct users’ needs. $40,000. $40,000 is spent on a door-to-door market research team that interviews the specific market they were creating for [think 20-25-year-old female college students in Nairobi]. Even then, she warned us that the people that we were designing for are essentially inaccessible and there currently isn’t a sustainable market to sell our product to get to them. Additionally, countries are moving away from financing unsustainable ideas. All in all the global health space is filled with layers and layers of complexities.

Dr. Gobin’s Brainstorming workshop was engaging and hilarious. She whipped out a bunch of cards (I need to find out what the card game is called so I can get it for my baby cousins) and had us fully enthralled in a brainstorming game. Essentially everyone received a certain amount of seemingly random miscellaneous items and two user cards. Our users included a ninja and a hippie and we had to figure out what problem they had in common to solve. Of course, we wanted to design for a shared issue that had a large and trending market, sustainable fashion. As a result, our team was able to generate the most brainstormed solutions out of the cohort.

Now in terms of BVM aka Team BreathEasy aka Team Breezy, we were able to meet with a couple of members of the Rice EMS team. We were super thankful for them sharing their experiences and hours to be interviewed and for us to conduct a short usability assessment of the current device. We quickly learned of different pain points that we hadn’t uncovered ourselves. But best of all we were assured that there was indeed a need for a monitor that we are designing. With this user feedback, we were able to rapidly brainstorm ideas and create an informed set of design criteria.


Week 2: Moving on up!

Hi again everyone! I’m back with another week of updates from our time at the OEDK. One noticeable thing that I’d say has made a huge impact on the mood of the internship is that everyone is starting to become really close, which is really nice because now we can all just hang out and joke around. It has made the environment so much better at least for me, because I was kinda nervous for at least the first week just coming in as someone who doesn’t go to Rice. But now I feel really comfortable around everyone, especially my team and it has made the work more enjoyable and everyone more productive. I think the picnic we had last week really helped as well, because we all got to hang out in a non-work environment which was new but I feel like everyone had a good time. I really enjoyed just kicking a soccer ball around with some people and just talking about random stuff. Unfortunately, I had to leave early to go to the Astros game but I was actually lucky because as soon as I got in my car, it started pouring so it was good that I left early.

Continuing on in the week, we moved into something I was really excited about which is prototyping. This was finally something closer to my forte in design and building so that made me really excited to do that. Firstly, we had to identify design criteria to use in our prototyping and that essentially took up all of our time on Thursday and Friday, because we had to come to a consensus on difficult ideas. We came to the decision that we should make five different low-fi prototypes of different ideas on Monday in order to see how things would work together.

On Monday, we did a bunch of low-fi prototyping of all of the ideas, and from there we narrowed it down to three main ideas. Those ideas are to have a swiveling cylinder, the standard LUCIA cylinder, and to have a box that you simply flip over to rotate from supine to prone. On Monday we also received the CAD design for the labia from the LUCIA and we printed the mold at 50% size and made our first casting just out of the silicone rubber on hand in the OEDK. Tuesday we came back, analyzed the first casting, and poured another silicone rubber solution into the mold, while also printing a second mold. We really had an epiphany in the afternoon during our conversation with Grant from Rice 360, who helped us organize our thoughts about materials and decide what to order for the project. We then poured different samples of Dragon skin and Ecoflex 10 and 30 in order to test their elasticity and see how well they would serve us. Right now I’m just really looking forward to keep working on this project and seeing how all of the castings come out on Wednesday!