Week Three: Light is Key

The week started off on Monday with early stages of the design process: research, setting design criteria, and brainstorming.  Tuesday morning we researched a few more areas and then started our Pugh Scoring Matrix, however this was a bit of a difficult process for us.  Since Dr. Carns already gave us the idea to use a fiber optic cable for our device, our brainstormed ideas were all variations on how we would attach it and what type of stretchy material we would use, which made estimating differences in how easy a design would be to apply or clean difficult to judge.  Due to this, we didn’t finish before lunch and after lunch all of the interns participated in a “lamp making” workshop.

For the workshop, we partnered up and one person learned Adobe Illustrator and laser cutting while the other person, aka me, learned some Arduino and soldering.  The kit that we soldered set LEDs to light up when the circuit detected noise, such as someone talking or clapping.  I have had some experience soldering in the past with circuits I organized myself, so filling in a pre-marked circuit board wasn’t too difficult, which meant I finished with some extra time to go watch the laser cutting.  That was the first time I’ve ever stood and watched a laser cutter work, so it was pretty snazzy.  My partner, Jeremy, laser cut a box that would house the circuit I made, hence creating a “lamp.”

On Wednesday we finished our Pugh Scoring Matrix to determine our winning design.  We had to order some materials for this, so in the meantime we started prototyping our runner up solution in case the materials for the winner don’t work out.  Since Dr. Carns had provided us with a low fidelity prototype, we went straight for medium fidelity:

IMG_6345

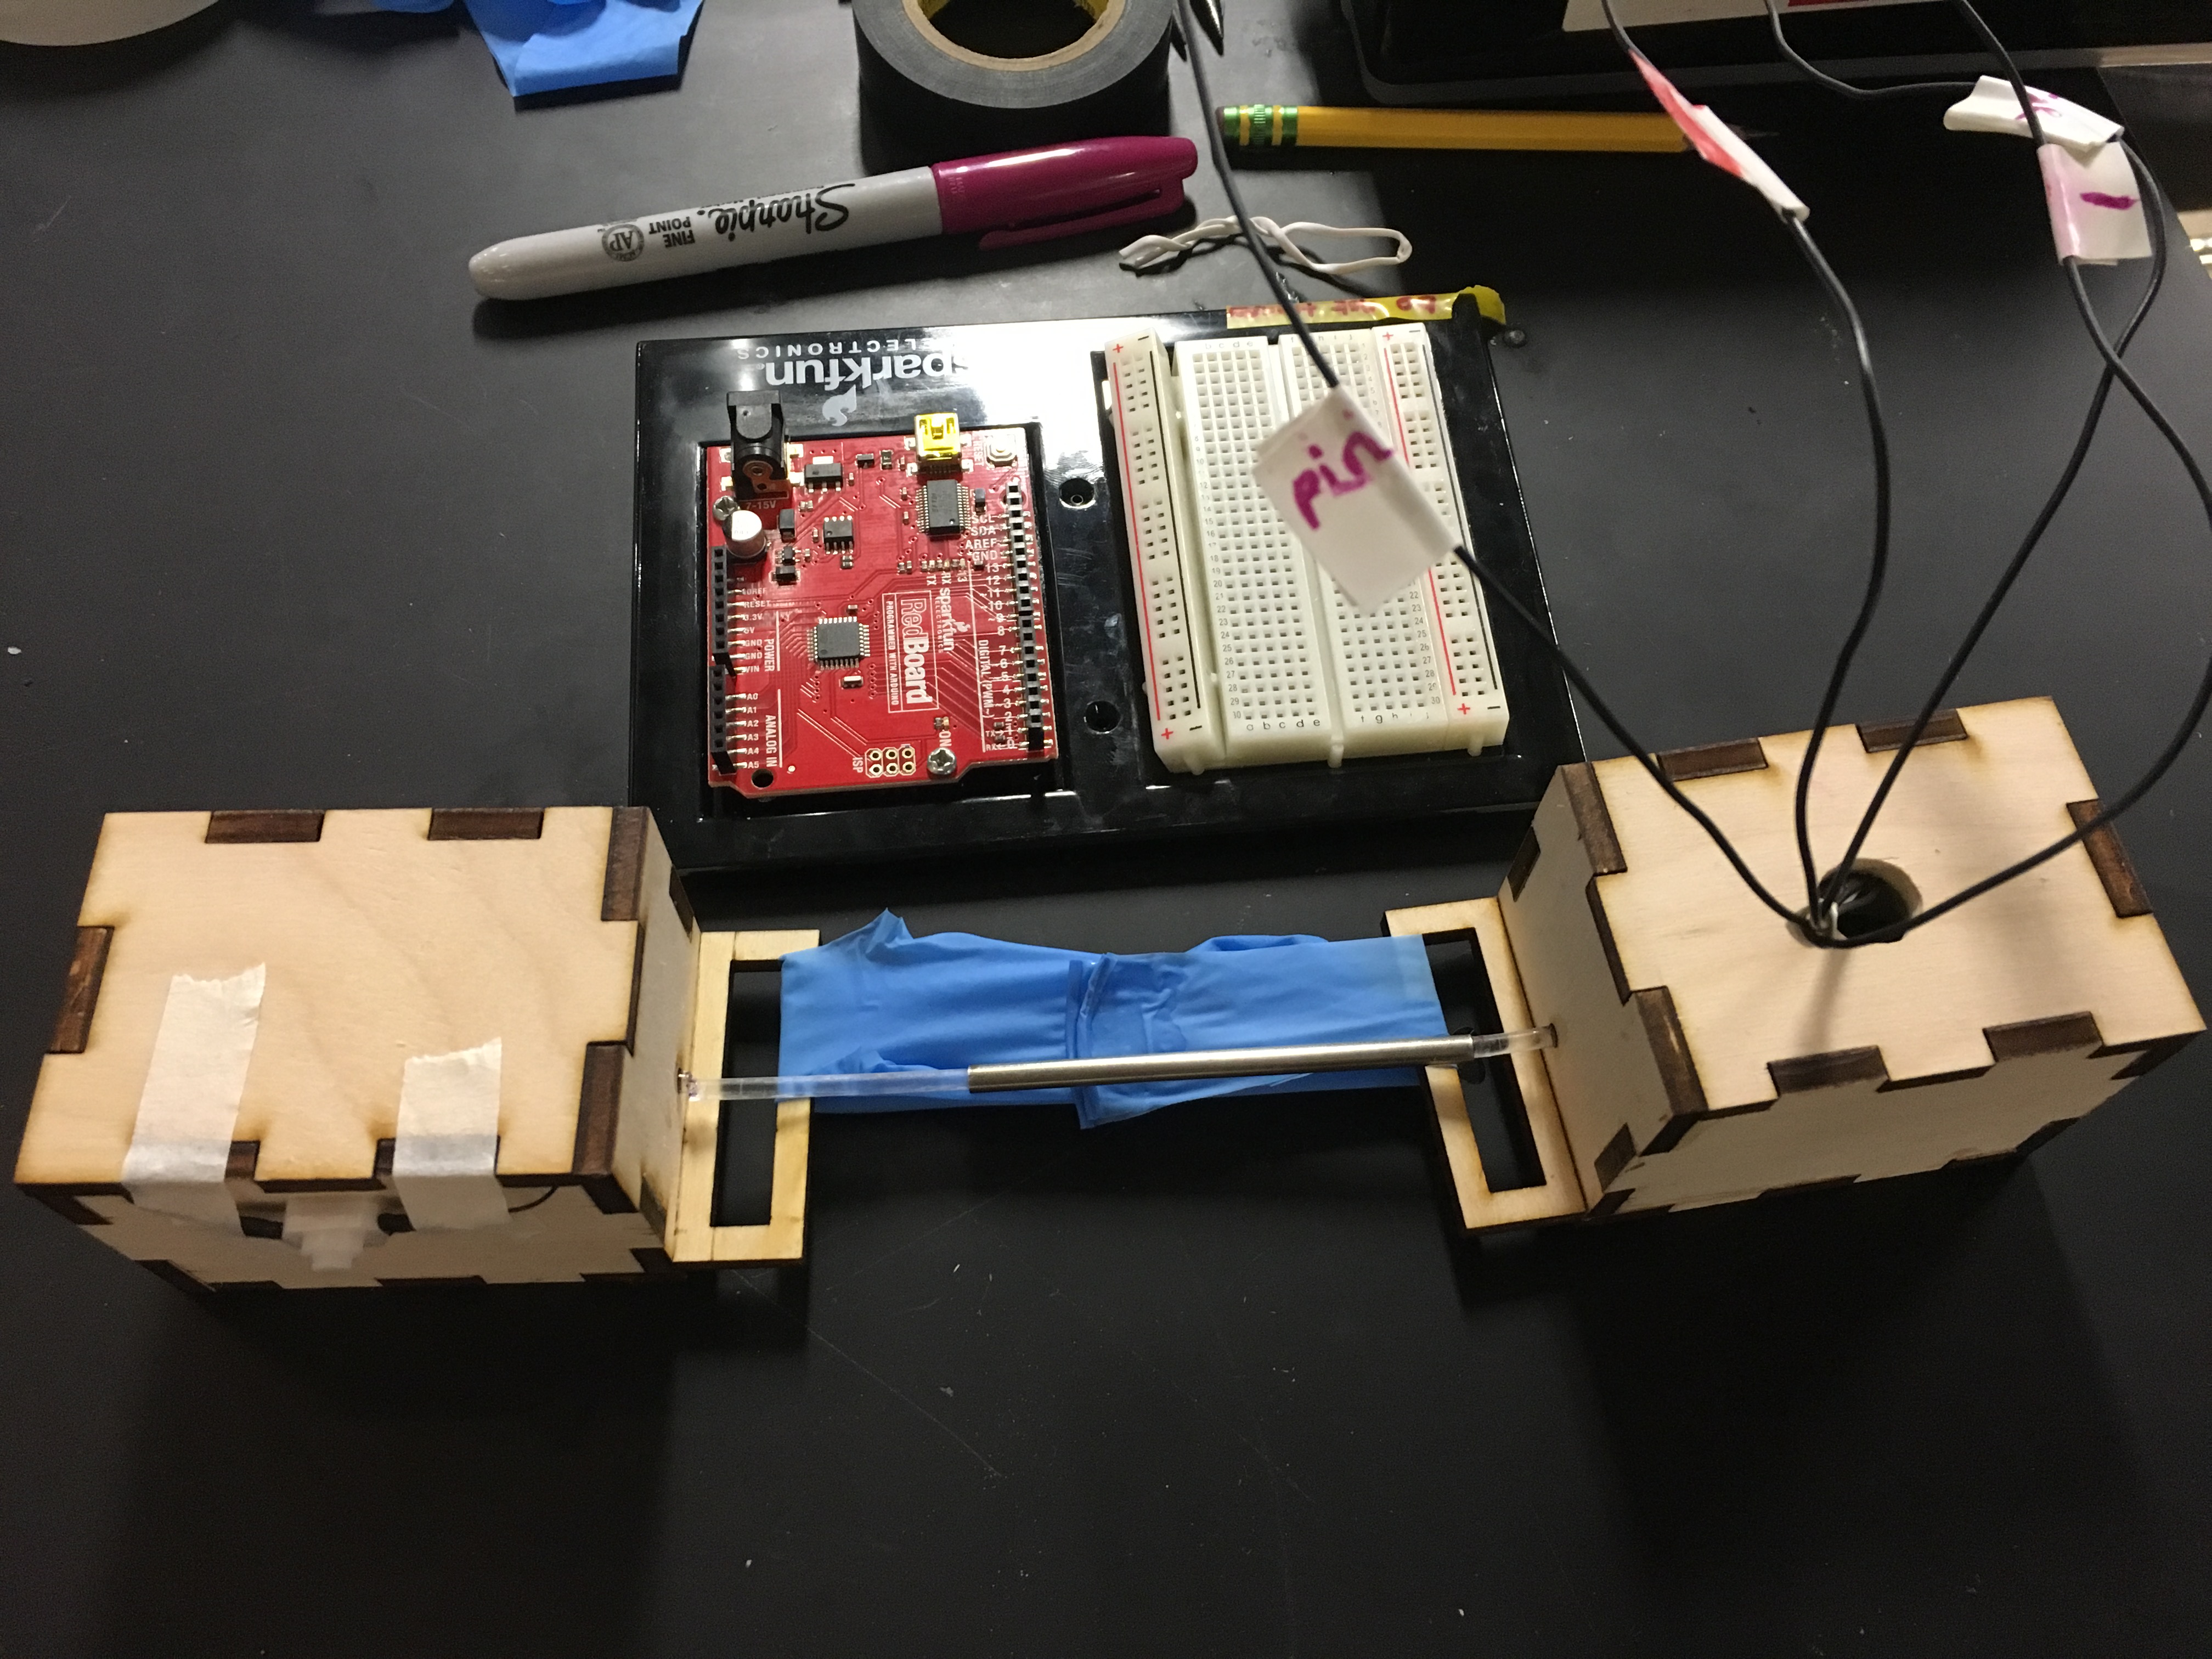
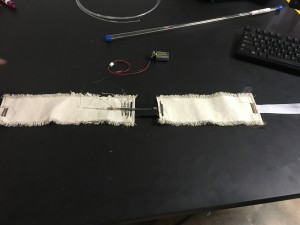
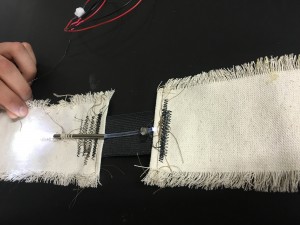
The prototype consists of two boxes with a piece of the fiber optic cable mounted to each.  The slit of the fiber optic is covered by a piece of hypotube which is glued to one of the pieces of cable.  In this photo, a piece of rubber glove connects the two boxes, although this will not be the final material.  Inside one of the boxes a small LED is mounted against the fiber optic cable to shine through it and in the other box a photoresistor is mounted against the end of the cable and is a component of a circuit that hooks up to an Arduino kit such that we can read off light level values on the computer.  After finishing this prototype on Thursday, we were able to begin thinking about the code that we will need to use in order to determine contractions, send warnings when the three conditions of possible impending uterine rupture occur, and ideally make a partograph like readout.  As a result, today, Friday, we spent the morning learning Arduino, although I still feel very far away from being able to contribute to writing any sort of useful code.  After lunch we made a graph of displacement versus light intensity with our prototype and found it to be exponentially decreasing, however we don’t know how sensitive the device needs to be such that it picks up contractions but not breaths.  We tried to get a bit of an idea of how much breathing moves the stomach by measuring on our own stomachs, but our measurements were not particularly accurate.

Hopefully we will have materials arriving next week to work on our other idea while also starting to code our program, which will surely require baby steps.

Nathalie

Week Three of SEED

This week was focused primarily on our major projects with a couple of breaks for engineering workshops. My team continued work on the forearm rotation device by first building a replica of the past team’s final prototype. We used their SolidWorks files to create pieces of the device and 3D print many of the specific pieces. We completed this on Monday, along with a few modifications, and it looks like the picture shown below.

IMG_6909

The main orange collar would be attached to the patient’s elbow to hold it in place, while the two blue rings and orange beam on top are free to rotate with the wrist. The main challenge we faced was developing a way to slide tabs along that inner orange ring to measure the angle the wrist rotates. After a couple days of research, we brainstormed on Wednesday and decided to move forward testing three of our designs. We created several different SolidWorks assemblies of our ideas, one of which is pictured below. We also managed to 3D print and construct one of our three designs, which is also pictured below. Next week we will determine which of our three deigns we will move forward with.

IMG_6904 IMG_6907

We also had a workshop this week on laser cutting and Arduino programming. Half of the interns went with Helen to learn how to solder and use the Arduinos, and the rest of us, myself included, went with Mikaela to use Adobe Illustrator and the laser cutter. The TA’s did a great job teaching us about their particular topics, and by the end of the workshop I was able to make a small laser cut box out of ply wood with my partner Nathalie.

IMG_6908

SEED is going great so far, I’m having a great time with my teammates Hillary and Saad, and I’m looking forward to solving our engineering problem, and the rest of the experience.

IMG_6905


Team Bonding with Mortimer

This week, our team was introduced to the newest and most important member of our design team, Mortimer, the inflatable test dummy.

IMG_0719

Our project’s goal is to design a swim support for a local boy with cerebral palsy and a tracheal tube, a continuation of my Spring ENGI 120 project. During that time, we found that, for safety reasons, it was not feasible to use the user for all of the device testing, but it was also incredibly difficult for us to accurately simulate his lack of muscle of control. We found that in our simulations, our device worked perfectly, but with our user, it was dangerous and failed major design criteria blocks.

So, this time around, we ordered a plastic dummy off of Amazon, picked a name via an online random name generator, and spent a good chunk of our week at the pool, trying to simulate our client using Mortimer, air, water, weights, and other methods. We took the old device with us, since we know how the user reacts when placed in that swim support. It took a long time to get the proper mix to create a slumped forward, almost boneless motion that our user frequently exhibits, and we did some research and decided to fill a lifejacket with a lot of weights in order to simulate our user’s weight.

After two exhausting and extensive rounds of Pugh Scoring, we picked a final design! We drew up a quick prototype of pool noodles, duct tape, mesh, and PVC, as seen below:

IMG_0723

Then launched in researching and ordering materials. Our final design consists of an inner tube with backrest, modified with straps to provide extra support and a special mesh seat with extra support underneath the knees and to submerge our user’s body lower into the water, as requested. We then spent a lot of time researching different configurations and materials for straps, in order to provide support for our user, while still being comfortable and easy to use. We ended making small, medium-fidelity belts, then testing them ourselves to settle on a final design.

Next week, I’m looking forward to continuing our prototyping and I’m sure Mortimer is looking forward to doing his job and testing those prototypes!

week 2

so interesting.
this week has been a wonderful week. getting to know more information about things we need to know to when doing projects.
it was so good getting to finish our first design. at first it was some how hard getting to do things but with team work, am able to understand almost everything now. our team was designing a fence feast that can be used as a n enrichment for anteaters at Houston zoo. our design contains a transparent bottle which is screwed to the lid attached to the support plate. the bottle was transparent so as to make the anteaters expose their tongues and attract visitors, at the same time it will be attached at the fence so that the anteaters should exhibit their behavior of standing on  fits as they will be eating the food in the bottle.

Capture

we started with the low fidelity prototype where we used simple materials , then medium fidelity 1, and we finally came up with medium fidelity 2.

currently am working on a Zoe model project which is to screen cancer of the cervix. in our project, our devise will be inserted in the existing Zoe and  the disc should present the normal cervix as well as specific stages of cervical cancer, the device color should change to  white to indicate positive results. we have done some research about our project and we are looking forward to start working on it this coming week.


Introducing Mortimer

So we are now about a week into our project. We went to the recreation center pool on Monday to test the previous design. We discovered the failures of the previous design and how we can improve it. Afterwards we started the engineering design process: research, brainstorm ideas,  screening and scoring matrices, and a final design (see image below).

final design

Basically this design won over seven others because it was easy for the family to use, comfortable, safe, prevented rotation, and most of all prevented the client’s tracheal tube from entering the water.

To proceed with prototyping we had to do more materials research and order what we wanted. So far we are currently waiting on materials, so this project is in a bit of limbo at the moment.

While we were waiting, we created a model of our client. Basically one of the failures of the previous device was that it worked of everyone but the user. This is because the previous team underestimated the amount of effort needed to remain in an upright position in the water. Our goal was to simulate his movements so we could test without putting the client in danger.

Thus we now have a new team member, Mortimer. He is an inflatable doll that people use to dress up front porches on Halloween. Basically we tied knots in his joints to simulate movement, and filled joints with water to allow limbs to weigh down. When we tested him in the water he passed the first round of testing. Mortimer

After creating a fourth team member, we started a side project that we can work on while waiting for our materials to come in. The project is called the neonatal temperature monitor and we are creating a new user interface for the project. Right now we are in the clarifying team assignment and research stage, but since our materials may not be in by Monday, we may move on to the brainstorming stage.

Week 2 of the Rice 360° Experience

I got to try out a little bit of everything, again, this week. I had been trying to tweak an equation in the Arduino code for the temperature sensor since the middle of last week and finally got it to work – I think that’s pretty amazing considering the fact that I had absolutely no prior experience working with Arduino. Now, we can change the resistor values in the circuit, and the equation will account for these changes and output accurate temperature readings! Despite having to trek to the OEDK several times last week, I finally finished the control box for our study. I had the soldered perf board from last week, and with help from Danny at the OEDK, I was able to laser cut holes for the jack and USB port from a plastic project box. Now, we have a control box that’s ready to go for temperature accuracy testing!

box
The Control Box

box_in

In the Control Box

This week, I also started planning the Incubaby user interface (UI). Currently, incubators in hospitals here have different modes: preheat, warming, and wean. In the ‘preheat’ mode, the incubator is warmed so that it can initially provide heat. In the ‘warming’ mode, the baby is warmed, and the baby’s temperature controls the heating behavior of the incubator. Finally, in the ‘wean’ mode, the incubator decreases the heating power to monitor the infant’s response, preparing the infant to self-regulate his/her temperature. My job is to plan the UI layout; so far, it includes a display screen; a three-way control to select the incubator mode; and indicators for events like ‘overheating’ and ‘power loss’. It’s fascinating to see how much thought goes into designing a UI, especially for foreign clients. Do we use words or pictures, or both, to indicate the modes? What could the words/pictures be interpreted as? Are there particular connotations associated with the words/pictures of which we are and aren’t aware? As part of the UI, we decided that rotary selectors are much easier to use than toggle/slide switches. So I delved into the details of potentiometers and switches to see how they are similar and/or different. And, eventually, settled on using a switch to create a potentiometer. I can’t wait to experiment with that! Alongside that, I started to become familiar with Adobe Illustrator to prepare the UI front panel for laser cutting.

On top of that, I got a pretty thorough exposure to thermal interface materials (TIM). We think we can improve the contact between the thermistor probe and the infant’s skin by using TIM. After extensive research, I found that stickers made of hydrogels and hydrogel colloid are currently used for this purpose. So, for almost 2 whole days, I researched several vendors who sell either  hydrogel sheets or gel and requested samples from all of them. I have yet to obtain prices from any of them but hope to find materials that will keep the entire device cost-efficient.

I’ve been doing a lot of prep work and research for the coming week. I can’t wait to begin experimenting with the switches and TIM samples and laser cutting for the UI!


From #ants_ants_Revolution To #team Wrist Twisters

On the first few days of the week we wrapped up engineering boot camp and finalized our anteater enrichment device project. We developed low and medium fidelity prototypes for our design solution. #team Ants Ants Revolution comprising of myself Zach and Nathalie developed a network of PVC pipes looped together using twine as our medium fidelity prototype. The design was developed such that the PVC pipes could hang on the fence inside of the exhibit. The PVC pipes had series of small holes drilled along its axes facing into the exhibit for the anteaters to reach the food with their tongues and 3″ extensions sticking to the outside of the fence for zookeepers to put food into the pipes. On the low fidelity prototype we modeled the fence and PVC pipe network using mesh, straws and tape. It was so funny that during medium fidelity prototyping, each member of ants ants revolution had unique expertise. Zach was good at drilling the holes, I was good at filing the drilled holes where as Nathalie was best at designing layout of the PVC network. I was so horrible at drilling that I damaged three separate PVC pipes in an attempt to drill holes but in the end Zach taught me the tips to drill successfully. I was so excited to be part of #team ants ants revolution

Later in the week, we got assigned to our teams for the main summer projects. #team Wrist_Twisters comprising of myself, Jeremy and Saad was assigned to rework on a previously built prototype of Forearm rotation measuring device. The initial prototype was developed by the Rad Torquies of Rice University during ENGI 120 and 200 projects. #team Wrist_Twisters was tasked to address the shortfalls of the Rad Torquies’ prototype. In brief the device aims to measure supination and pronation of the forearm which is necessary during physical therapy and rehabilitation. Upon interviewing Leah Sherman of the Rad Torquies we learnt that the current design lacked accuracy, unable to accommodate users with physical limitations just to mention a few. Unfortunately the actual prototype was disposed off as such #team Wrist_Twisters was tasked to rebuild the prototype using CAD files developed by the Rad Torquies to visually understand the problem concept.

Boot Camp Wrap-Up … and Projects!!

To start the week off, we wrapped up our engineering design boot camp and concluded out anteater projects… for now. As it turns out, our prototypes exceeded expectations and they might be tested at the zoo in the near future. I loved the design we came up with on our team: a simple plate attachment for the fence where a bottle can be screwed in.

2016-06-14 16.06.40 2016-06-14 16.06.00

The first picture shows just the plate attachment on the fence. It is laser cut out of plywood and zip-tied to the fence wire. In the middle sits a bottle cap which has a hole cut through it to allow for the anteater’s tongue. In the picture on the right, the bottle is screwed in with food, demonstrating the setup for feeding the anteaters.

My favorite aspect of the design is its simplicity, exemplifying KISS (keep it simple, stupid). The fabrication is very low cost and it accommodates an everyday plastic bottle, something the zoo can easily replace. Still, it brings the anteaters to the front of the exhibit and showcases their tongues through the transparent plastic. I am really excited to see how the prototype tests at the Houston Zoo!

On Thursday, we also found out our teams and projects for the summer! I’m looking forward to designing a forearm rotation device alongside Jeremy and Hillary. Our project is a continuation of a previous ENGI 120 and 200 project from the 2014-15 school year. The objective is to design a device for Shiners Hospital which measures forearm rotation, specifically meant for patients recovering from surgery or with physical disabilities. Limitations in the current device include lack of accuracy, the inability to isolate just the forearm rotation, and the inability to easily accommodate patients with a variety of physical limitations.

We will be heavily building off the previous solution proposed by the earlier ENGI 120 and 200 team. The design is shown below.

Angle_9    IMG_3727

This design addresses the problem via a mechanical solution in which markers along the cuff rotate out with the wrist and measure the degrees of rotation. Although we don’t have the prototype from the previous team, we know that flaws with the design included too much friction and some issues with accommodating a variety of physical limitations.

To finish the week off, we started rebuilding the old prototype from the team’s CAD files. As we move into next week, we are planning on assessing the prototype and moving on to improving it through the engineering design process.

Week Two: Much To Do

This week we finished up the Engineering Bootcamp workbook as well as completed the prototypes of our anteater enrichment devices.  My group, Ants Ants Revolution, created a series of hanging PVC pipes that could hang on the fence of the exhibit with small parts sticking to the outside of the fence for zookeepers to put food into the pipes and small holes facing into the exhibit for the anteaters to reach the food with their tongues.  It started as a low fidelity prototype, below, made out of straws as PVC and a small model fence.  The original plan was to have the PVC permanently attached to the fence, but as we moved on to our medium fidelity prototype we concluded that a hanging option would be easier for zookeepers to work with.

Low Fidelity:          IMG_6277

High Fidelity:        IMG_6278


On Thursday we spent the morning doing a 3D printing workshop which was really interesting.  I have never 3D printed anything, so now that I kind of know how to (I don’t think I can properly say know until I actually try it) I can’t wait to get an opportunity to use one of the machines.

After lunch on Thursday we learned our teams and main projects for the summer.  I am part of Team Toco, along with Zach, Lucas, and Chimwemwe and I couldn’t be more excited.  We will be working on fleshing out Dr. Carns’ idea for an optically based tocodynamometer–a device that measures uterine contractions during childbirth.  Dr. Carns has a proof of concept prototype (see picture below) that involves a non elastic band with a small elastic portion.  A piece of fiber optic cable cut in two and enclosed in a metal tube spans the elastic portion.  An LED shines into one end of the fiber optic and the light travels through the tube and is seen at the other end of the cable.  However when the elastic stretches such as during a contraction, the pieces of fiber optic cable separates and the light can no longer travel through the cable.  Our goal is to create this device and a sensor to detect the light and monitor contractions.

IMG_6292IMG_6294

Another idea Dr. Carns passed on to us with the proof of concept was that we try to use athletic tape as the attachment method for the device to the belly instead of using a band that wraps around the whole belly like normal tocodynamometers, because they are generally considered uncomfortable.

I am super excited to work on this project because I think it will be a good combination of the more mechanical making of the fiber optic cable part, which I feel more confident in, along with an electrical reading device, probably using some type of photoresistor, which will require me to learn something new.  Photoresistors also happen to be my favorite type of resistor (not that I’m an expert on resistors… I’m a MechE for a reason).  Good thing Chimwemwe is studying electrical engineering!

Can’t wait to see what next week holds for Team Toco!

fun # prototype# project week

hie everyone,

This week has been really great. I posted some pictures of an anteater last week and talked about how we were currently going through the engineering design process.So happy to say we have completed learning and applying the engineering design process through working on the anteater enrichment device.It was quiet OK working in my team, i learnt a lot from them and possibly they learnt from me too.Most importantly we came up with both the low fidelity and medium fidelity prototype. After brainstorming, going through the Pugh screening and scoring matrices we reached to an idea which we ended up  prototyping and testing somehow. As for our team we thought of coming up with a container which may be made up of metal and fixed to the ground. Which is to have a maze so that the anteaters can play around with their fascinating tongues.In order to have them show off their claws we included canvas straps .And also we included a PVC tube that can go through the gate for easy refilling of food in the maze.Below are the pictures of the prototypes, on the right is the low fidelity prototype and on the left is the medium fidelity prototype;


Medium Fidelity low fidelity

Each group presented their prototypes,it was fascinating seeing the diverse creative ideas.Later own learnt the basics of computer aided design and also 3D printing which can be used in our major and minor projects.bloggbloggy

above are  some of the CAD i came up with.We were also assigned in different teams working on four major projects.My team is called team Toco. We are to come up with a device that monitors uterine contractions all in order to prevent uterine rapture which kills most women in Malawi during child birth. so on Thursday and today Friday we have  apparently started working on our project. So far we have come up with the research topics which we are working on. Earlier today we had an interview with our client Dr Carns who presented to us the proof of concept.Just a brief explanation the prototype consists of two separate fiber plastic cables which aligned are passing through the hypo tube, and one plastic fiber is connected to an elastic material.So during contractions the elastic material stretches it pulls away one optical fiber which reduces the light intensity of the light passing through them. The light is actually being emanated from an LED which is getting voltage supply from a 9v DC battery.In measuring the varying light intensity we can get the frequency output.


as a group we are to improve the low fidelity prototype,by replacing the belt with athletic tape, also including an alarm system, timer and display etc .At the same time it should be able to display accurate frequency or pressure of the abdominal contractions. It is going to be fun working on this project, i like that its so involving and electronics related .By the end of the project i will gain a lot.all happy#all smiles#slaying!!!